The everlasting beauty of Windows lies in customisability. No matter what you want, Windows has it on its shelf. Truth be told, while Windows 11 is utterly pleasing, Apple’s aspirational value gets people to mimic their devices to look like one, more so on the software front. And guess what? Windows can make this happen, all without tampering with any crucial system settings.

Indeed, we are referring to a theme makeover you, which will make your machine running Windows look like macOS. You can go all out on this, so whether you are a design freak or want to confuse your fellow Mac users, stick along as we camouflage Windows visually behind a layer of macOS.
Table of Contents
Make Windows Look Like macOS
Before we jump into the action entirely, you can enjoy the starters. Unsurprisingly, you can give an instant makeover to your Windows PC by making upfront changes. This can very well make your Windows look like macOS, at least prima facie. A child’s play to perform, let’s get going!
Desktop Wallpaper
The easiest and quickest way to make Windows look like macOS, at least from the front, is by using macOS wallpapers. Thanks to their sheer popularity, macOS wallpapers are the easiest to recognize. Here’s how you can do it:
- Search the web for macOS wallpapers. Although you will be bombarded with a ton of wallpapers by default, a few notable websites for the same include Wallpaper Flare, WallpaperAccess, and 4Kwallpapers. For quirky Apple-inspired wallpapers, we recommend checking out BasicAppleGuy’s wallpaper inventory. Don’t download wallpapers with a resolution lower than your PC’s display, as they would look pixelated to your eyes.
- Once you have downloaded the wallpaper, locate the file and Open it.
- Click on the meatball menu icon (⋯) from the toolbar above and hover the cursor over Set as.
- Select Background to apply the wallpaper to your PC’s home page. If you also wish to rock the same wallpaper on the lockscreen, select Lock Screen from the dropdown menu.

If you want this to take a step further, say hello to WinDynamicDesktop. The app enables you to have a dynamic wallpaper pair for your desktop to rock different wallpapers during the day and night. This feature is present on Macs by default, but WinDynamicDesktop replicates it on Windows successfully. To set it up:
- Install WinDynamicDesktop from the Microsoft Store here.
- After the app is installed, Open it and go through the installation process.
- You’ll be asked to provide location details, and you can do that by entering a location manually, allowing the app to access your location, or setting sunrise and sunset hours manually. This is to ensure the dynamic wallpaper switching occurs at the correct moment.
- After installation, surf through the wallpapers and select the one you wish to use. Download your preferred theme and click on Apply.

Mouse Pointer
Another apparent thing that is often overlooked is the mouse pointer. Weirdly enough, macOS uses an entirely opposite style of mouse point: black cursor with white borders, not to mention the iconic rainbow spinning wheel, which symbolizes loading. Thanks again to Windows; changing the mouse pointer is easily possible.
- Visit here and download macOS cursors for Windows by Antiden. You may be required to log into your Deviant Art account or create a new one if you have one already.

- Unzip the .zip file and open the extracted folder. Ensure that the folder is extracted to the downloads folder of your PC.

- Open the folder and enter the macOS-cursor-for-Windows-0.5 folder.

- Head to the 1. Sierra and newer folder.

- Now, you must choose your preferred size and type of cursor. We recommend opting for the No Shadow type and Large size. Navigate to the folders of your chosen mouse pointer type and size. Worry not; this can be changed later on if you don’t prefer the style of the cursor.

- Right-click on the Install.inf file and click on Install from the dropdown menu. If the install isn’t showing up in the dropdown menu, click on Show more properties and then select Install.

- Click on Open in the security warning message that appears next.

- Once the installation begins, switch to Mouse Properties, select Pointers from the top section, and select macOS Cursors L – No Shadow Newer under Scheme. Hit Apply. That’s it!

Note that the pointer may seem different coming from a Windows one. In that case, you can switch to a different type by following the same procedure.
Glass Theme
macOS follows a stunning glass-like design language. No, the UI elements aren’t see-through but are translucent. This enables them to have a unique look, where you can see the lighter aspects of the app that are present behind the app you are viewing. Unsurprisingly, this can be replicated on Windows, too.
- Visit the GitHub repository of ExplorerBlurMica and install the .zip file.

- Extract contents from the zip file to your desktop by right-clicking the zip file.

- Access the extracted folder and copy the Release file into any notable folder in your PC’s C Drive. For instance, we are copying the folder into our PC’s Downloads folder.

- Now, open the Release folder. Right-click on the Register icon and click on Run as administrator. You may need to bypass the Windows security warning message by clicking on More info followed by Run anyway.

- Click OK in the proceeding dialogue box.

Open the File Explorer and notice the changes. You will be greeted by a mesmerizing semi-transparent interface that looks stunning.
Dock and Menu Bar
The macOS dock is famous for its unique looks, jelly-like hover animation, and the genie effect while closing apps. While Windows 11 defaults to a centrally situated taskbar, it still needs much work to make it look like the macOS dock.
Another notable thing about macOS is the presence of a menu bar situated at the top. Like on the phone, the menu bar shows the essential quick settings toggles like Wi-Fi and Bluetooth, time and date, battery indicator, and others.
We’ll be hitting two birds with one stone using an app called MyDockFinder. Besides replacing the dock, the app can simultaneously remake the macOS menu bar! Here’s how to get going with the installation.
- Visit here to install MyDockFinder for your Windows PC. Click and download the file to your PC.

- Right-click and extract all contents from the zip file. Proceed by placing the extracted folder in any prominent folder of your PC’s C Drive. An appropriate place would be the downloads folder on your PC.

- Open the extracted MyDock folder.

- Enter the lang folder and delete the Chinese.ini language file. This ensures that the app doesn’t follow Chinese as the default language.

- Head back to the previous folder and double-click the Dock_64.exe file. The dock and menu bar should instantly appear on the home screen.

- Right-click anywhere in the dock and select the option that says Hide Taskbar. This will ensure that Windows’ original taskbar doesn’t interfere with the app’s functionality.

With this, you’ll be enjoying an all-new way of interacting with the user interface – using a dock and menu bar. Of course, since it’s drastically different from what you are used to, you would need time to get used to it.
We recommend adjusting the dock settings by right-clicking and selecting Preferences so it doesn’t look or work out of order. Surprisingly, the app packs even more macOS features like Hot Corners and design elements like macOS-themed brightness and volume sliders.

If you wish to add more app icons to the dock, right-click the dock while you’re on the home screen and select Add Normal icon or Add System icon, depending on the type of application. Furthermore, the Launchpad only accepts the .exe files of applications, which can be a bit tiring to set up. The said file type can be found in the Program Files folder of C Drive.
![]()
Widgets
The final aspect of the makeover lies in widgets. Windows 11 isn’t exactly known for its widget selection, unlike macOS. The selection of widgets on macOS is massive, and most of the widgets are pretty iconic. For this, we’ll be using a popular app called Rainmeter, which is famous for creating stunning setups on Windows. To replicate the widgets on your Windows PC, follow the below procedure:
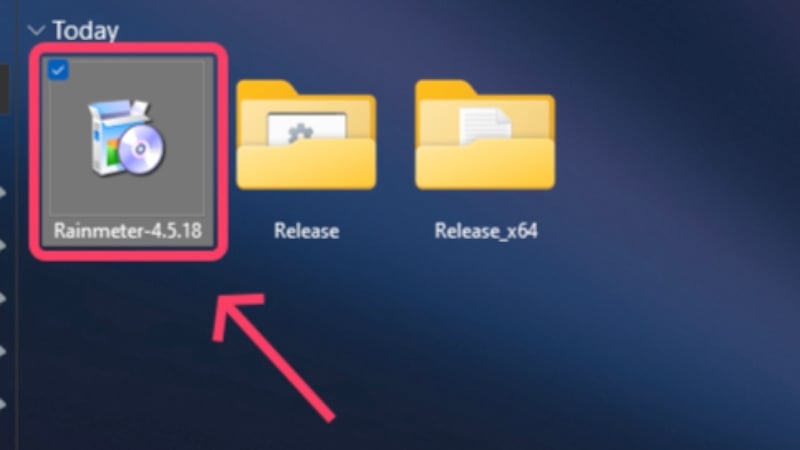
- Download the latest version of Rainmeter by visiting here.
- Double-click the installer and go through the Rainmeter setup.
- Right-click on the default widgets on the home screen and select Unload Skin to remove them.
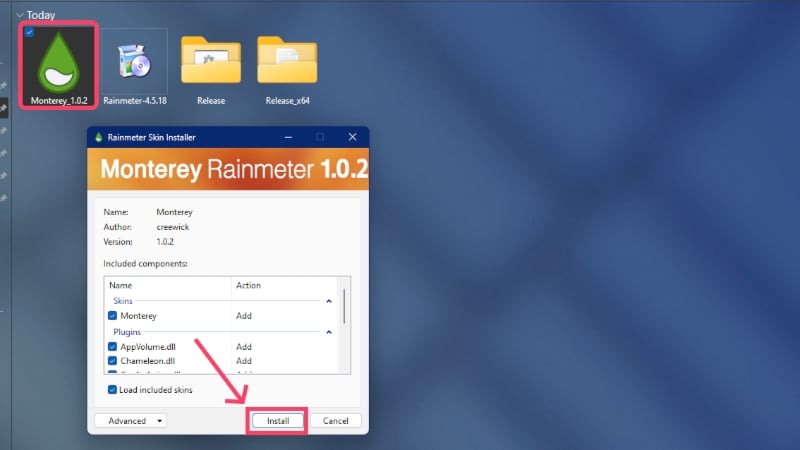
- Visit the GitHub page of Monterey Rainmeter widgets here and download the .rmskin file to your PC.

- Open the file and begin the installation.
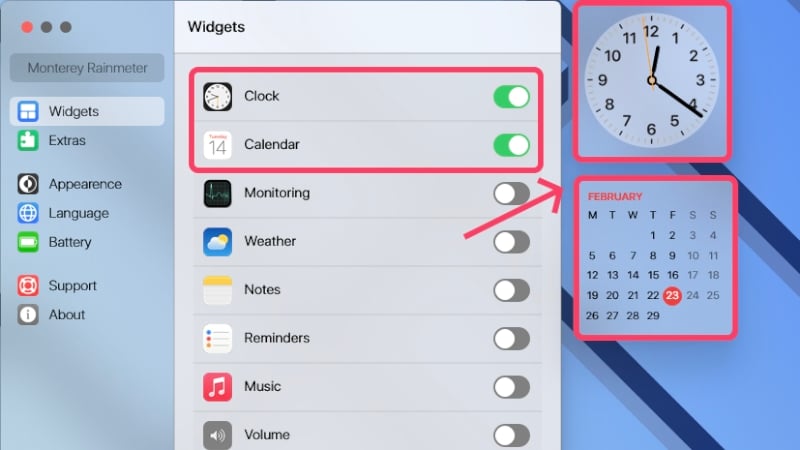
- Once done, the app should open with toggles for each widget it offers. Add the ones you like to your home page and adjust their positions by dragging them.
Say Hello to Mac, Oops… Windows!
With this, your Windows PC would look like a Mac machine now. Yes, there are even more ways to make Windows look like macOS, but most require much higher technical know-how and a lot of fiddling with system files. Regardless, this guide will help you achieve the looks you are targeting in the easiest way possible.
