Quick Answer
There are two ways to move your notes from Notion to Obsidian. You can either download your Notion notes (in the Markdown format) and import them to your Obsidian vault manually or use a community plugin–Importer–to have it do that for you. We use the plugin to move notes from Notion to Obsidian. Here is the step-by-step guide.
Migrating notes is one of the biggest challenges when switching note-taking apps. This is true even for moving notes from Notion to Obsidian. However, if you’ve decided to make the switch, we’ll break down the migration process in this guide to ease your transition between the two apps.

Table of Contents
The Correct Way to Move Notes From Notion to Obsidian
There are two ways to move your notes from Notion to Obsidian. You can either download your Notion notes (in the Markdown format) and import them to your Obsidian vault manually or use a community plugin–Importer–to have it do that for you.
I find using the plugin a better approach and would recommend you use the same for importing notes into Obsidian. Not only does the plugin simplify the whole process, but it also ensures none of your data gets lost during migration. In addition, it also takes care of your folder structure and internal links as you bring them from Notion.
Here’s what migrating notes from Notion to Obsidian looks like using the Importer plugin.
Step 1. Download Your Notion Data
First, you need to prepare the data you want to move from Notion to Obsidian. The best way, which doesn’t result in any data loss, is to export your entire Notion workspace.
- Open the Notion app on your Mac or Windows PC.
- Select Settings & Members from the left sidebar.

- Click on Settings under Workspace.

- Hit the Export All Workspace Content button.

- On the pop-up that appears, change the Export Format to HTML and make sure Include Content is set to Everything and the toggle for Create Folders for Subpages is turned on.
- Hit Export to begin exporting your data.

- When the process finishes, you’ll see a Download prompt. Give the file a name, select your preferred destination folder, and hit Save to save it.
- Close Notion.
Step 2. Prepare Obsidian for Import
Obsidian uses vaults to save your notes. As such, you need to create and set one up to be able to import your Notion notes. You can either create a vault locally on your computer or a storage service like Drive or Dropbox (if you want to sync your notes across all your devices for free).
To create a new vault:
- Open the Obsidian app on your computer.
- Click the Create button next to Create New Vault.
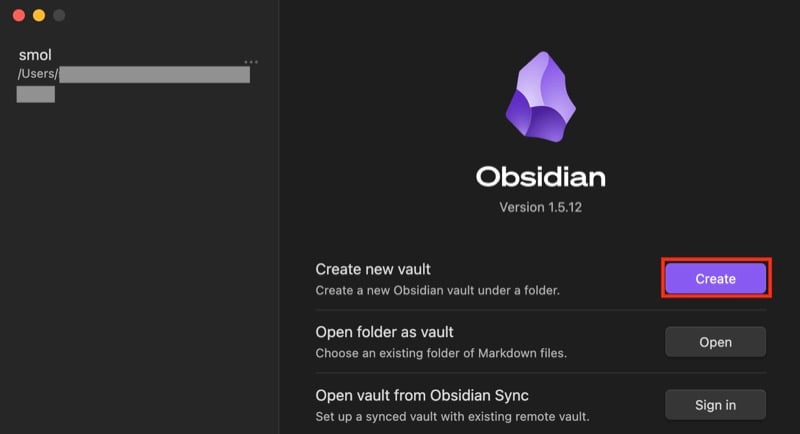
- Give your vault a name.

- Tap the Browse button and select the location to save the vault.
- Hit Create to create the vault.
If you plan on keeping the vault on an online storage service, you’ll have to go through the following process: download its app, set a folder for it on your device, and choose that as the location for your Obsidian vault.
On the other hand, if you have an existing Obsidian vault, import it like this:
- Hit the Open button beside Open Folder as Vault.

- Choose the folder where you’ve saved the vault.
- Alternatively, if you’ve stored your vault on an online service, choose its folder on your computer.
Step 3. Download the Importer Plugin to Your Obsidian Vault
Next, you need to add the Importer plugin to your Obsidian vault. Follow these steps to do this:
- In the Obsidian app, go to your vault and click the Settings button (with the gear icon) in the left sidebar.
- Select Community Plugins under Options.
- Click the Turn On Community Plugins button. If you don’t see it, then the option is already enabled.

- Click on Browse next to Community Plugins.

- Search for Importer in the search field above.
- Click on the plugin to expand and view more details.
- Tap the Install button to install the plugin.

- Once it’s installed, click Enable to enable Importer on your vault.
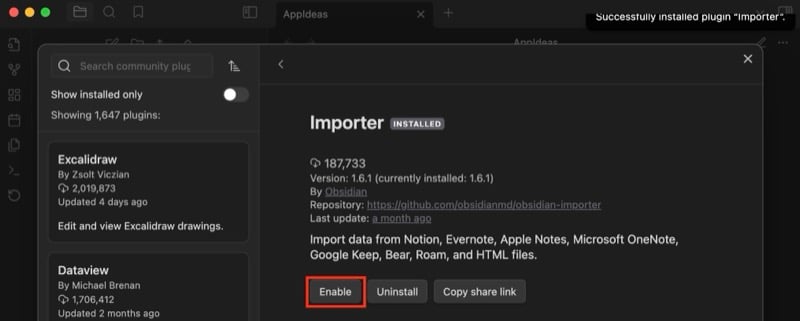
- Close the window to return to your vault, and you’ll see a new icon (for the Importer plugin) in the left sidebar.
Step 4. Import Notion Data Into Obsidian Using Importer
With the exported Notion data in your hands and your Obsidian vault set up, you’re ready to import your notes. Here’s what you need to do:
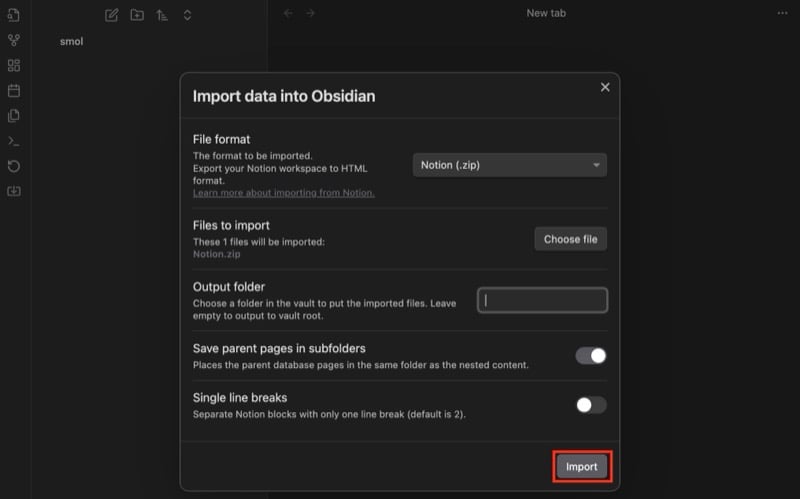
- From inside your vault, click the Importer plugin button from the left sidebar.
- Click the drop-down for File Format and select Notion (.zip).

- Click the Choose File button next to Files to import and select the Notion data file you downloaded in step 1.
- If you want to import the entire Notion data to a particular folder in your Obsidian vault, leave the text field next to Output Folder set to Notion. Otherwise, clear it to put everything in the vault’s root.
- Make sure the toggle for Save Parent Pages in Subfolders is on.
- Finally, hit the Import button.
Once your notes are imported to Obsidian, you’ll see the status on your screen. Hit Done to close, and you’ll find all your Notion data in your Obsidian vault.
Optionally, if you’ve set up cross-platform sync using the Remote Sync plugin, you’ll want to sync these changes. Click the Remote Sync plugin in the left sidebar to sync your changes to the Obsidian folder online.
Migration May Break Some Notes in Obsidian
After you migrate notes from Notion to Obsidian, you should be able to view them just fine. However, there are instances where certain elements may not appear how they did in your Notion workspace.
For example, the togglable columns (with multiple input options) in a Notion table wouldn’t work in Obsidian. Sadly, there isn’t much you can do about it other than setting up a new table–perhaps using the Advanced Table plugin–to create something with a similar effect.
Similarly, although the Importer plugin takes good care of keeping text formatting intact, some elements might still break, and you’ll have to fix them yourself. Certain plugins can come in handy in such situations and help you make better sense of data in your notes.
