Motorola has been making some great smartphones lately. They are right on trend with their approach to delivering a clean Android experience with great performance and sometimes even segment-class features. Whether it’s 12GB of RAM and 256GB of storage for under $220 or the Moto Razr with a folding display, Motorola is doing great in the market, and we’re excited.

One of Motorola’s greatest strengths is the clean, no-nonsense, and stock Android UI, MyUX, that comes with every Motorola device. But a clean and nearly stock Android experience doesn’t mean it’s lacking in features. It has some great personalization features and some neat gesture tricks up its sleeve. In this blog, we’ll discuss one of those features, Motorola Ready For.
Table of Contents
What is Motorola Ready For
Motorola Ready For is Moto’s realization of transforming a smartphone experience into a full-fledged desktop experience by connecting the phone to a display. It seamlessly transforms from a phone interface to a desktop-like interface for better productivity or entertainment, but that’s only half the story.
Motorola has also developed a PC assistant for Motorola Ready For that allows your Moto device to connect to your PC or laptop with a USB-C cable or wirelessly, allowing you to access your smartphone in a dashboard environment.
Here, you can access numerous cross-platform Android and Windows features, such as app streaming, mobile desktop, screen sharing, using your smartphone as a webcam, and much more. All of these features work when your smartphone is connected to your Windows PC/laptop with a cable or wirelessly.
In this article, we’ll focus on the “Ready for PC Assistant” part, how to connect and configure your Moto device with the Motorola Ready for PC Assistant, and the different features Ready for offers and how well they work.
First, let’s take a look at what you need to do to get started with the Motorola Ready For PC Assistant.
Pre-requisites for using Motorola Ready For with PC
You need to have a few things with you if you want to use Ready For to its full potential. While some of the things are not absolutely necessary, there are 2 things that you absolutely must have in order to use Ready For, and those are:
-
A Compatible Motorola Device
You need a compatible device from the Moto G or Edge series. To check your smartphone’s compatibility with Ready For, you can visit the Moto Connect website and view the compatibility list.
Pay attention to the “Ready For” column. It is compatible if your device is mentioned and has a checkmark. If it has a cross, it is not compatible. If your Motorola smartphone is not listed, try installing the Ready For app from the Google Play Store if it is not pre-installed on your smartphone. If the Ready For app is installed successfully, you can use Motorola Ready For without any problems.
Note:On most Edge devices, the app is pre-installed, while on most G-series devices it is not pre-installed. Also, if you have a Moto device launched in 2021 or later, Ready For will only work on your device. -
A Windows PC/Laptop
You need a Windows PC or laptop with Wi-Fi and Bluetooth to connect your device wirelessly. If your PC/laptop does not have Bluetooth or Wi-Fi, you can only use Ready For by connecting your Moto device with a USB cable. It is also advisable to update the Wi-Fi and Bluetooth drivers beforehand to avoid unnecessary errors.
-
A USB cable
A USB cable is a necessary part of the process, as you will understand later in the article. We believe it’s best to stick with a USB cable that came with the phone, but you can also use a different and high-quality USB-C cable, as we did in our case.
Once you’ve checked the compatibility of your device and your Windows PC/laptop is ready, it’s time to configure and set up Motorola Ready For on both the PC/laptop and the smartphone – so here we go.
Motorola Ready For: Installation on PC and Phone
The first step in configuring Ready For is to install Ready For on your smartphone if it is not already installed. On most Moto G series devices, this is not the case, and you will need to install it from the Google Play Store, while on a Windows PC/laptop, you will need to install the Ready For PC wizard from the Windows Store, and yes, you will need an activated Windows 10 or 11 for this. Let’s take a look at the installation process on Android.
Installing “Ready for” on Android
On most flagship Moto devices, Ready For is already installed, and you can start configuring it, while on most budget or mid-range Motorola devices, you will need to install the Ready For app from the Google Play Store and start the initial setup.
Here is how you can install the app from the Google Play Store
- Open the Google Play Store and search for Motorola Ready For.
- Open the listing shown in the image below.
- Install the Ready For app.

If the Ready For app is already installed on your Moto device and needs to be updated, you can also simply update it.
Installing “Ready For” on Windows PC/ Laptop
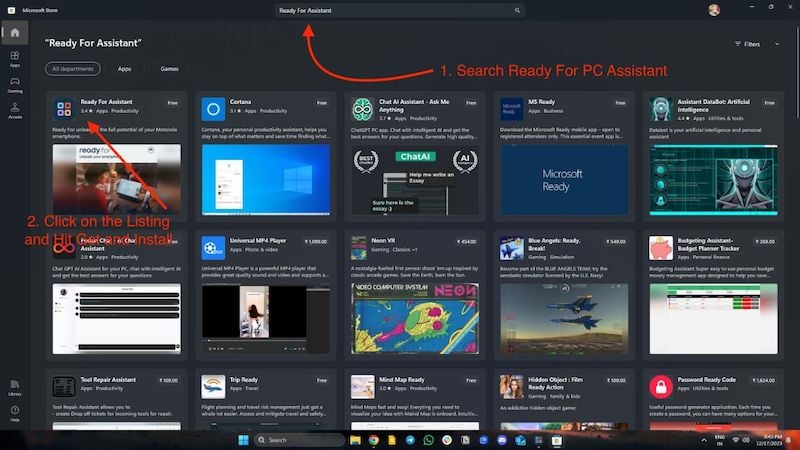
To use Motorola Ready For on your PC/laptop, you need to install the “Ready For PC Assistant” from the Microsoft Store. Here are the instructions:
- Open the Microsoft Store on your Windows device.
- Search for “Ready For Assistant” in the search bar.
- Here, click on the listing that is shown in the image below.
- Click on Get and then hit Install.
Once you have installed the Ready For app on your phone and the Ready For PC Assistant on your PC/laptop, it’s time to set up and configure Ready For.
Setting Up Motorola “Ready for” on Windows and Android Wirelessly
Getting Started with Ready For PC Assistant
Let’s start with the configuration of Motorola Ready For on Windows and then continue with the Android configuration. Once the Ready For PC Wizard is installed on the PC/laptop, we need to follow these steps to set up Ready For wirelessly.
- Open the app and click “Get Started” at the bottom of the app window.

- Then it will prompt you with multiple Windows, stating Ready For features. You need to hit the next button on all of the Windows.
- On the last Window, you will see a QR code, and the app window will prompt you to connect your device.
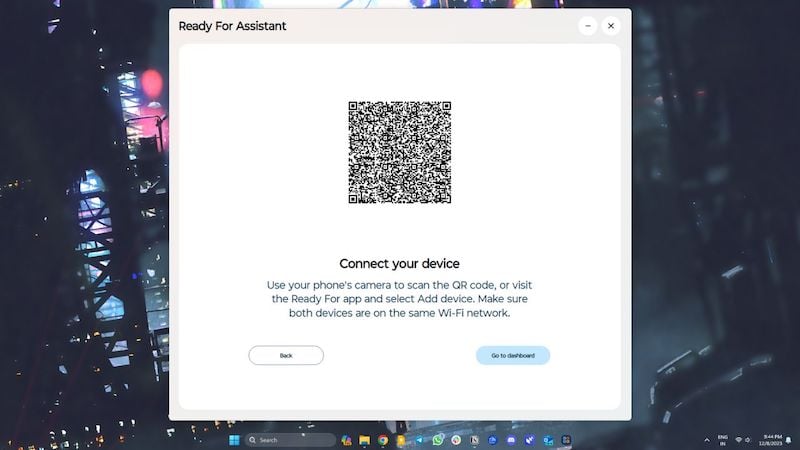
- Now, it is time to set up your Android device. You may leave this app window open for the time being and jump to your Phone.
Getting Started with Ready for app on Android
To set Motorola Ready For on Android, start by following these steps:
- Open the Ready For app on your Motorola device.
- The app will show you some useful information about Motorola Ready For. You can read it if you want or click on the Next button in the bottom right corner.
- Then, you will see the welcome screen with 2 options to connect your phone to a PC or tablet.
- Here, you will see a QR code scanner in the top right corner.
- Click on it and scan the QR code that appears on your laptop or desktop as described above.
- Once you have scanned the QR code, a small window will appear on your phone where your phone will try to connect to your Windows laptop or PC.

Once connected, you will see a connection to your computer, and you will see the status of your computer as online or offline, with several options below, and this also applies to your PC/laptop. The computer screen shows your device on the left side, with status, Wi-Fi signal strength, and the phone’s battery level. You will see the same activity menu on the left-hand side as on your smartphone. With that in mind, let’s look at how to set up Motorola Ready For on Windows and Android with a Type-C cable.
Setting Up Motorola “Ready for” on Windows and Android with a USB cable
To use Motorola Ready For with a USB cable, first connect your phone to your computer using the USB cable provided or a high-quality cable, and then follow the steps below to use Ready For.
Let’s start configuring Motorola Ready For on Windows and then continue with the Android configuration. Once the Ready For PC Wizard is installed on the PC/laptop, we need to follow these steps to set up Ready For with a USB cable.
Getting Started with Ready For PC Assistant
- Open the app and click on “Get Started” at the bottom of the app window.
- You will then see several windows labeled “Ready For Features,” in which you have to click on the “Next” button.
- You will see a QR code in the last window, and the app window will ask you to connect your device.
- Now it’s time to set up your Android device. You can leave this app window open and switch to your phone.
Getting Started with Ready for app on Android
- First, connect your Moto phone to your PC/laptop with a USB cable.
- Open the Ready For app on your Motorola device.
- The app will show you some useful information about Motorola Ready For. You can read it if you want or click on the Next button in the bottom right corner.
- Then, you will see the welcome screen with 2 options to connect your phone to a PC or tablet.

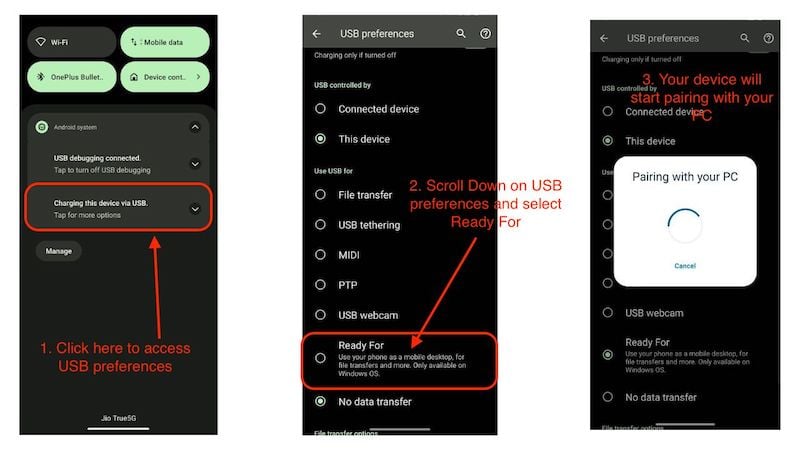
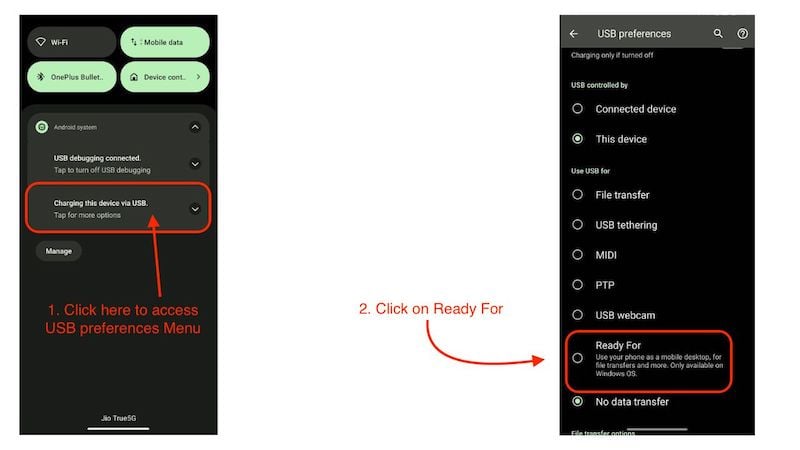
- Now exit the app and swipe down to access the notification panel.
- Click on the Android System Notification that states, “Charging this Device Via USB.”
- On the USB preferences page, swipe down and select Ready For.
- Your Device will start pairing with your Windows computer, and you will jump on the Ready For Dashboard.
Once connected to your Windows computer, you can expect the same results with Motorola Ready For when you’re connected wirelessly to Wi-Fi. In some scenarios, the wired method works better than wireless because there is little to no latency while performing actions like app streaming, screen sharing, and using your device as a webcam. The best part is that your smartphone won’t heat up when connected to a PC or laptop as your device is constantly charging.
Now that you’ve set up Ready For on both devices and both are connected, let’s see what features Motorola Ready For offers and how good or bad the experience is when using the device wirelessly or with the USB cable.
Motorola Ready For Features List
When you open the Ready For app on your mobile or PC, you are greeted with a dashboard where all functions are presented in an activity menu. There are 8 functions in total, and let’s take a look at what they do.
Using a Phone as A Webcam
Let’s start with the most useful feature of all 8 activities included in the Motorola Ready For the Dashboard. Using your smartphone as a webcam is not a unique feature and many apps mimic the same function. Many devices are equipped with this feature, so what’s new?
Motorola’s strength lies in the fact that many affordable devices can use this feature and that it is easy and seamless to use. It also offers a variety of features, such as subject tracking, background effect, and camera zoom. This takes video conferencing from good to great.
Here is how to set it up:
- Connect your phone to your Windows computer using a USB cable and launch “Ready For” on your PC.
- Select Ready For from the Android System Notification that states, “Charging this Device Via USB.”
- Once your device is connected, simply click on the “Webcam” tile in the Ready For app on your phone or Windows computer.
- You will see your webcam feed with several options to choose from on your phone and PC.
- Now, you can simply use your phone as a webcam.

- Hop on your computer and open the video conferencing app of your choice (we use Zoom for demonstration purposes).
- Open the app and click on your profile in the top right corner.
- Now click on Settings and open the video option in the menu.
- Under Camera, select the Motorola Ready For Camera option.
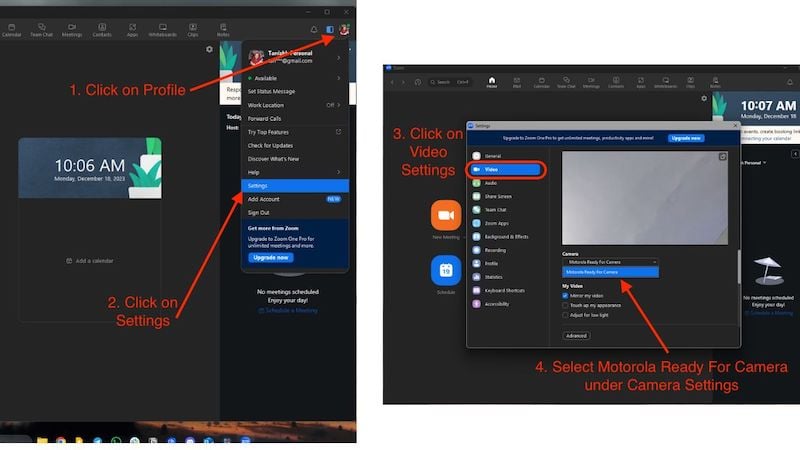
- You can now use your phone as a webcam.
File Transfer
File Transfer is a great solution for transferring your phone’s data to your PC and could be a good alternative to Nearby Share for Windows. It works on the principle of drag and drop and is suitable for both wired and wireless connections. It can’t access your PC files on your smartphone, but you can do that on your computer.
- Open the Motorola Ready For dashboard on your Windows computer.
- Click on File Transfer. (For wireless transfer, you may have to wait a few seconds)
- A file explorer window will open with the internal memory of your smartphone.
- From here, you can easily drag and drop files from your Windows computer to your Motorola device.

- When you’re done, simply open the dashboard and click on Stop browsing files.
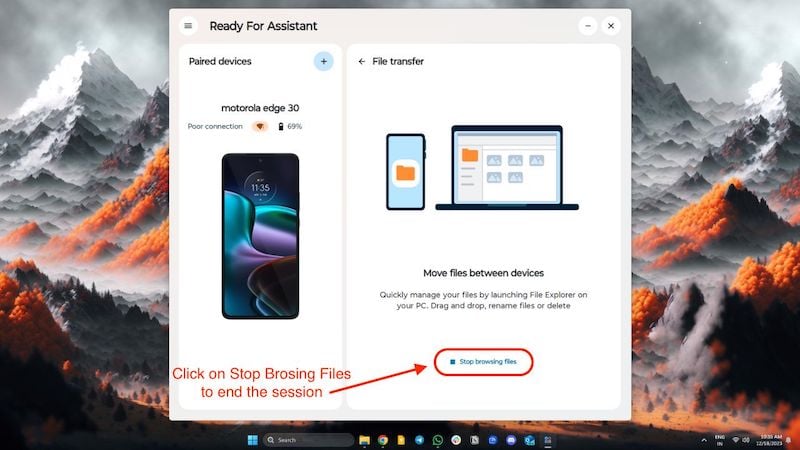
- This will end the session.
Smart Clipboard
Smart Clipboard synchronizes the clipboard between both devices, is easy to use, and works flawlessly with both wired and wireless connections. Before using Smart Clipboard, you should know that the Ready For app can access your clipboard on both your PC and smartphone at any time and that it also saves the entire clipboard history in the dashboard. With that out of the way, let’s take a look at how to activate and use the clipboard.
- Open the Motorola Ready For app on your smartphone and activate Smart Clipboard by clicking on the tile.
- Once you have activated the function, you can paste everything you copy on your smartphone to your PC and vice versa.
- You can even copy images.
- You can find all copied items in the Ready For dashboard by clicking on the Smart Clipboard tile on your phone or PC/laptop.

It’s a handy tool and could be useful for people who frequently jump back and forth between their devices at work.
Related Read: How to Check and Recover Clipboard History on Android
Hotspot
Hotspot is a practical function for people who commute and often work on the move. You simply activate a hotspot on your mobile device and connect it to your laptop or desktop. It works with both wired and wireless connections, is very easy to use, and is quick to set up.
- Hop onto your smartphone, open the Motorola Ready For app, and click on the Hotspot tile to enable Hotspot.
- Once connected, you can use your smartphone’s mobile data on your PC, as simple as that.
- You can also enable or disable the hotspot from your Windows PC/ Laptop.
- Simply open the Ready or PC assistant and click on Hotspot to enable or disable it.

App Streaming
You can stream all the apps on your phone to your PC, which can be an immersive experience as you don’t have to pick up your phone to access all the apps. It works best when your phone is connected to your PC with a USB cable, but you can also use it with a wireless connection. There’s no setup, and it’s easy to use.
- Just open the Motorola Ready For PC assistant on your Windows laptop or PC.
- Now, click on App Streaming and select the app you want to open.
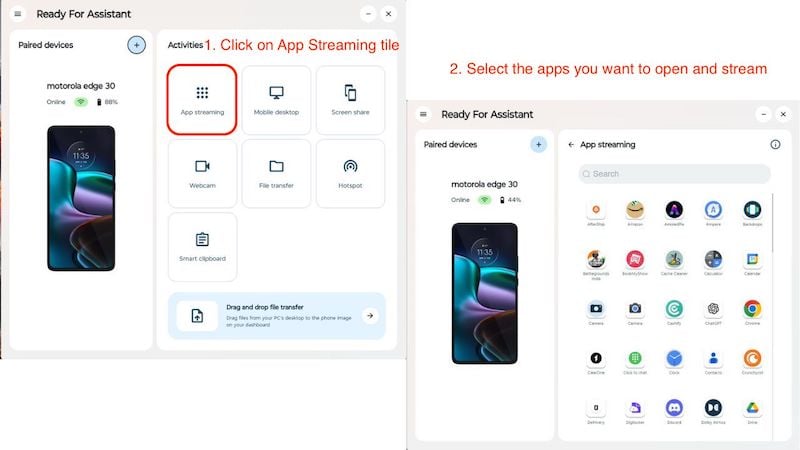
- The first time you use the app, you’ll need to make a connection request on your phone, and you’re ready to go.
- You will see a virtual device the size of your phone on your display with your selected app open.
- You can also use several apps at the same time.
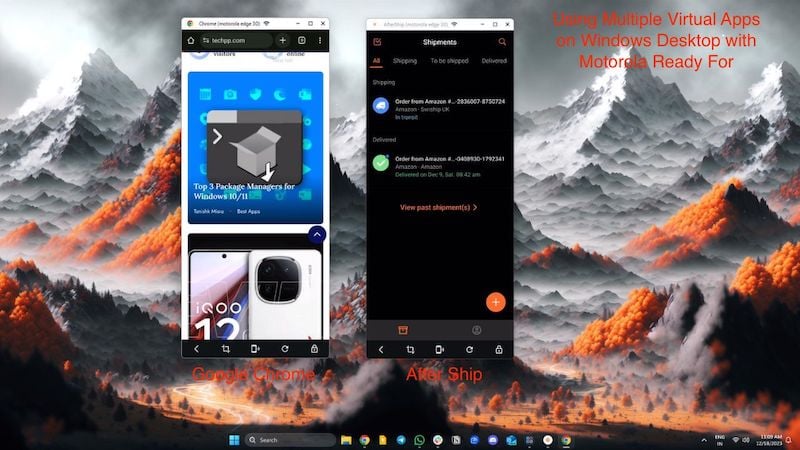
- In the lower half of the virtual device, you also have a few small functions at your disposal with which you can lock your phone, take a screenshot and even restart the app.
Motorola says it works without you having to lift your phone. If your phone is locked, you’ll still need to unlock it, but that’s just for security. Also, you’ll need a strong Wi-Fi connection for app streaming, or you’re better off sticking with the wired connection for a better experience.
Mobile Desktop
With Mobile Desktop, you can access a desktop-like interface on your PC that is operated from your smartphone. But why do you need another desktop-like interface if you’re already using a desktop-based OS? Quite simply, you don’t need another OS.
This feature works best when your Motorola device is connected to a TV or display. The mobile desktop offers almost the same functionality as a Chromebook, except it’s powered entirely by your smartphone. The best part is that all your apps work as if they were developed for a desktop operating system, not a mobile one.
The problem, however, is that there are few apps that are optimized for a desktop experience. In short, we think Motorola has done a good job optimizing the user interface, but developers need to put more work into their apps. Find out how to use Mobile Desktop here:
- You can simply open the Motorola Ready For app on your PC or smartphone.
- Click on the “Mobile Desktop” tile and then on “Start Mobile Desktop.”
- You can also change the window resolution and orientation to your liking. (The resolution goes up to 1080p).

- When you’re done, simply click Stop Mobile Desktop to exit the virtual desktop completely.
- Here is an example of a mobile desktop.
Screen Sharing
Screen Sharing does what it says: it mirrors your Android device on your PC. This can be useful if you want to share something on a larger PC monitor or laptop screen. But Motorlay didn’t hold back and also gave us a virtual phone option, which is very useful in case you want to share a tutorial with someone or use your device as a virtual phone model for experimental purposes. Find out how to activate it here:
- Just open the Motorola Ready For app on your PC or smartphone.
- Click on the “Screen Sharing” tile and select one of the two options.

Mirror phone: You can easily mirror your phone on the display of your PC/laptop.
Virtual phone: This creates an additional screen for your device, so you don’t have to operate your smartphone. This makes it even more useful.
- When you’re done, click the Stop screen sharing button to stop the virtual device or screen mirroring.

The software works on both wired and wireless connections and doesn’t consume as much battery as other traditional screen mirroring software, making it even better.
PC Lock
PC Lock is a small, practical tool integrated into the Motorola Ready For Phone app. And it does what it promises: it locks your Windows laptop or PC simply by pressing a button on your phone. It works wired and wireless and is very handy if you forget to lock your computer. It’s a nifty little utility that saves a lot of time and effort and is very easy to use.
- Once connected to your Windows laptop or computer, open the Motorola Ready For app on your phone.
- Click on the PC lock tile to lock your laptop or PC.

- Your computer will be locked immediately, and you can unlock it again by entering your password as usual.
While it’s a nifty tool, it would be great if Motorola could include additional features, such as unlocking your Windows computer with your Moto device or something like smartphone detection that automatically locks your computer as soon as you move away from the computer. Some apps can already do this, but Motorola should add this feature in upcoming updates.
Motorola “Ready For” Connecting your Smartphone and PC
We’ve been using “Motorola Ready For” for a while now, and the user interface keeps getting better with updates. The best thing about Motorola Ready For is that Moto hasn’t left out its budget smartphones. The G series devices can also use Ready For, and all new and old Edge series devices will be equipped with Ready For.
While there are minor issues with connection stability and device pairing, it’s nothing that can’t be fixed. Moto has taken the approach of creating something useful and integrating it into its entire product range. Ready For is an underrated feature of Moto devices that many people don’t know about. We think it’s a useful tool to increase productivity and improve everyday life.
FAQs about Motorola Ready For Assistant for PC
1. Which Motorola Phones support Ready For?
Almost all Moto Edge devices support Motorola Ready For and come with Ready For pre-installed. Most Moto G series devices do not have Ready For pre-installed, but you can simply search for “Motorola Ready For” in the Google Play Store and install it from there. You must have a Moto device from 2021 or later to use Ready For, and some Ready For features may not work on certain Moto devices. But by and large, all new Moto devices should give you the Motorola Ready For experience.
2. What is the Motorola Ready For app used for?
The Motorola Ready For app can be used for several things, such as connecting your phone to a Windows PC or laptop and utilizing extremely useful features, such as using your Moto phone as a webcam or sharing your clipboard across multiple devices and much more. You can also use the Motorola Ready For app with your smart TV and enjoy a full desktop operating system on a large TV screen powered by your Motorola smartphone.
3. Do I need to run Motorola Ready For all the time on my PC?
If you are connected to Motorola Ready For with your smartphone, you need to run the app on your PC/laptop all the time to use all the features. However, if you disconnect your smartphone from your Windows computer, you can simply quit the PC wizard and start it again when you want to reconnect your Moto device.
4. Should I connect my smartphone and PC with wire or wirelessly to use Motorola Ready For?
You can access all the features of Ready For if you use both options. We recommend pairing your device both ways and using it wirelessly for things like screen sharing, file transfer, and smart clipboard. If you’re using your smartphone for app streaming and mobile desktop, we recommend connecting your USB cable for a better overall experience.
5. Can I use Motorola Ready For on Mac OS?
At the moment, Motorola Ready For is only supported on Windows 10 and 11. There is no support for Mac OS. However, this could change in the future if Motorola decides to release a Mac version of their Ready For Assistant. We think they should because Ready For works great on the PC.
