Several background processes are constantly running on your Windows PC and laptop to ensure the smooth operation of your computer. On average, 60-90 background processes run on a Windows PC in addition to the usual system files, and under heavy workloads there can be as many as 100 to 300. If your system lacks processing power or the amount of physical memory, or has less or slower RAM, it may lag or stutter.

If this is the case, it is best to manually reduce or minimize the number of background processes or change some settings in Windows so that you can reduce the load on your PC’s components. In this blog, we’ll show you several ways to reduce or minimize the number of background processes on your Windows PC or laptop. If you follow these options, your PC and laptop will run smoothly and there will be no delays and failures.
We will start with the most basic solutions and then move on to the more advanced solutions for better understanding and clarity. But first, let’s understand why there is so much background activity in Windows in the first place and which of it we should disable.
Table of Contents
Understanding Background Processes and What to Disable
Background processes play a crucial role in the smooth functioning of the operating system. Many processes run in the background to control and maintain the connection between the hardware and the operating system. Some activities run constantly as they are part of the applications installed on the computer. These processes ensure that all applications function accordingly. A good example of these applications are game launchers and platforms like Steam, but some background activities are not necessary for the operating system to function and you should close them manually.
However, background activities such as apps and games that are constantly running need to be closed if Windows doesn’t close them automatically as they put a strain on your CPU, GPU and RAM. These background activities are easy to spot and remove, but there’s a fine line between what you can close and what you can’t. In this blog, we’ll cover the things you should stop manually and the services you shouldn’t touch at all. A good example of these services are the Microsoft services that ensure system stability.
Restart the system
Restarting the OS is always helpful, especially in situations like this. A complete reboot deletes all files from your RAM. Once the system restarts, it will activate all the services that absolutely need to be loaded and the processes you should stop, giving you a clear idea of which apps and services are responsible for your Windows laptop stopping working.
Let’s see how you can restart your Windows PC
- Close all the apps and hop on to the Windows desktop.
- Now, Press the Alt + F4 keys together.
- In the popup window, click the small arrow to expand all the options.
- Now, select Restart.
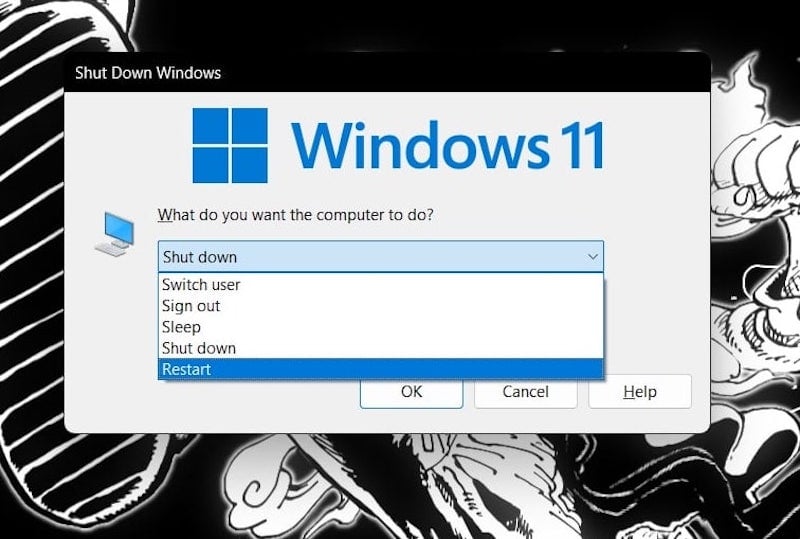
It will restart your PC. Depending on your hardware, it may take some time for the system to reboot.
Remove apps from the System Tray
Removing apps from the system tray is the best way to minimize or remove background processes. Some apps like Discord and Chrome and game launchers like Riot run constantly in the background, even when the app’s main window is closed. This is done intentionally so that the services of these apps continue to update when necessary. This could significantly improve the overall user experience, but sometimes machines with less system memory or CPU power continue to operate and provide resources.
Removing apps from the taskbar can significantly reduce the load on your laptop or PC. This way, you will experience fewer stutters and the apps you use will be noticeably improved.
It is the fastest way to reduce background processes on a Windows PC or laptop.
- In the taskbar on the right-hand side, you will see a small arrow pointing upwards.
- If you click on it, all the apps that are currently running will be displayed.

- Find the apps that you are not currently using and right-click on them.
- Now click on Exit to close them.

Always make sure that you close all apps that you are not currently using, but not the system services such as Microsoft Defender.
Disable Startup Apps
Deactivate all start apps that are not important for the operating system. You don’t need Spotify, Origin and Chrome, which start in the background when you reboot your system. All of these apps can be used when they are needed. If you have an earlier generation system with less RAM, disabling startup apps can significantly reduce load times and give your system a few extra megabytes of RAM that you can use for important tasks.
Let’s take a look at how we can disable unwanted startup programs on your PC or laptop.
- Press Ctrl + Shift + Esc on your keyboard to open Task Manager.
- Now click on Startup programs in the hamburger menu.
- Here you can see all third-party programs installed on your PC.
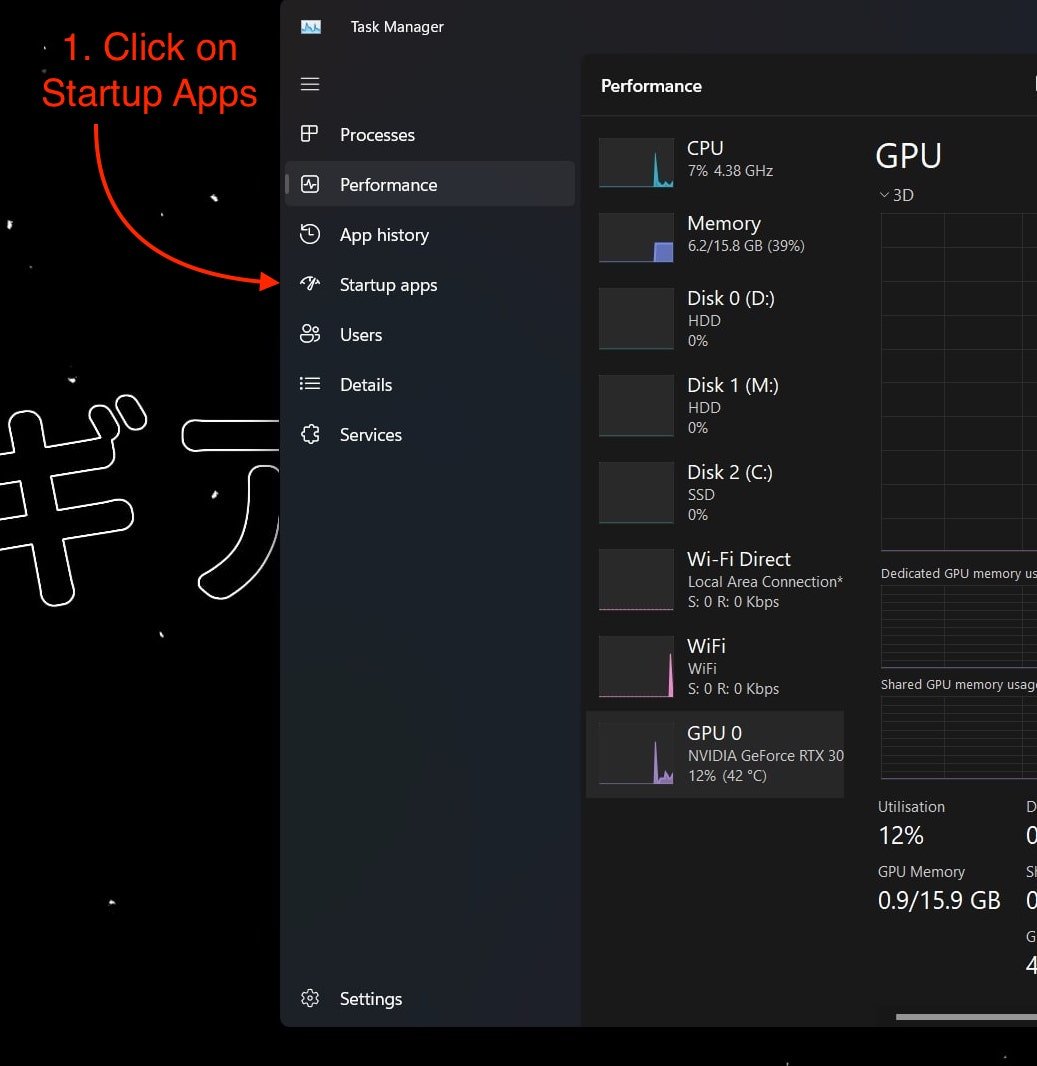
- To Disable the apps, you need to right-click on the app and click on Disable.
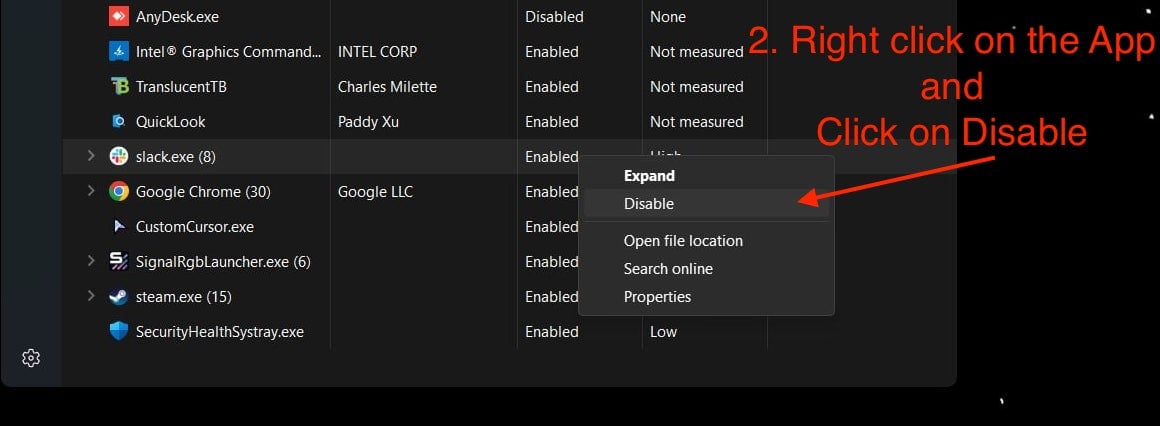
If you follow these steps, you can immediately see improvements in startup times and even some tasks that require more RAM. We always recommend sticking to 16 gigabytes of RAM on the PC side. If you’re buying a new laptop or desktop, you should use DDR5 memory instead of DDR4 memory.
Uninstall Apps
Uninstalling unwanted apps is always a better option for your PC. Not only can it free up resources in primary and secondary memory, but it can also improve overall system performance in the short term. Often, people install apps that they rarely use, and these apps then eat resources from your system. Apps like RGB software and crappy motherboard apps for driver installation are not worth installing on your PC or laptop.
These apps have been shown multiple times to degrade gaming performance because they are not well made and optimized for the various system specifications. Removing such apps simply means more performance that you leave on the table. If you ever need them, just install them or keep an exe or zip file on your system. Or find better alternatives.
Let’s take a look at how we can uninstall apps from our Windows PCs and laptops.
- Press the Windows key on your keyboard and search for Control Panel.

- Now click on Uninstall a program under Programs.

- Now search for apps that you rarely use, and uninstall them.
- Right-click on the app and click on Uninstall.

Manually Kill Background Processes
Manually terminating background processes is the fastest way to improve your system’s performance if you feel that your system has slowed down or your applications have crashed. This will throw your entire workflow into chaos. Manually terminating activities or background processes is the best way to solve this problem. Manually shutting down an application is nothing more than force closing an application that is either using too many system resources or is no longer responding.
- Press Ctrl + Shift + Esc on your keyboard to open Task Manager.
- Now click on the Processes option from the hamburger menu.

- Select the app that is using too many system resources and right-click on it.
- Now click on End tasks to end all processes of this service or app.

The best apps to quit using this method are the apps that are constantly running in the background, 24/7! Apps like Discord, Slack and Chrome. These apps continue to run in the background even when you close the app window.
Manage Background Processes using the System Configuration tool
System Configuration tool or MSconfig is a handy tool that is used to manage system startup processes in Windows 10 and 11. It could be extremely useful, but we need to use it properly. Otherwise, your system could get stuck in the boot loop. We need to follow appropriate steps to avoid any damage to the OS.
- Press the Windows + R keys on your keyboard to launch the Run application.
- Type “msconfig” to launch the system configuration tool.

- Now, click on the Services tab.
- Before you do anything, check the “Hide all Microsoft services” box
- It should provide a list of all the remaining services and apps.
- Here, you should select the apps you don’t want to run in the background.
- Now click on Disable All, and then Hit Apply.

Once these apps are disabled, use the system configuration program. All their background processes will be stopped completely. This can also mean that these apps or services no longer update automatically in the background.
Pause Windows Updates
Windows updates take up a lot of resources and cannot be completely deactivated. In many cases, Windows services are constantly checking for new Windows updates. If you have a PC or laptop that still has support for Windows 11.
Windows update services are constantly checking for Microsoft servers to send a Windows update that could be downloaded and installed in the background. This is a poor implementation of automatically updating your computer, and the worst part is that there is no way to stop this permanently. The best we can do is to pause it for a certain amount of time and then start it again as a background process in Windows.
Here’s how to pause the updates in Windows 11.
- Open the Settings app on your Windows PC or laptop and click on Windows Updates.

- Now, under “More options”, uncheck “Get the latest updates as soon as they’re available”. This will prevent your Windows PC from downloading every update in the background.
- Under “More options” you will see the option “Pause updates”. Click on the box in front of the settings for “Pause updates” and pause Windows updates for five weeks. Unfortunately, this is the maximum we can achieve.

- Now select the Advanced options and uncheck the box next to “Receive updates for other Microsoft products”. This means that applications such as Microsoft Office will no longer be updated in the background.

- Also, make sure to untick the “Get me up to date” option. Windows will not try to install the update immediately after downloading and installing it.

Reset or Re-install Windows
Sometimes it is not easy to minimize background processes. There are a number of background activities/apps or even services that we cannot disable or remove because they are not visible and can cause various problems in the operating system. These applications could be classified as unwanted viruses or trojans that have been downloaded to your Windows PC or laptop and are now invisible to Windows Defender.
These viruses continue to hog computer resources, which can render laptops or PCs unusable. In this case, the only way to remove such unwanted services or malware/Trojans is to reinstall Windows or reset the PC.
Here you can find out how to reset Windows:
- Press the Windows key and search for Reset this PC.

- Under the Recovery options, click on Reset PC.

- Now select Remove Everything. This option will remove everything that includes your personal files as well as app data and settings.

Selecting this option is necessary as a clean install of Windows is well recommended in situations like these.
Minimize Background Processes in Windows 11
Minimizing or reducing background processes in Windows can improve the overall experience of our Windows PCs or laptops. It doesn’t matter if you have a high-end machine or one that barely qualifies for the upgrade to Windows 11. Minimizing background processes in Windows can help free up disk space, reduce memory usage and improve the overall performance of a system when it is burdened by bloatware, viruses or Trojans. By following the above methods, from restarting the system to killing and managing background processes or activities, you can be sure that your system is running in the best possible condition.
FAQs about Minimizing Background Processes in Windows 10/11
1. How could I reduce background processes in Windows 10 and 11?
Reducing background processes in Windows 10 and 11 is easy, you just need to follow the steps from the article above thoroughly. If you need to immediately kill a background task that is causing problems in the system, such as very high CPU and memory usage and apps crashing, then it’s a good idea to open the task manager and go to the “Processes” tab and manually kill a specific task that is causing the problem.
2. Is having 100 background processes normal in Windows 10 and 11?
Normally a Windows PC can run 60-90 background processes in addition to the usual system files, and under heavy workload this number can increase to 100-300 background processes. If your system does not have the necessary computing power or has too little or too slow RAM, you may experience delays or stuttering.
3. How do I check which processes are running in the background in Windows 11?
To check which apps are running in the background in Windows 11, you need to open the Task Manager and go to the “Processes” tab. Here you can see all the background processes that are currently running and consuming resources. You can also check which process is using how much memory, CPU, hard disk and network.
4. What is that green leaf symbol shown in the Process tab in the task manager in front of some apps?
With the Windows 10 update 21H2, Microsoft has given Windows the option of suspending apps that are not being used. The green leaf icon indicates that the app is running in efficiency mode. This restricts the app/service or activity so that it uses very few resources, which saves battery life on laptops and Windows computers. This mode is also called Economy or Econ mode. It only works with third-party applications and not with Windows core applications and services.
5. Why let apps run in the background?
There are several applications and services of the Windows core system that are crucial for the smooth functioning of the operating system. Many third-party applications contribute to the overall Windows experience. The best example of this is something like the transparent taskbar or fan control, which you must always use if you want to take full utilisation of their features.
While it’s not necessary to have all apps running in the background all the time, there’s a fine line between the apps you should have running and the apps that shouldn’t be running all the time.
