Quick Answer
macOS Monterey (version 12) is a stable, lightweight release that works great on older Macs, including models going back to 2015. The latest version is macOS 12.7.6, and you can download it directly from the App Store or use the DMG, ISO, or InstallAssistant.pkg links below. Whether you want to clean install Monterey, downgrade from a newer macOS, or set it up on a VM, this guide covers all the steps. Just confirm your Mac is on the supported list, free up at least 26 GB of storage, back up your data, and follow along.
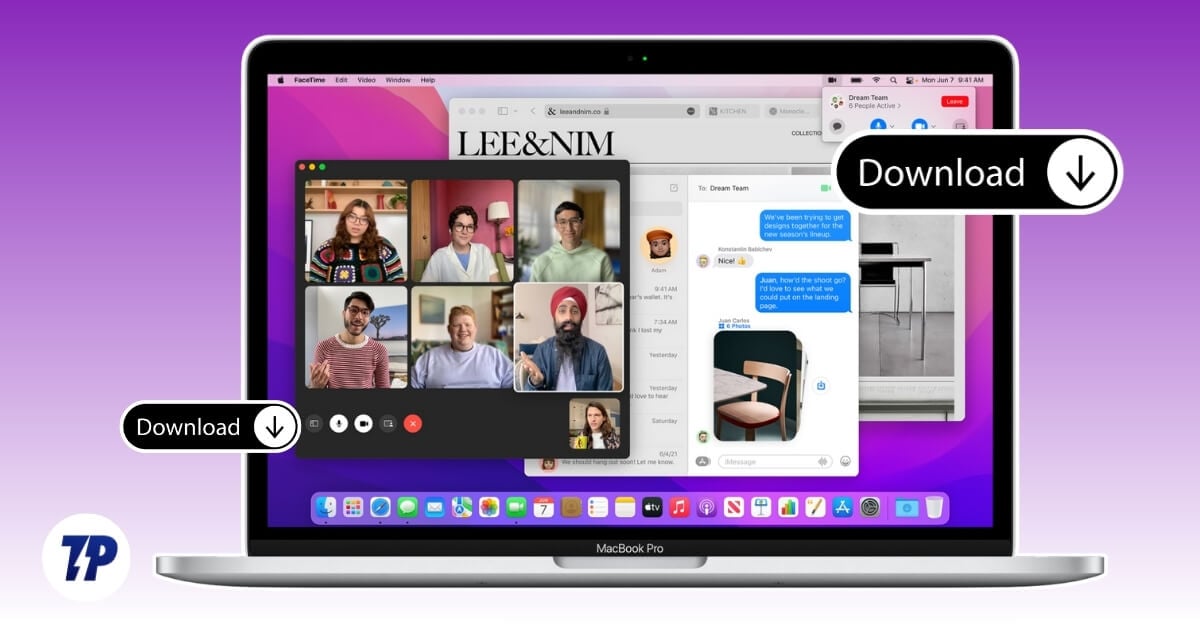
macOS Monterey (version 12) is one of my favorite upgrades for MacBook ever. It is not only useful but also the most stable macOS release in recent memory, and it has none of the forced AI features that have made newer OS versions feel bloated and unreliable.
What makes Monterey even better is that it supports older MacBooks, even the lightweight Air models from 2015. So whether you have an old Mac you want to breathe life into, or you are looking to downgrade from a newer macOS that keeps causing issues, you can download the macOS Monterey installer, DMG, or ISO file right from the links below. The latest stable release is macOS 12.7.6, and I have also included a full step-by-step guide to clean install or downgrade to Monterey on both Intel and Apple Silicon Macs. If you are ready, let’s get started.
Table of Contents
Download macOS Monterey DMG software
Before you download, it helps to know where each file is coming from. I have split the links into two groups below: official Apple-sourced files and community-archived mirrors. The official InstallAssistant.pkg links are hosted directly on Apple’s CDN servers, so those are always the safest option. The archive.org and Mega links are third-party mirrors that can be useful if you need an older version or a pre-converted ISO for a VM setup, but you should verify them before installing (more on that in the FAQ).
Official Apple Downloads
- Download macOS Monterey 12.7 (Latest) – InstallAssistant.pkg (Direct from Apple CDN)
- Download macOS Monterey from the Mac App Store (Official Apple App Store link)
Community-Archived Mirrors (Third-Party)
- Download MacOS Monterey 12.1 DMG (Direct Download Link via archive.org)
- Download Monterey DMG 12.1 – Alternate (Direct Download Link via archive.org)
- Download MacOS Monterey DMG (Download from Mega)
- Download macOS Monterey 12.6.1 ISO (via archive.org – use for VMware/VirtualBox)
- Download macOS Monterey ISO image pack (via archive.org – use for VMware/VirtualBox)
These are direct download links; you can click on any link and visit the official sites and download the secure files. Before that, you can check the compatibility list and also the prerequisites to downgrade or upgrade to macOS Monterey.
Everything you need to know before installing macOS Monterey
macOS Monterey is version 12, first released in October 2021. The latest version is macOS 12.7.6, released in July 2024. If you are installing Monterey fresh or downgrading to it, here is everything you should check off before you begin.
macOS Monterey Version History at a Glance
Version |
Release |
|---|---|
macOS 12.0 |
October 2021 |
macOS 12.1 |
December 2021 |
macOS 12.6.1 |
October 2022 |
macOS 12.7 |
September 2023 |
macOS 12.7.6 (Latest) |
2024 |
Storage and RAM Requirements
Before downloading, make sure your Mac has enough room. Apple requires:
- Free disk space: At least 26 GB for the download; up to 44 GB for the full installation process on older macOS versions
- RAM: 4 GB minimum (8 GB recommended for smooth performance)
- Internet: A stable connection for downloading the ~12 GB installer
If your Mac is running low on space, you can clean up Other storage on your Mac before proceeding.
Supported Mac Models
| Mac Model | Supported Versions |
| MacBook Air | Early 2015 and later |
| MacBook Pro | Early 2015 and later |
| MacBook | Early 2016 and later |
| iMac | Late 2015 and later |
| iMac Pro | 2017 and later |
| Mac mini | Late 2014 and later |
| Mac Pro | Late 2013 and later |
| Mac Studio | 2022 and later |
Other Prerequisites
- Back up your important files to an external drive or iCloud before starting. Here is a quick checklist of things to do before making major Mac changes.
- Keep your Apple account credentials handy. You will need to sign in after installation.
- Disable Find My Mac before a clean install to avoid activation lock issues.
- Keep your MacBook fully charged or plugged in for the entire process.
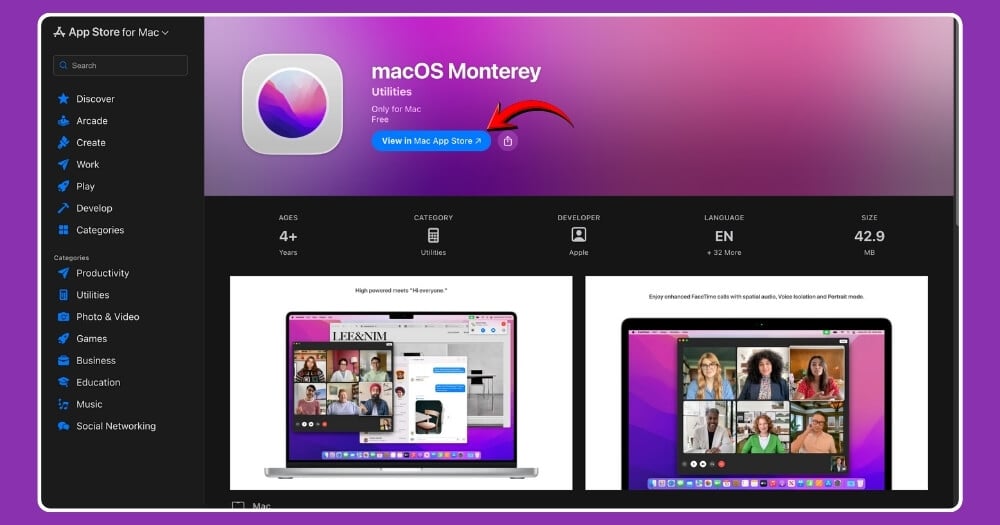
How to Download macOS Monterey Directly from the App Store
The easiest and safest way to get the macOS Monterey installer is directly from Apple through the Mac App Store. Here is how:
- Open the App Store on your Mac.
- Search for macOS Monterey, or click this direct link to go straight to the page.
- Click Get (it is free). Your Mac will download the full installer, which appears in your Applications folder as Install macOS Monterey.
- Once downloaded, the installer will launch automatically. You can proceed with the upgrade, or quit it if you want to use it later to create a bootable USB instead.
How to Install macOS Monterey on an Unsupported Mac (OCLP)
If your Mac is not on the supported list above, you can still run macOS Monterey using the OpenCore Legacy Patcher (OCLP) – a free, open-source tool that patches older Macs to run newer versions of macOS. This works on Macs as old as 2008 in some cases.
What you need:
- A Mac not officially supported by Monterey (e.g., MacBook Pro 2014, iMac 2014)
- A USB drive of at least 16 GB
- The OpenCore Legacy Patcher app (download from github.com/dortania/OpenCore-Legacy-Patcher)
High-level steps:
- Download and open OpenCore Legacy Patcher on your Mac.
- Click Build and Install OpenCore, then flash it to your USB drive.
- Reboot your Mac and boot from the USB drive.
- Use OCLP to download macOS Monterey and create the installer.
- Follow the on-screen installation steps.
- After installation, run the Post Install Root Patch in OCLP to restore graphics and Wi-Fi drivers.
How to Use macOS Monterey ISO on VMware or VirtualBox
If you want to run macOS Monterey inside a virtual machine (VM) on a Mac or Windows PC, you need the ISO version of the installer. The ISO files linked in the community-archived mirrors section above are specifically useful for this purpose.
On VMware Fusion (Mac):
- Download the macOS Monterey ISO from the archive.org links above.
- Open VMware Fusion and click Create a New Virtual Machine.
- Drag the ISO file into the installer window and follow the prompts.
- Set RAM to at least 4 GB and storage to at least 60 GB for the virtual disk.
- Complete the macOS setup as you would on a real Mac.
On VirtualBox (Mac or Windows):
- Download and install VirtualBox from virtualbox.org.
- Create a new virtual machine, set the type to Mac OS X and version to macOS 12 Monterey (64-bit).
- Attach the downloaded ISO as the startup disk.
- Allocate at least 4 GB RAM and 60 GB storage.
- Boot the VM and follow the macOS installer.
Download macOS Monterey IPSW for Apple Silicon
If you have an Apple Silicon Mac (M1 or M2) and need to restore or reinstall macOS at the firmware level, you will need the IPSW file instead of the standard installer. IPSW is used for DFU (Device Firmware Update) restores via Apple Configurator 2.
You can download the official macOS Monterey IPSW files for your specific chip from Apple’s developer portal:
Apple Silicon IPSW Downloads — developer.apple.com (filter by macOS 12)
To use it:
- Connect your Apple Silicon Mac to another Mac using a USB-C cable.
- Open Apple Configurator 2 (free on the Mac App Store).
- Put the target Mac into DFU mode (hold power + volume down on boot).
- In Configurator, right-click the device and choose Restore, then select the IPSW file.
Here is how to clean install macOS Monterey
If you want to upgrade to macOS Monterey, you can freely upgrade to the latest version from the settings. However, if you need to downgrade to this version, first, ensure you have met all the prerequisites that have been mentioned, and ensure you have a backup of the important files on your Mac.
Step 1: Install the Mac OS Installer app
First, you need to get the macOS Monterey installer on your Mac. There are two ways to do this. The easiest is to download it directly from the Mac App Store for free. Click on this link,and it will take you straight to the macOS Monterey page. Click Get, and the installer will download to your Applications folder.
If you already downloaded the InstallAssistant.pkg or a DMG file from the links above, you can double-click the file to mount and run the installer directly. Both methods end up with the same Install macOS Monterey app in your Applications folder.
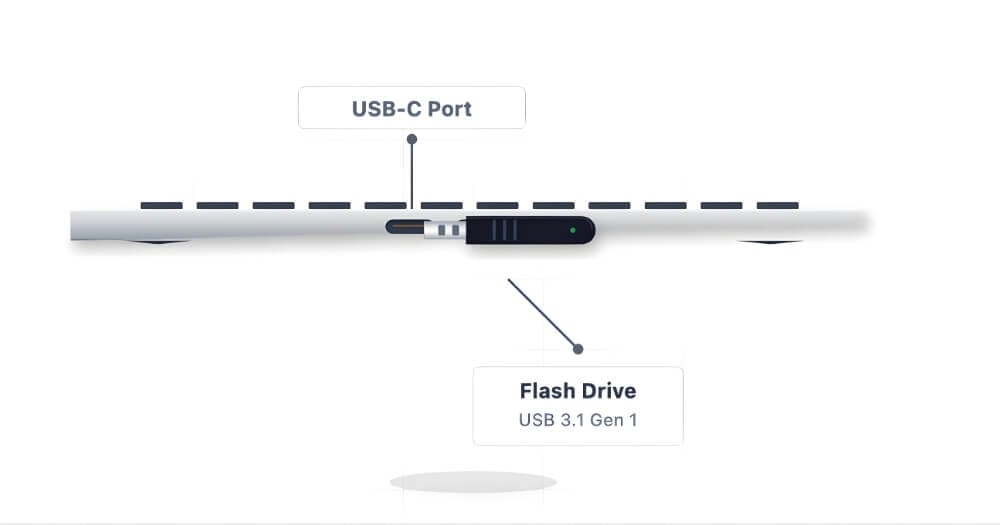
Step 2: Format your External USB drive
Next, you need to format your external USB drive to convert it into a macOS Monterey installer. First, plug your USB into your Mac.
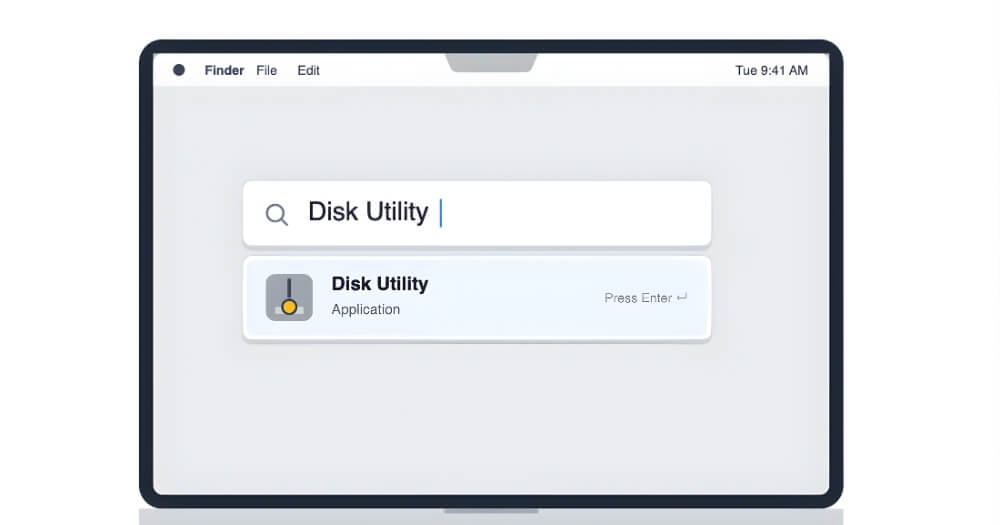
Next, use these commands: CMD + Space, type Disk Utility, and press Enter. It will open the disk utility app on your Mac.
Now, once you’re done, in the top left corner of the screen, click on the View to see your USB device there. If the external device is not showing on your Mac, you can view this tutorial to fix it.
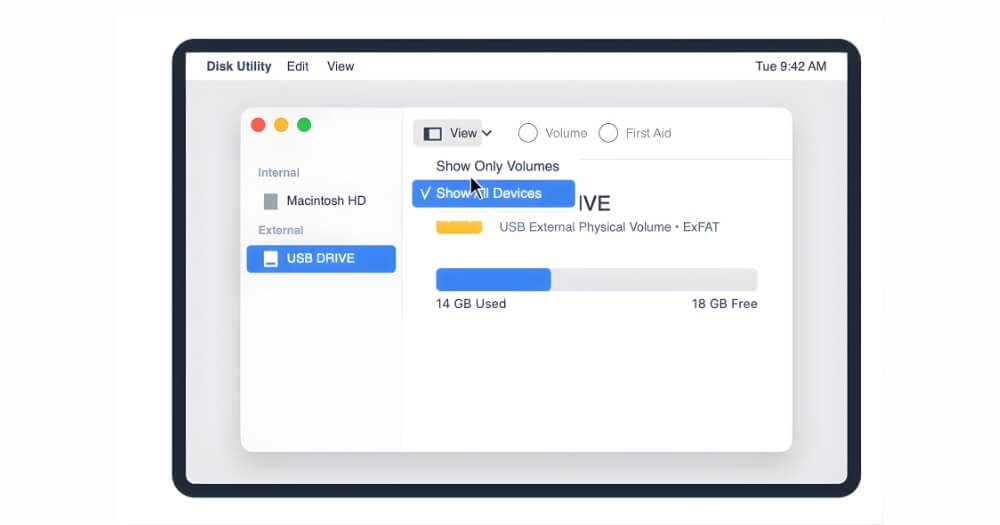
Now, in the sidebar, select the USB device that you connected to the Mac, and then click on the Erase button at the top.

Now, enter the following option before reading
- Name: myVolume
- Format: Mac OS Extended
- Schemes: GUID Partition Map
Once you’ve entered all these values, click on the erase, and this will erase your USB drive and make it compatible to install macOS
Step 3: Next, you need to turn the USB into an installer
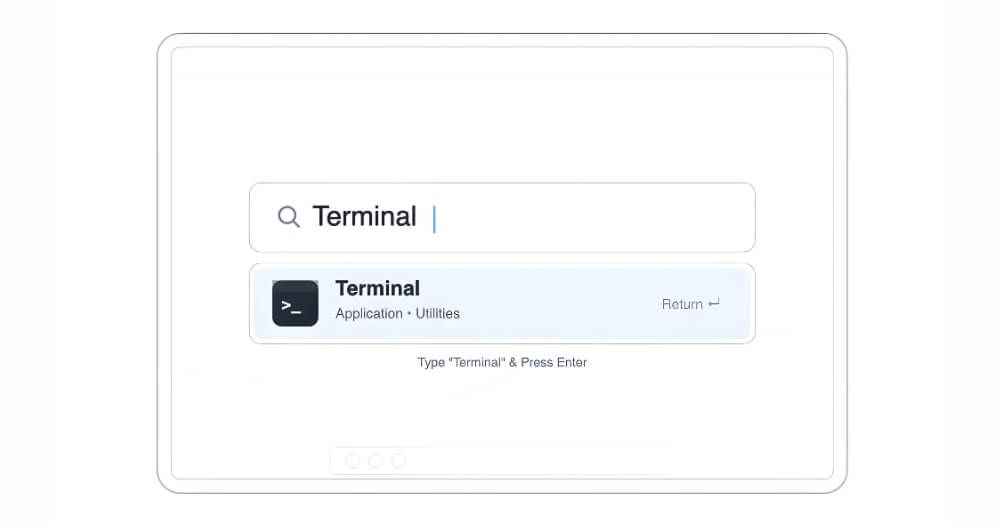
Keep the USB device connected to your Mac. Now, open Terminal on your Mac
Now, in the terminal, enter this command and press Enter.
sudo /Applications/Install\ macOS\ Monterey.app/Contents/Resources/createinstallmedia –volume /Volumes/MyVolume
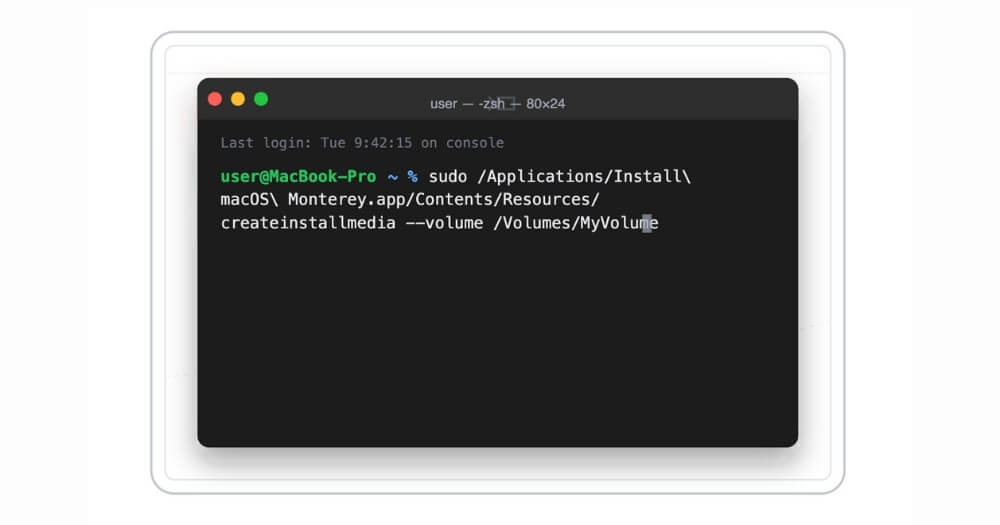
Now enter your device password and press enter
Next, press Enter when it asks, “Erase this volume. It erased your volume and made it a macOS Monterey installer.”
That’s it, now you can plug it into any supported Mac to install macOS Monterey on your device. To make it accessible for everyone, I have included a detailed step-by-step process for both Intel MacBook and the latest Silicon Macs.
First, let’s see how you can downgrade macOS on the latest silicon Macs
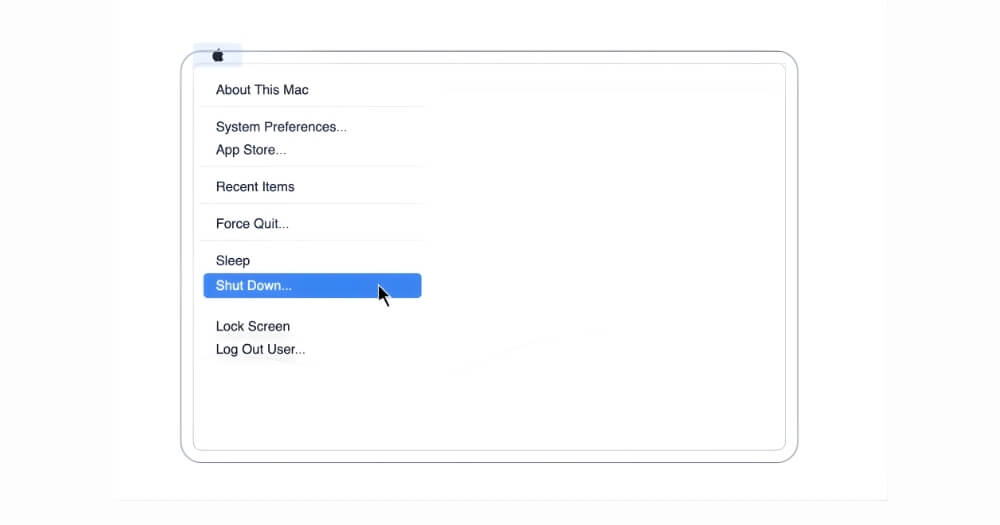
Step 1: First, shut down your Mac
Step 2: And then plug your USB device into the Mac. Ensure the USB device is plugged in, since it is the device used to install the Monterey macOS on your device
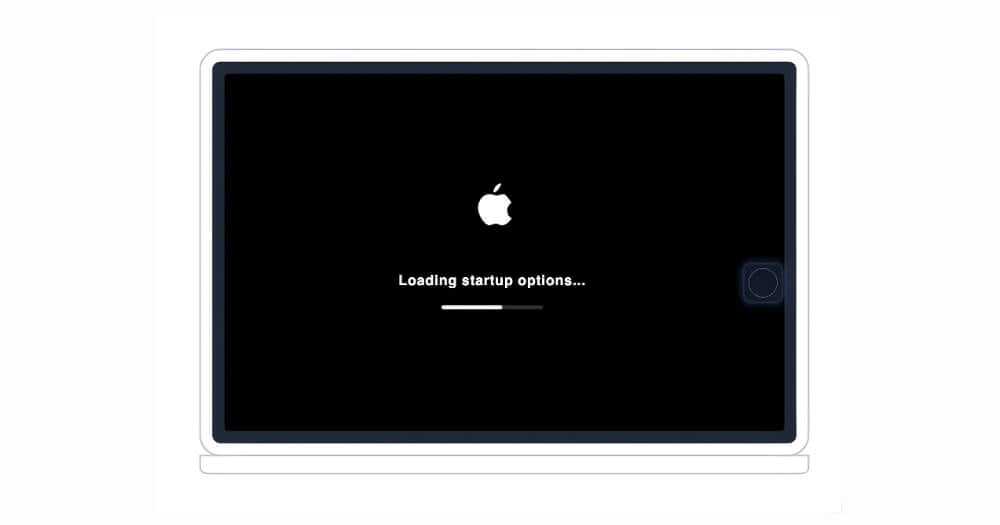
Step 3: Now press and hold the power button on your Mac until you see loading startup options.
Step 4: Next, you will see an internal drive + the USB installer option. Since we installed it using an external drive, select the external USB device you just connected: Monterey installer USB.
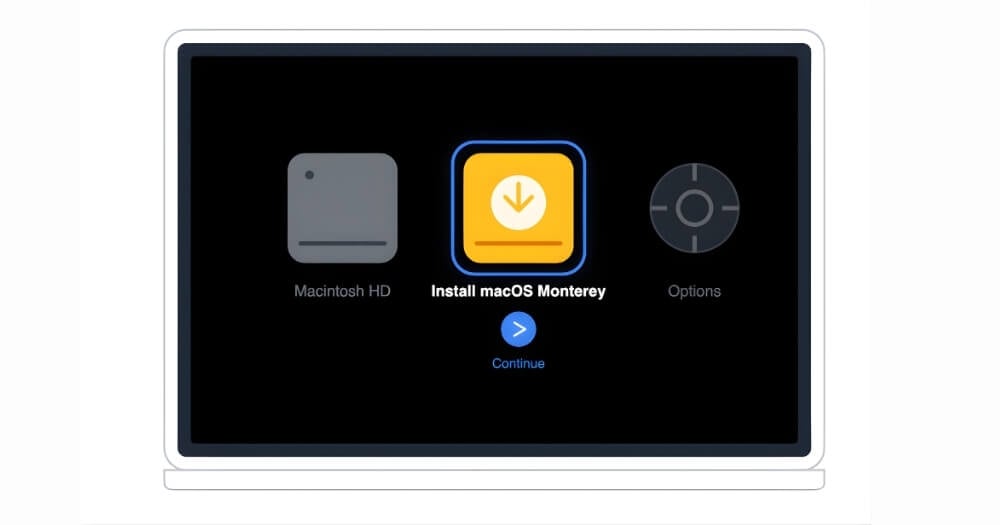
Step 5: And now the installation process will begin, and click on the Continue button to continue the process.
Step 6: When you are on the installer screen, choose Disk Utility and then click on Continue. Again, at the top, click on the View and then Show all devices. Now, from the left side bar, select the top internal disk options and select Apple SSD or, in some cases, Macintosh HD
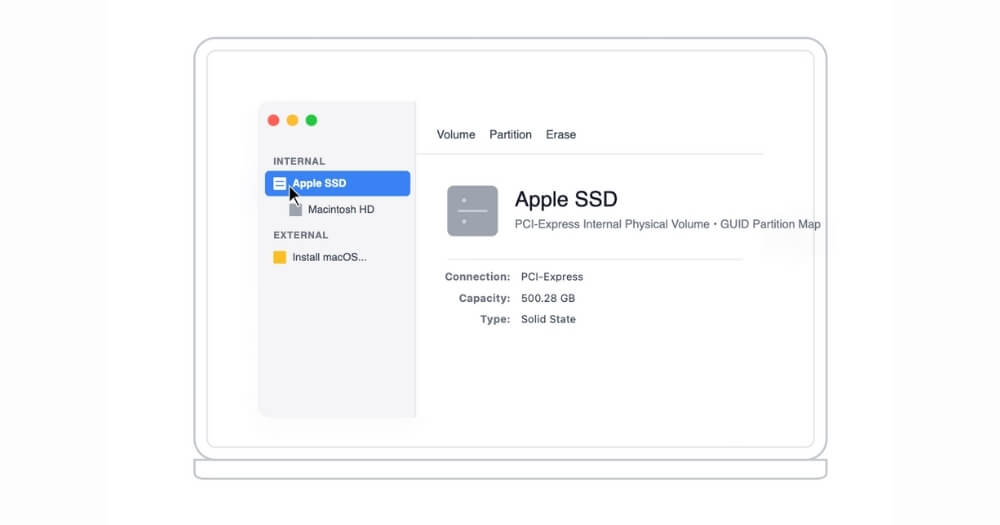
Step 7: And once you select, click on the Erase option and enter these options
- Name: Macintosh HD
- Format: APFS
- Scheme: (if shown) GUID Partition Map
Step 8: Once again, click on the Erase option and wait until the process completes. Now, close the Disk Utility and then go back to the installation process.
Step 9: Now, install macOS Monterey. Click on the Install macOS Monterey button and then click on Continue.
Step 10:Now you need to agree to the terms and conditions and select the disk: Macintosh HD, which you just erased in the previous steps. That’s it, your Mac will restart a couple of times and install the OS.
Step 11:Now you can go through the OS onboarding steps and install the new macOS on your device. You can back up your files during the setup or later connect your external device to bring back the files. If you have a time machine backup, you can use the Migration Assistant tool from mac OS to bring back older files on your Mac. Here is the video detailing that process
For Intel-based Macs
If you want to install macOS Monterey on an Intel-based system, the steps are very similar until you create the OS Monterey installer from your USB drive. However, booting your drive from macOS is a bit different compared to booting it from your silicon version. For Intel-based macOS, follow the steps below
Step 1:First, shut down your Mac completely.
Step 2:Keep the USB plugged in.
Step 3:Turn it on and immediately hold the Option key.
Step 4:Keep holding until you see disk icons on a black/gray screen.
Step 5:Use arrow keys or mouse to pick Install macOS Monterey (or USB name) and Press Return.
Step 6:Next, you can use similar steps as shown in the Mac icon installer from step 5. First, you need to erase your Mac’s internal disk, install Monterey, and set it up. You can follow the above steps to install it on your device.
Ready to install macOS Monterey?
That covers all the ways to download and install macOS Monterey on your Mac, whether you are doing a clean install, downgrading from a newer macOS, setting it up on a VM, or patching an older unsupported Mac with OCLP. The safest path is always the official App Store download or the InstallAssistant.pkg direct from Apple’s CDN. If you run into any errors during the process, drop a comment below and we will help you sort it out.
FAQs on macOS Monterey Installation Issues
1. Are third-party DMG/ISO links actually safe to use?
The InstallAssistant.pkg and App Store links are directly from Apple, so those are completely safe. The archive.org and Mega links are community-hosted mirrors, not Apple-official. They are widely used by the Mac community, but you should always scan any downloaded file with antivirus software and verify the installer signature using the Terminal method in Q2 before running anything.
2. Is there a Terminal method to verify installer/package signatures?
Yes. Once you have the .pkg file downloaded, open Terminal and run:
pkgutil –check-signature /path/to/InstallAssistant.pkg
This confirms the package is signed by Apple. If the output shows anything other than Apple as the signer, do not proceed with that file.
3. Why won’t a T2 Intel Mac boot from the USB installer?
This is a common issue on T2-equipped Intel Macs. To fix it, restart your Mac and hold Cmd + R to enter Recovery Mode. Go to Security Utility, and set Secure Boot to No Security and allow booting from external media. Once done, restart and hold Option to select your USB installer.
4. How can I downgrade my apps to older versions compatible with Monterey?
The best approach is to download apps from their developers’ official websites or trusted third-party archives. Check compatibility before installing, as apps downloaded from unofficial sources can carry malware. For Mac App Store apps, you can re-download older purchased versions through the App Store’s purchase history if the developer still hosts them.
5. How to fix macOS could not be installed on your computer errors during installation?
Apple has an official troubleshooting guide for this. You can follow this guide from Apple Support to resolve the most common installation errors.
6. What is the latest version of macOS Monterey?
The latest version of macOS Monterey is macOS 12.7.6, released in 2024. This is the final update Apple issued for Monterey before shifting full focus to newer macOS versions. The InstallAssistant.pkg direct link in the official downloads section above points to macOS 12.7
7. How much storage do I need to install macOS Monterey?
You need at least 26 GB of free disk space for the installer download, and up to 44 GB for the full installation depending on which macOS version you are upgrading from. It is a good idea to free up a bit more than the minimum to keep your Mac running smoothly after the install.
8. Can I install macOS Monterey on an unsupported Mac?
Yes, using the OpenCore Legacy Patcher (OCLP), you can run macOS Monterey on older Macs that are not officially on Apple’s supported list. See the dedicated OCLP section above for the full walkthrough.
. What is the difference between a DMG, ISO, and PKG file for macOS Monterey?
A DMG is Apple’s native disk image format, used natively on macOS. An ISO is a universal disk image format, most useful if you are setting up macOS in a VM on VMware or VirtualBox. A PKG (specifically the InstallAssistant.pkg) is the official Apple installer package that installs the full macOS Monterey installer app directly onto your Mac. For real Mac hardware, the PKG or App Store route is always preferred.
10. Can I use macOS Monterey on VMware or VirtualBox?
Yes. You need the ISO version of the installer for most VM setups. The archive.org ISO links in the community mirrors section above are designed for this use. See the dedicated VM section above for step-by-step instructions for both VMware Fusion and VirtualBox.
