Screen Recording provides an easy way to record your screen without the need for external devices. Most smartphone brands, including iPhones, now offer built-in screen recording options that let you easily record and share your screen content.

If you want to record your iPhone’s screen, in this guide, we will take a look at different ways you can record your iPhone’s screen. Whether you’re recording a video for a tutorial or creating a tutorial for your friends, here’s how you can easily record your screen.
Table of Contents
How to Record Your Screen on an iPhone
Here are the 4 ways to record screen on iPhone that we will be covering in this guide:
- Using Built Screen Recorder
- Using Third-Party Screen Recording Apps
- Using Mac
- Using Xcode
Using Built Screen Recorder
Apple has introduced a built-in screen recording function in iOS 11. It is available directly in System Settings and does not require an app to be installed. It is one of the easiest ways to record your screen on an iPhone. To use it, you should first add it to your Control Center:

- Open the Settings on your iPhone
- Click on the Control Center. Or simply swipe down from the home screen to bring it up.
- Tap on Customize settings.
- If you don’t see the screen recording options under the “Include” section, scroll down to the screen recording options and click the + next to screen recording. This will add screen recording to your Control Center. Follow the steps below to record your screen.
How to screen record on iPhone (the easiest way)

- Open the Control Center and click on the Record icon.
- If you want to record with audio, press and hold the recording icon in the iPhone Control Center, tap the microphone, and start recording.

- To stop recording, tap the red bar at the top of your screen.
- After recording, a notification will appear at the top of your screen. Tap this notification to view and edit your recorded video.
How to Edit Recorded Video
After you stop recording, a notification will appear in the upper right corner. You can click on the notification to view or edit the video. All videos recorded on iPhone will appear in the Photos app. You can open the video and click “Edit” to edit the video. The Apple Photos app provides basic video editing features such as trimming, cropping, removing sound, and more. If you want, you can also export the captured video to other video editing apps to edit it there.
Related Read: How to Record Calls on iPhone Without an App
Best Third-Party Screen Recording Apps for iPhone
Inbuilt screen recording is a quick and easy option for many people. But it has some limitations like recording videos max of 720p resolution, not having options to adjust the bitrate and frame rate of the video, and no webcam support and more. If you miss those features, you can use third-party screen recording tools like Record It to record iPhone screens. In this post, we picked three of our favorite screen recorder apps for iPhone.
Record it
Highlights:
- Output Quality: High-quality screen recordings
- Price: Free, with a Pro version for $5.99.
- Ease of Use: One-tap recording and easy organization.
- Editing Capabilities: Trim, filter, and adjust videos easily.
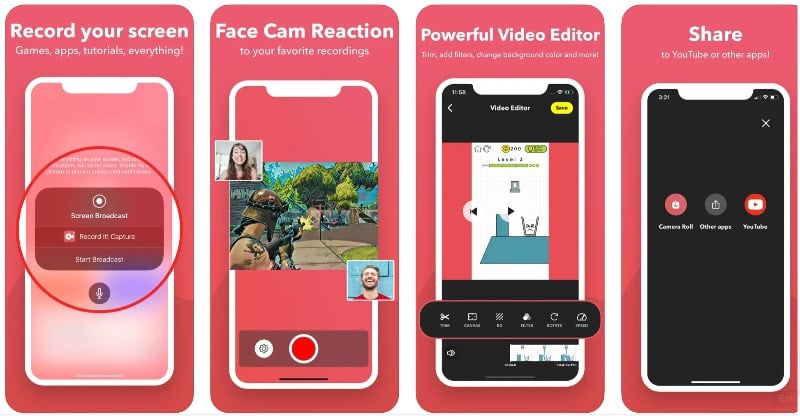
Record It is a popular screen recording app for the iPhone. With the app, you can record games, video tutorials, apps, and much more. The app is simple and easy to use. With the free app version, you can record videos up to 720p quality. As for the built-in recording option, you can tap on the recording tab to start recording. There are also microphone settings that let you enable and disable muting.
The big advantage of the app is the Facecam support and video editing features. The app lets you add face cam footage to your videos. It records videos through the front camera. You can adjust the size and position of the Facecam, but you can’t position it anywhere you want. It also has advanced video editing features that let you add filters, trim your video, adjust the playback speed, change the canvas and background color, and rotate the video.
The app is free and requires iOS 12 to work. There is also a Pro version that unlocks additional benefits such as no time limit, unlimited video recording, no ads, recording in 1080p and 720p HD, and more. It offers a one-time subscription that can be very useful for some people who want to capture high-quality screen recordings with no time limit.
How to screen Record on iPhone using Record it
Although Record It is simple and easy to use, it might be difficult for some people. Here’s a short and simple guide on how to use it on your iPhone:
- Download the free Record It app and install it on your iPhone. It’s free!
- Open the app, tap the Record button in the middle, and click Start Broadcast. You can control the microphone settings from the bottom.
- To stop recording, click Stop Broadcast.
- To add face cam reactions, click on the face cam and add your reaction.
- To edit the video, click Video Edit and edit your video, and finally, click Share to share the video with others.
Download the Record It app for iPhone
Screen recorder – V recorder

Highlights
- Output Quality: The app offers picture-in-picture with webcam recording, which enhances the viewer experience.
- Price: The app is free and offers the option to upgrade to the Pro version to get additional features.
- Ease of Use: The one-tap recording feature makes for a user-friendly experience.
- Editing Capabilities: Users can make basic edits and add comments to existing videos in their camera roll.
Screen recorder V recorder app is another great way to record screens on the iPhone. It supports picture-in-picture webcam recording, audio commentary recording, gameplay recording, and more. With the free version of the app, you can record up to 720p resolution and get advanced video editing features to edit the video. The app also offers editing tools like video compression, video-to-audio, teleprompter, and more.
Screen recording with this app is simple and similar to other screen recorder apps. You can tap the record button to broadcast the video. After recording, you can add live face reactions and edit the video. Live mode allows you to add face cam reactions to already recorded videos on your iPhone. This is very useful to add live reactions to existing videos.
Voice commentary allows you to record your voice without video and add it to existing videos. Besides, there are other tools like telegram promoter, video trimming functions, video-to-audio converter, video compressor, crop video, and increased video playback speed.
The app is available for free. There is also a Pro version available for $4.99 that removes ads and unlocks tools that are only available to premium users. The app automatically adds watermarks to recorded videos. You can upgrade to the premium version to remove watermarks.
How to record videos using a V recorder
- Using Screen Recording V recorder is very similar to other screen recording apps. You can open the app and start recording.
- After you record the video, you can add live facial reactions, edit the video, and share it with others.
- You can click on the application icon (four square boxes) to access additional tools. You can tap on any tool to use it.
- To manage all your video recordings, go to the Account tab. To access the app settings, click the plus or go to the home screen and click the gear icon in the upper right corner of the screen. Here, you can set the frame rate, bit rate, and resolution.
Download the Screen-Recorder-V-Recorder app for iPhone
Ultra Recorder

Highlights:
- Output Quality: Offers picture-in-picture with webcam recording, making it ideal for reaction or commentary videos.
- Price: The app is free, but there is also a Pro version with additional features.
- Ease of Use: With one-tap recording and built-in editing tools, the app offers the best user experience.
- Editing Capabilities: Comprehensive video editing tools, such as trimming, speed adjustment, cropping, and more.
Ultra Screen Recorder is another simple and best app for iPhone for recording and live streaming. The app offers live streaming (only available in the Pro version) and lets you live stream your screen to platforms like Facebook, YouTube, and Twitch. It supports microphone and audio recording simultaneously and lets you add voice-overs and record app or game sounds. The app also lets you adjust the resolution, bitrate, and orientation of the live stream.
Speaking of other features, the app also offers live audio commentary, advanced video editing features, and Facecam reactions. Both Facecam and Live Stream are only available in the Pro version. The free version comes with ads. Upgrade to the premium version to turn off the ads and unlock additional benefits like 2K video resolution, Facecam, and full video editing. The app offers weekly and lifetime subscriptions.
The user experience and interface are another highlight of the feature. Ultra Screen Recorder offers a simple and uncluttered user interface compared to other apps and all the screen recording apps we tested for this post. The ads may bother some people, but you can upgrade to the premium version to eliminate them.
Using Ultra Screen Recorder is also easy. On the home screen, you’ll find the Record Options button to start screen recording your video. You can set the video resolution; the free version offers up to 720p resolution, and the Pro version offers up to 2k resolution. You can set the frame rate and bit rate of the video. The free version offers up to 30fps and a bitrate of up to 10 MBBs. Overall, an Ultra recorder offers a simple and straightforward way to record videos.
Download Ultra Screen Recorder for iPhone
How to Screen Record iPhone Screen Using Mac
If you also have a Macbook, you can record your iPhone’s screen from your Macbook. To do this, connect your iPhone to your Macbook with a cable. For iPhones of the 14 series or lower, a light cable is suitable. For the 15 series, a Type-C cable. Once you have successfully connected your iPhone and Mac, follow the steps below:
- Launch QuickTime Player. You can find it in your Applications folder or use Spotlight to search for it.
- In QuickTime, go to File > New Movie Recording.

- Click the arrow next to the red Record button and select your iPhone screen from the options. You can also choose the audio source and quality.

- Now, you’ll see your iPhone screen on your Mac. Press the red record button to start recording. Rotate your device if necessary; QuickTime will adjust.
- To stop and save the recording, hover over the QuickTime window to see the controls. Click the stop button when you’re done. You can then save the recording as a .mov file.
- You can export the video and share it with others. To do that, open QuickTime, go to File, and choose Export or Share. You can export it in different sizes or share it across different platforms.
Related Read: How to Record Internal Audio during Screen Recording on MacOS
How to Record iPhone Screen Using XCode (Without iPhone)
Xcode is Apple’s official software development tool for creating apps for macOS, iOS, iPadOS, watchOS, tvOS, and visionOS. With this Xcode, you can simulate the iPhone on your Mac, record the screen, and start recording the screen with Screen Recording Tools. Here is the video explaining the whole thing in more detail. You can also follow the steps below.

- Install the Xcode Developer Tools from the Mac App Store.
- After installing Xcode, you can launch the simulator on your Mac. Use Spotlight (Command-Space) to find and open the Simulator application.
- In Simulator, go to File -> Open Simulator and select the device you want to simulate. For example, you could choose the iPhone 14 Pro Max or another iPhone of your choice.
- Open Screen Story from either the dock or the menu bar. Once the program is running, select the simulator window.
- To record the screen, you can use Screen Studio. Select the window and start recording.
- After recording, you may need to adjust the cropping area and frame to add an iPhone frame to the recording. You can also edit your video to show touch points as cursor types, control the size of the touch bar, and more.
- Finally, click the Export option to export the video.
FAQs about iPhone Screen Recording
1. How to hide sensitive content while screen recording on an iPhone?
Unfortunately, there is no direct way to hide sensitive content during screen capture on an iPhone. However, you can hide the sensitive content while editing the video.
2. How long can I record my screen on my iPhone?
You can record your screen on your iPhone as long as you have enough storage space. When your storage is full, the recording will stop. Some third-party apps have a limited time for recording videos. You can purchase a premium upgrade to remove these limitations.
3. Are there any limitations to the built-in screen recording feature?
Yes, the built-in screen recording feature in the app has some limitations. You can only record videos up to 720p resolution, and there is no webcam support. You can work around these limitations by using third-party apps.
4. How can I improve the quality of my recordings?
To improve the quality of your recordings, you can use external tools to improve video quality or install third-party apps for screen recording and upgrade to the premium version. With the third-party apps, you can record up to 2k resolution in the premium subscriptions. This is the most effective way to improve the quality. However, you can also use QuickTime to record the iPhone screen. It provides better video quality than the iPhone’s built-in screen recording option.
