Quick Answer
To run Android apps on a Mac, use emulators like Android Studio or Genymotion. Install Android Studio from Google’s website, set up a virtual device, and run apps via the Google Play Store. Alternatively, Genymotion, a cloud-based emulator, lets you run Android apps without Apple’s emulator restrictions.
Android apps on Mac – you might have been bamboozled after reading this, but it is indeed possible. Sure, yes, we are referring to two entirely different operating systems here, but our claim holds true. A similar ancestral background allows macOS to run Android apps, although not natively.

Despite some limitations, it’s really not difficult to run Android apps on the Mac. Possible uses include Android development, testing Android apps, running casual games, or just having fun. No matter what you choose, this guide will show you the easiest way to run Android apps on your Mac. Read on to find out more.
Table of Contents
What, How, and Some Background on the Topic
To put it away, no, you can’t install Android apps directly on your Mac. When we talk about running Android apps on Mac, we refer to their virtualized versions. Apple would never allow installing apps from other operating systems natively. So, how? Well, our answer lies in emulators and Android Studio.
If you are unaware, MacOS is based on the UNIX operating system, which also forms the basis of Linux. And since Android is based on the Linux operating system, we can get Android apps working on macOS with some fiddling. The newer Apple silicon SoCs, built on the same ARM-based architecture as mobile SoCs, further solidify our chances.
This is made possible using Android Studio for Mac, an official offering from Google, and third-party cloud-based emulation software like Genymotion. You might face several issues related to app compatibility, unsupported versions, and whatnot, but all in all, you can accomplish what you are here for.
If you are wondering about Bluestacks – the most popular Android emulator out there, you are in for some sad news. Apple doesn’t like you running emulators on their pristine machines, so with the release of Macs rocking their in-house M-series SoCs, they removed emulator compatibility altogether. And because there have been no updates in this regard from Bluestacks ever since, we can assume it won’t see the light of day, ever.
Run Android Apps on Mac Using Android Studio
Google refers to Android Studio as an Integrated Development Environment (IDE) that focuses on Android development and app testing on different operating systems. Backed by Google themselves, it is especially intriguing for Android app developers. The best part is that Android Studio is available on multiple platforms, including Mac, allowing you to run full-fledged Android apps on Mac.
However, you must keep your expectations accordingly and maybe even tone them down, as you can’t play full-blown games using Android Studio. Since Android Studio relies on the primitive OpenGL 3.0 graphics API, it can only run casual games at best. To run games properly on Mac (sort of), you must head the cloud gaming route. PlayCover is another app that enables this functionality.
That said, here is how you can get it working on your Mac:
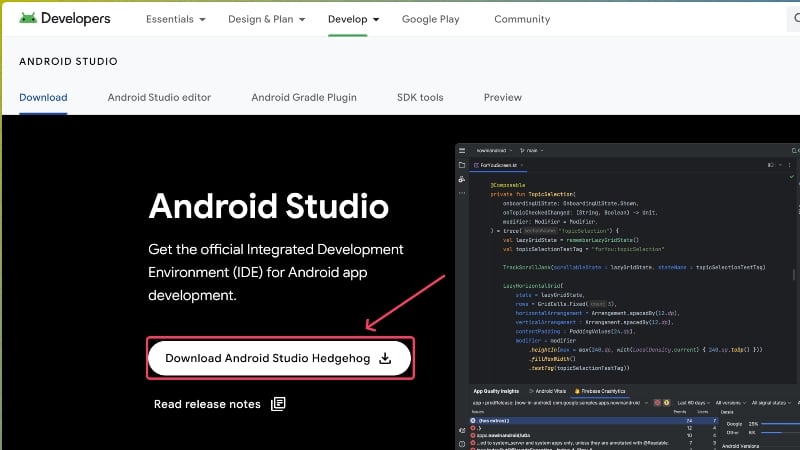
- Visit the Android developers website to download the latest version of Android Studio for Mac.
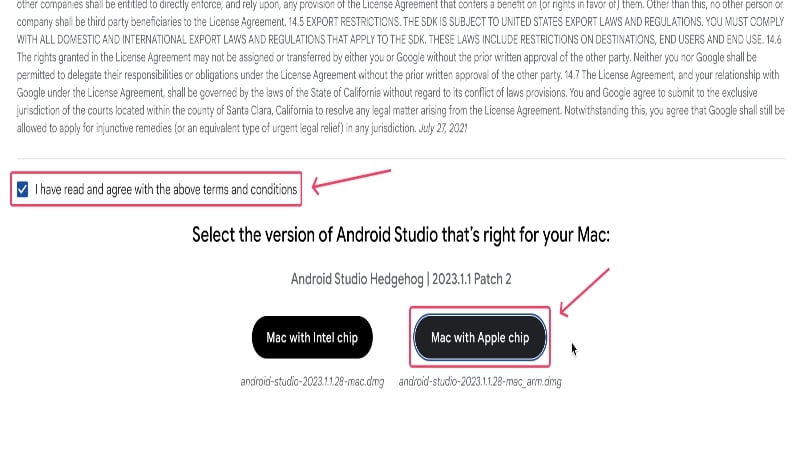
- Scroll down and agree to the terms of usage before installing the file. Here, you will be asked to choose the type of Mac for which you will install the tool. If your Mac uses one of Apple’s custom M-series (M1, M2, or M3) processors, select Mac with Apple chip. If not, choose Mac with Intel chip.
- Once the file has been downloaded, locate its folder and begin the installation by double-clicking the .dmg file.

- Drag the Android Studio app icon into the Applications folder in the Finder window that appears. This moves the application into the applications folder of your Mac to install the app.

- Open Launchpad and look for Android Studio. Click the icon to launch the app.

- Click on Open in the warning box that appears.

- Select the Do not import settings option since we are performing a fresh start. Proceed by clicking on OK.

- You can optionally choose to improve Android Studio by sending usage statistics and crash reports to Google, but we suggest opting out by selecting Don’t Send.

- Click on Next to proceed.

- Select the Standard installation type to get Google’s recommended presets. Then, click on Next.

- Proceed by clicking Next.

- Accept the license agreement and click on Finish. You may need to scroll and switch to the last section from the left pane to be able to click on Finish.

- Wait for the installation to conclude and click on Finish. The setup is now complete.

- On the home page, click on More Actions and select Virtual Device Manager from the dropdown menu.

- Select the plus (+) icon on the top-left corner to create a new virtual device. If you see the option to Create Virtual Device directly, click it.

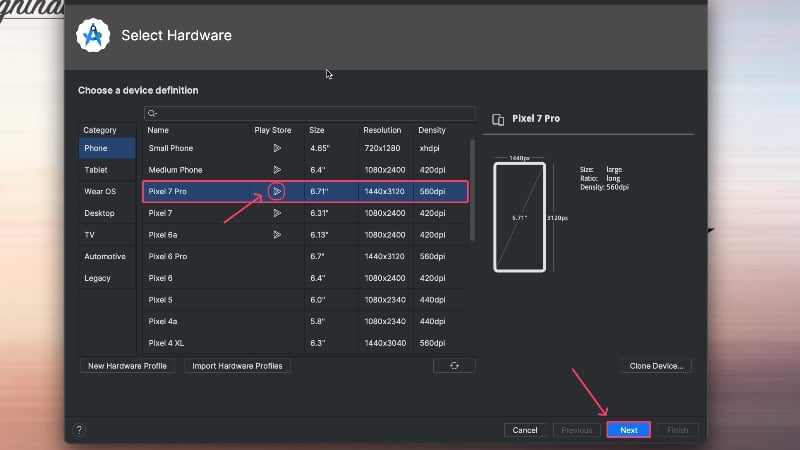
- Now comes the critical part. Since Android apps are better optimized for phones than tablets, ensure that Phone is selected under Category, not anything else.

- At the time of writing this article, the latest supported Pixel device in Android Studio is the Pixel 7 Pro, alongside a handful of other Pixel devices. No matter what device you choose, ensure that the Google Play Store icon is displayed beside it. This enables you to install apps from the Google Play Store directly; otherwise, you would have to sideload the Google Play Store separately and install apps from there. Click on Next.
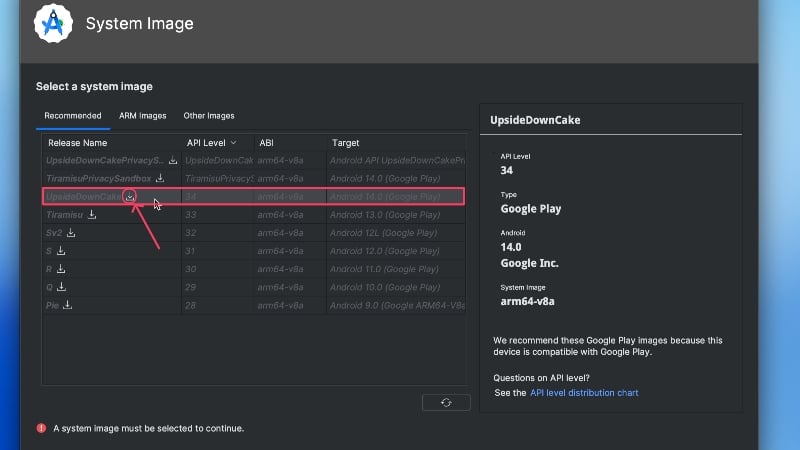
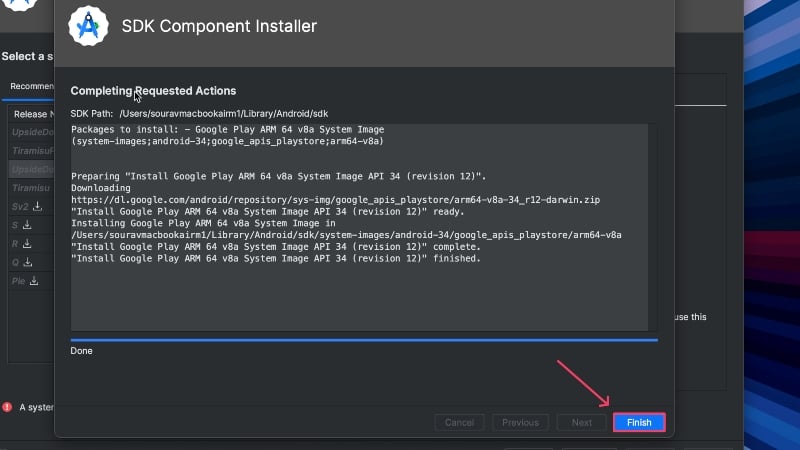
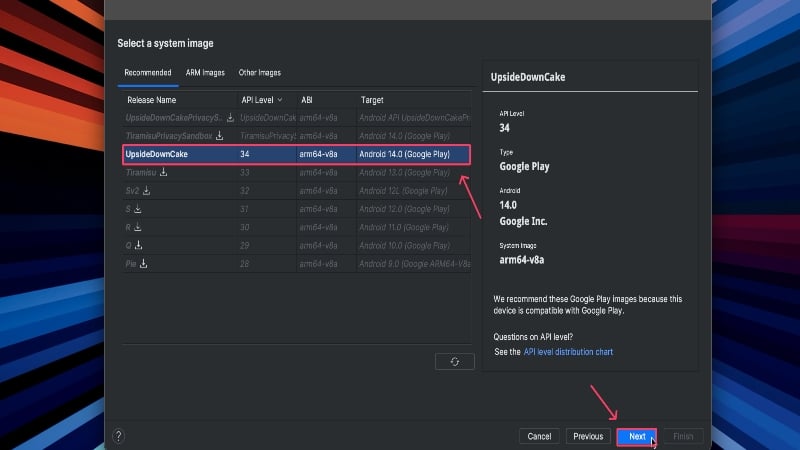
- Choose an Android version, preferably not the latest one, as it might not be entirely stable and bug-free. Click on the download button to load the selected Android version onto your device. In our case, we have chosen UpsideDownCake (Android 14), which has an API level of 34.
- Wait for a while and click on Finish when it’s done.
- Select the Android version you just installed and click on Next.
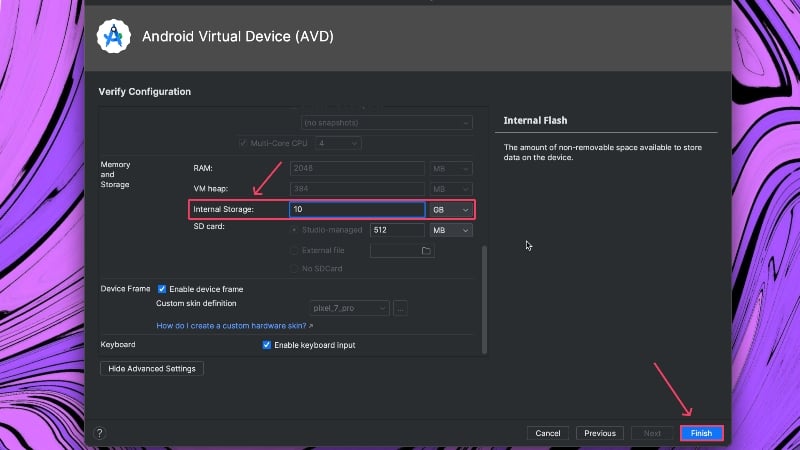
- Give your device a new name and ensure the orientation is set to Portrait. Then, click on Show Advanced Settings.

- Here, scroll down and increase the Internal Storage of your device. This is crucial if you want to install several apps on your Android device. Click on Finish.
- The device should now be created, and you can launch it by clicking on the Play icon beside it.
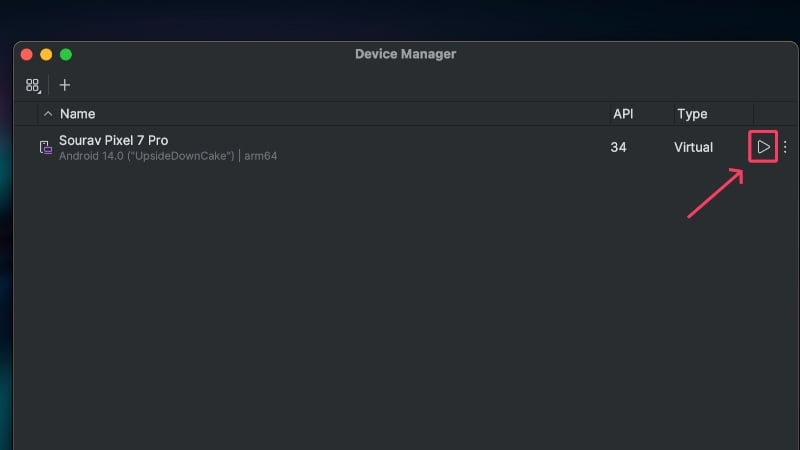
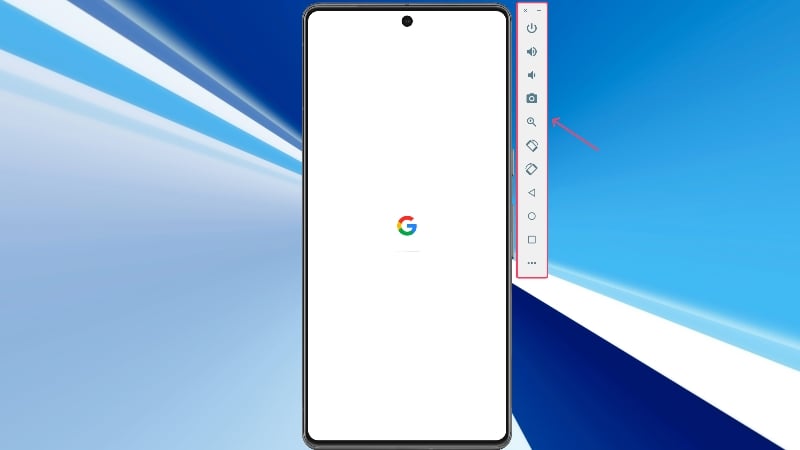
- A device frame should appear and be booting. All the essential functions required to use the virtual device will be on the right edge.
- To install apps, open Play Store.

- Sign into your Google account and continue using the Google Play Store to install and run Android apps.

Run Android Apps on Mac Using Genymotion
Genymotion is a cloud-based Android emulator that lets you run Android apps on a Mac. Being cloud-based allows it to bypass Apple restrictions, thus making it one of the few emulators that can run Android apps on Mac. Genymotion isn’t free, but you don’t need to pay anything if using the software for personal use, which comes with a limited set of features.
- Visit Genymotion’s official website here and download the app for macOS (x86_64, Sillicon).

- Locate the downloaded file and double-click to launch it. Drag the Genymotion Shell.app and Genymotion.app icons into your Mac’s Applications folder within the Finder window. The apps should now be installed on your Mac.

- Open Launchpad and select Genymotion to launch it.

- Proceed by clicking on Open in the warning box that appears.

- Now, you must sign into your Genymotion account or create a new one if you don’t already have one, and in that case, select Create Account. A browser window will open where you can create a new account by providing necessary information about yourself. Then, sign into your account using the same credentials.

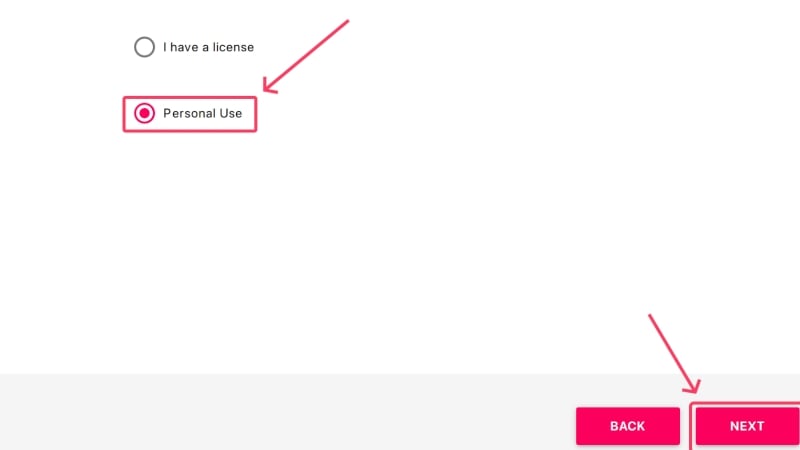
- Select Personal Use, as it’s free to use and doesn’t require a license, either. Click on Next.
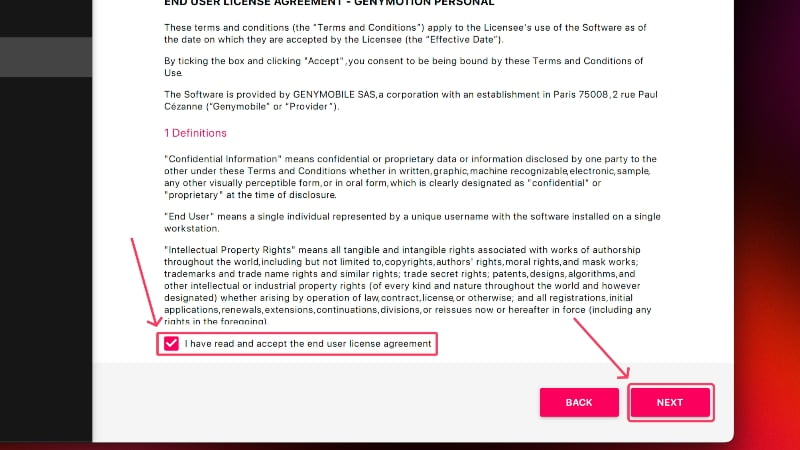
- Agree to the end user license agreement by selecting the checkbox and then clicking Next. This concludes the setup procedure of the application.
- Click the red plus (+) at the top to create a new machine.

- Select your device from the list. In our case, we have chosen the Samsung Galaxy Note 10+. Proceed by clicking Next.

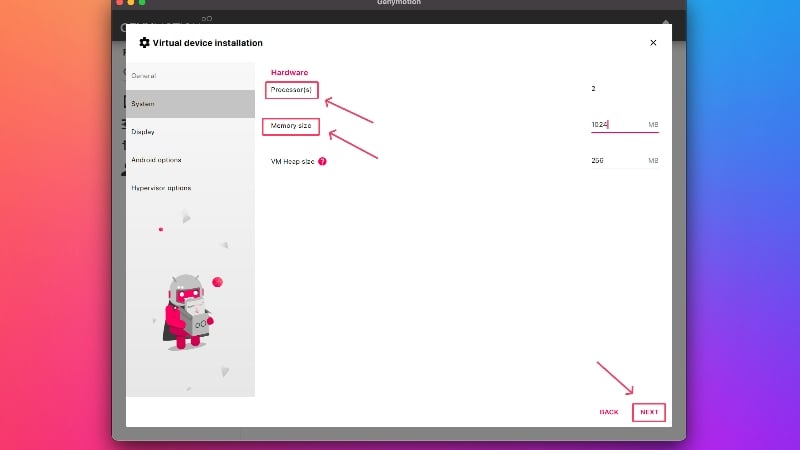
- Under System, allocate the appropriate capacities of RAM and processors. We recommend devoting them at least 2 CPU cores and 2GB (2,048 MB) of internal storage. Select Yes.
- Rename your device if needed and go past the other settings pages by clicking Next. At the end, click on Install.

- Wait for the download to complete and click on the play icon that appears after to launch the virtual machine.

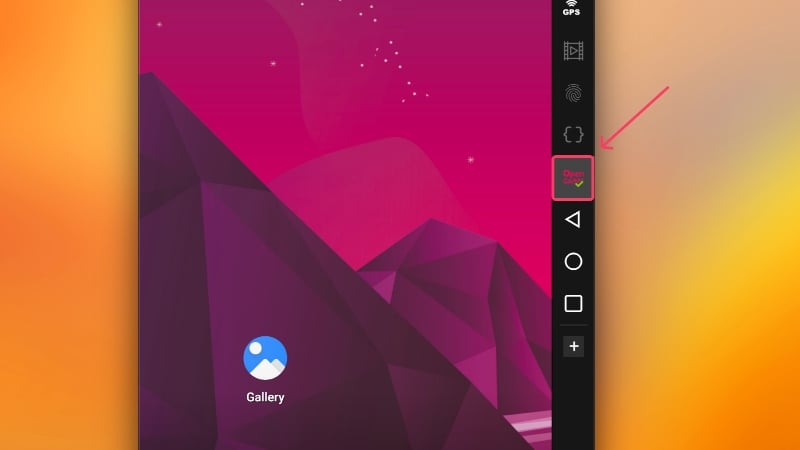
- The device will launch in a few seconds, but to your surprise, you won’t find Google Play Store. To enable that, select Open GAPPS from the right toolbar.
- Accept the terms of usage and proceed. Google Play Store will be installed soon, and you’ll need to restart the virtual device before using it again.

- Sign into your Google account in the Google Play Store and proceed accordingly. After this, you can install and run apps like on an Android device.

Android Apps on Mac – Made Possible!
After the initial installation procedure, which is mildly time-consuming, you will be ready to run Android apps on Mac. While emulators never provided a pleasing experience, Google’s Android Studio software is here to change that. On the other hand, creative cloud-based Android emulators for Macs, like Genymotion, provide more options to the end user, which is always welcoming.
FAQs about Running Android Apps on Mac
1. Why can’t newer Macs run emulators?
Ever since the announcement of Apple silicon chipsets, Apple dropped support for third-party emulators to run on Mac. Even until now, popular emulators like BlueStacks haven’t been able to make themselves compatible with Apple silicon, so it’s unlikely to arrive in the future. The only feasible way to run Android apps on Mac is by using Google Android Studio or cloud-based simulators like Genymotion. Speaking of gaming, you will have to rely on cloud gaming solutions or third-party apps like PlayCover.
2. Can I run games on Google Android Studio?
You could game on Mac using Google Android Studio, but don’t expect it to run full-fledged battle royale games or games of similar caliber. Nonetheless, Android Studio can run casual games reasonably well, so you are covered in that regard. As mentioned, gamers looking to game on Mac should turn their heads to cloud-based gaming solutions or dedicated apps like PlayCover.
3. Can Google Android Studio run full-blown Android apps?
As a tool geared towards Android developers and app testers, Android Studio offers devices that mimic the actual ones to ensure accurate testing conditions. This results in virtual machines that are very close to the real deal. But since it’s running on an entirely different operating system at the end of the day, you cannot expect it to perform ideally in extreme scenarios, such as gaming. However, Android Studio is perfectly ideal for its target audience.
Plus, you are very likely to witness performance limitations, too, which can hamper the experience. This is why testing out on older software versions instead of new ones is always recommended, as they are generally a lot more stable. Additionally, since no Mac comes with a touch input screen, you can never replicate using an actual smartphone. This is particularly challenging in the case of gaming, where you will be forced to remap your existing keyboard keys.
4. How can I install and run apps after installing the virtual device?
It’s pretty straightforward afterward. For Android Studio, open the Google Play Store and sign into your Google account. Since you’re logging into a device unknown to Google, you must go through the two-factor authentication process. Once logged in, search for the apps in the Google Play Store, install them, and start using them as you would. The procedure remains the same for the virtual device created using Genymotion, except you will be required to onboard the Google Play Store separately first, which is mentioned duly in the guide above.
