Quick Answer
Run macOS on Windows using a virtual machine like VirtualBox or VMware. Enable virtualization, disable Hyper-V, allocate sufficient RAM and storage, load a macOS ISO, and follow setup steps to install and configure the OS inside the VM.
Running macOS on Windows is very much possible. PC aficionados may have already guessed it, but if you’re still wondering, we’re talking about running macOS on Windows using virtual machines. As the name suggests, virtual machines are software that allows running different OSes on the host machine. It’s as simple as it sounds, with no complications whatsoever.

There are different types of virtual machines, but for the use of macOS on Windows, we will limit ourselves in this guide to VirtualBox and VMware Workstation Player, as they are the best known in this regard. As the process is lengthy and there are many details to consider, you should follow the steps and pay close attention.
Table of Contents
What is a Virtual Machine?
Virtual machines are computing software that lets you run applications, programs, and even entirely different OSes on the host PC. That’s correct; you don’t require any proprietary hardware to pull this off, and it all seamlessly happens on the host PC. Virtual machines differ from cloud computing, as the latter relies on physical machines on the server end to run, whereas the former is purely based on the local setup.
You might not realize its importance suddenly, but it’s immensely fruitful for app builders who wish to test their creations on different platforms. Since virtual machines cannot interfere with the host system, they can be used to run apps in a safe environment and even examine virus-infected data. Other than that, running legacy apps that aren’t compatible with the latest software, switching between multiple OSes, and fulfilling server and IT needs are a few other applications of virtual machines.
However, all that glitters isn’t gold, as virtual machines are resource-hoggers. You are very likely to witness system slowdowns and throttling issues, which are caused due to overload on the host system. Virtual machines take up a large chunk of internal storage. All this directly results in reduced battery life. Hence, it is recommended to use virtual machines on PCs that are capable enough to support them.
Pre-Requisites to Running macOS on Windows
1. Ensure Your System Has Enough RAM and Storage Space
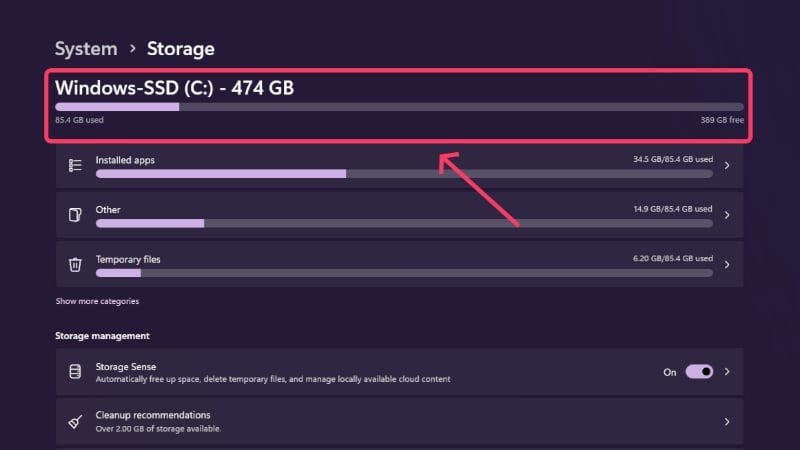
First, you must ensure your system has enough storage capacity to support the virtual machine. With virtual machines, you can allot the required storage space yourself, but for macOS, the recommended free space is easily a few dozen gigabytes. The exact amount varies with macOS versions, but the least you should keep in hand is 50GB. You would also require a considerable amount of RAM, a minimum of 4GB, to be precise. Ultimately, the virtual machine’s performance depends on the allotted RAM and storage capacity.
2. Enable Virtualization on Your PC
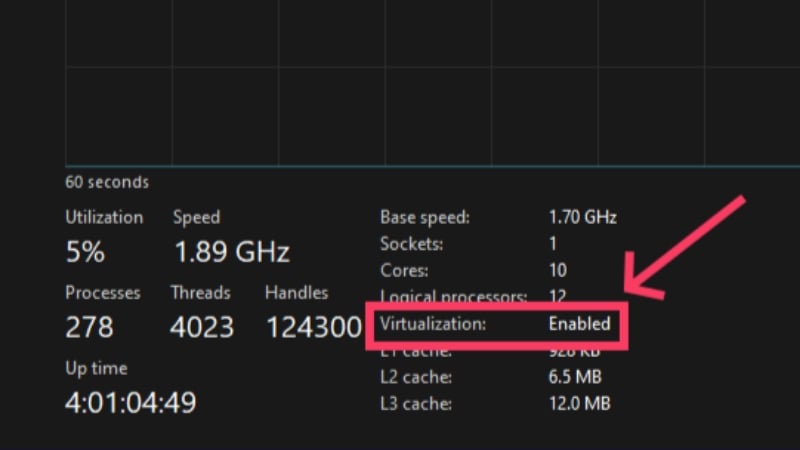
Since virtual machines are meant for advanced users, you must enable virtualization to enjoy running them on your Windows PC. However, it’s not something you can enable in your PC’s settings; it has to be done via the device’s BIOS settings. You can quickly check if it’s enabled by opening Task Manager using the shortcut Alt + Ctrl + Del and switching to the Performance section from the sidebar. Here, you can confirm if virtualization is enabled or not.
If it says disabled, follow the steps below to turn on virtualization:
- Open your PC’s Settings.
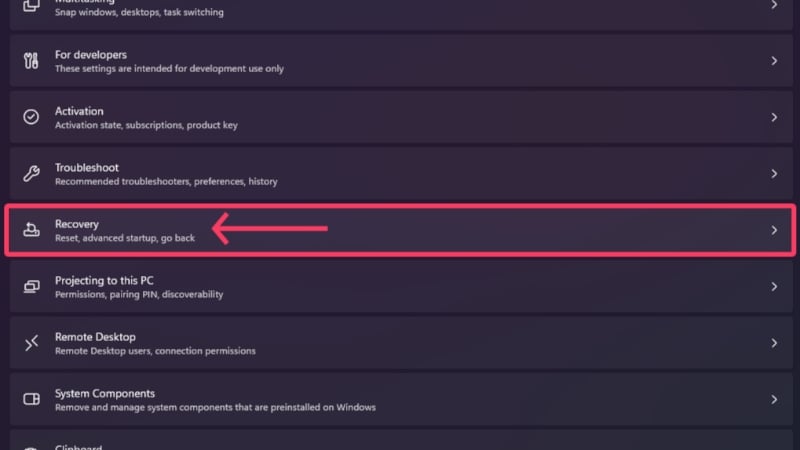
- Head to System from the left pane, scroll down and select Recovery.
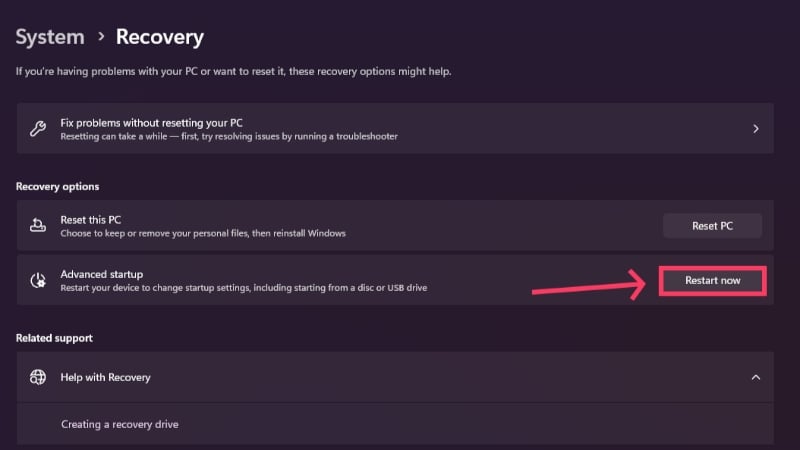
- Click on Restart now beside Advanced startup. This will boot your PC in Recovery Environment.
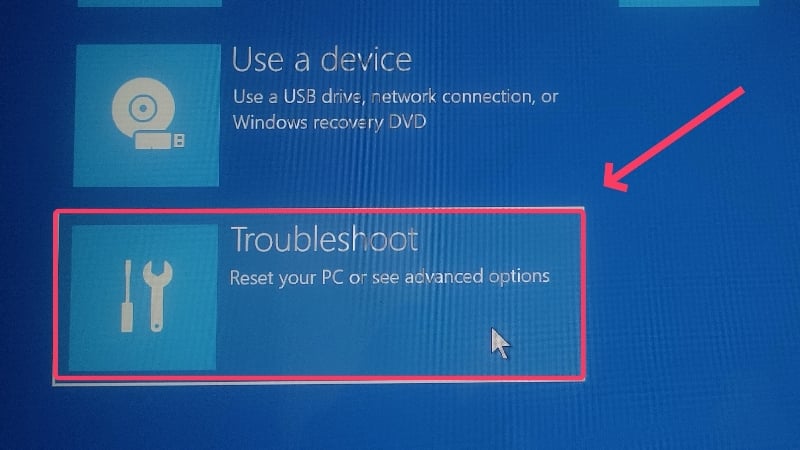
- Select the Troubleshoot option to fiddle with your PC’s advanced settings.
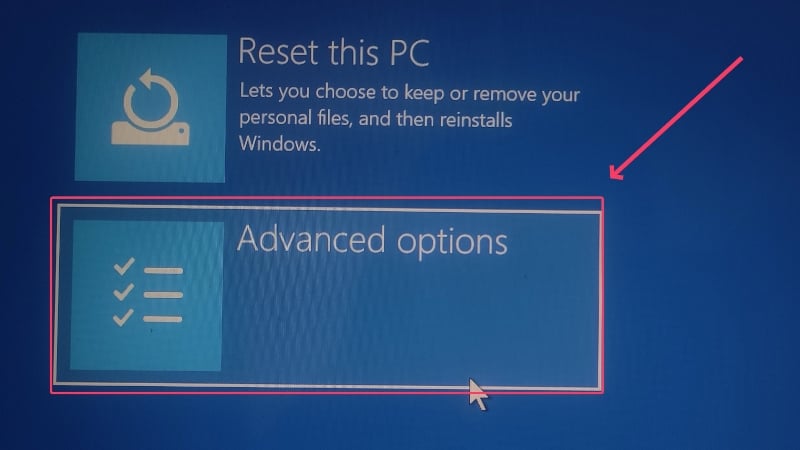
- Enter Advanced options.
- Click on UEFI Firmware Settings.
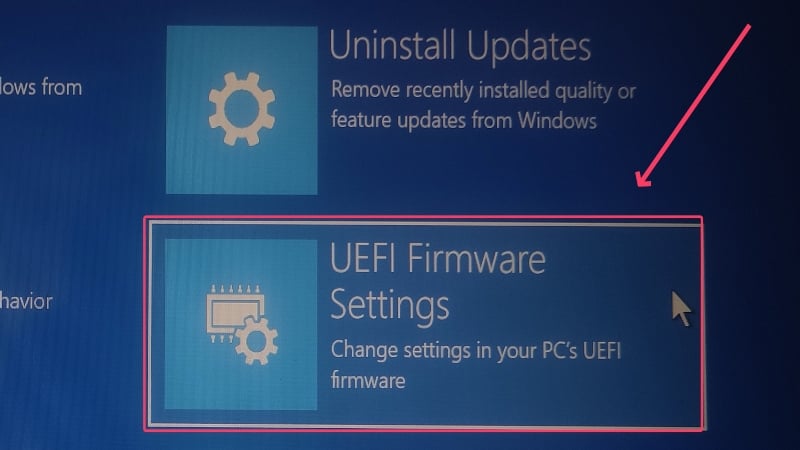
- Select Restart to boot your PC into the UEFI BIOS mode of Windows 11.

- Switch to the Configurations tab from the left pane.
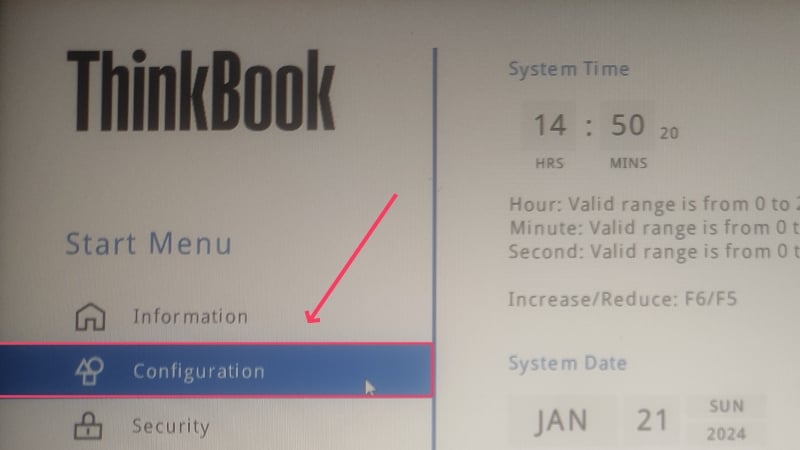
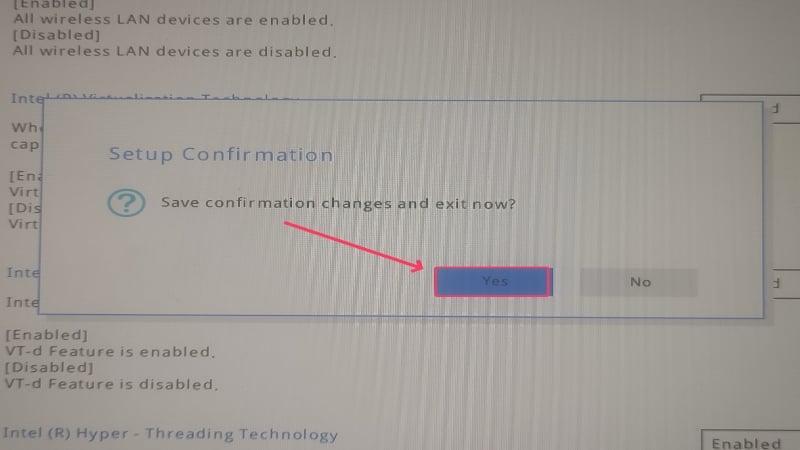
- Ensure Intel (R) Virtualization Technology is enabled. If not, enable it from the dropdown menu and save your changes by pressing the F10 key.

- Confirm your changes by selecting Yes. This will exit you from your device’s BIOS.
This method remains unchanged for Windows 10 users; however, if you’re using an older version, you may need to use the power keys to enter your device’s BIOS. Unfortunately, the key combinations vary from manufacturer to manufacturer and are by no means standardized, so you’ll need to look up your device’s BIOS key online. It’s usually a combination of the function keys and Fn, Ctrl, or Alt. Shut down your PC and turn it on by pressing the required powered keys repeatedly.
3. Disable Hyper-V on Your PC
Since Windows natively supports running virtual machines, every machine ships with a proprietary virtualization software called Hyper-V. To prevent interfering with the security protocols of Windows’ native virtualization software, you must disable it to ensure a smooth installation. Follow the steps below to do so.
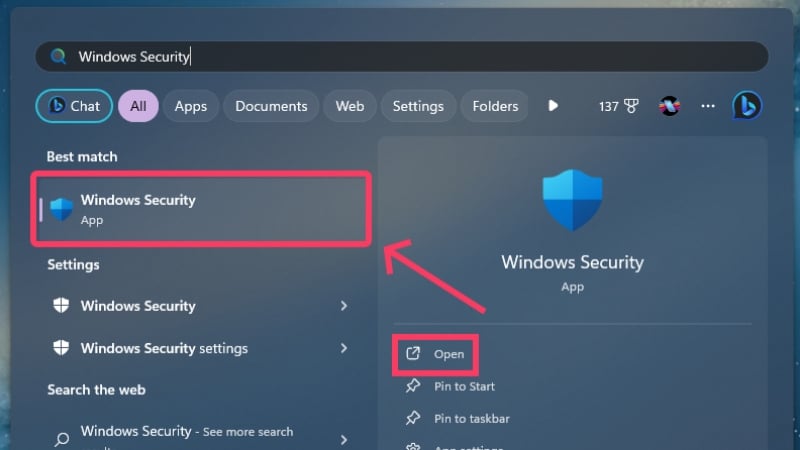
- Press the Windows key and search for Windows Security. Open it.
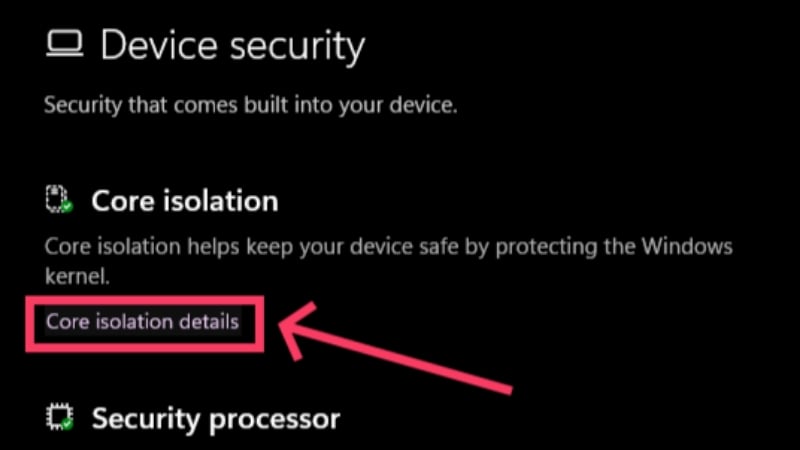
- Enter Device security.

- Select Core isolation details.
- Disable Memory integrity. This prevents Hyper-V from interfering with third-party virtualization software.
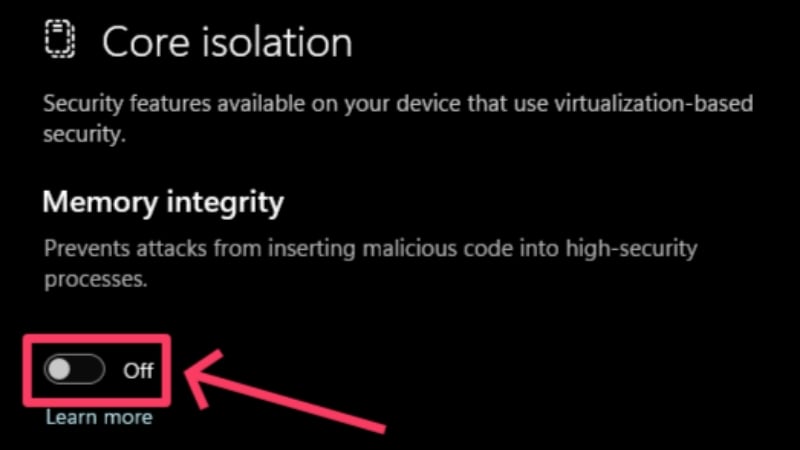
- Confirm your action by clicking Yes in the warning that appears. A notification will prompt you to restart your PC to confirm the changes. If not, perform a manual restart.
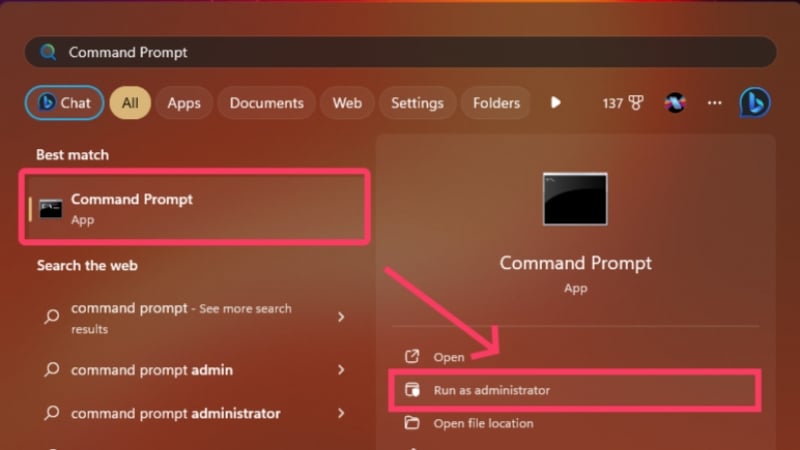
- Press the Windows key and search for Command Prompt. Click on Run as administrator.
- Run the following command: bcdedit /set hypervisorlaunchtype off.
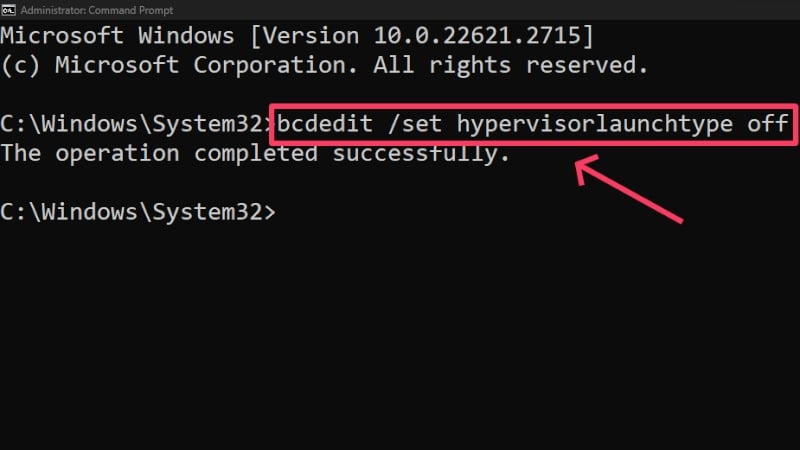
- Exit the Terminal window and restart your PC to apply the changes.
If you ever need to enable Hyper-V again, run the following command in Command Prompt: bcdedit /set hypervisorlaunchtype auto. An alternative way of disabling Hyper-V is as follows:
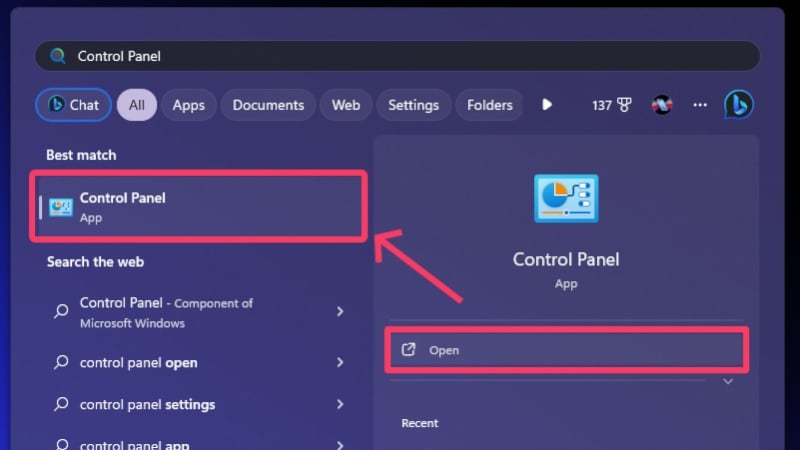
- Press the Windows key and search for Control Panel. Open it.
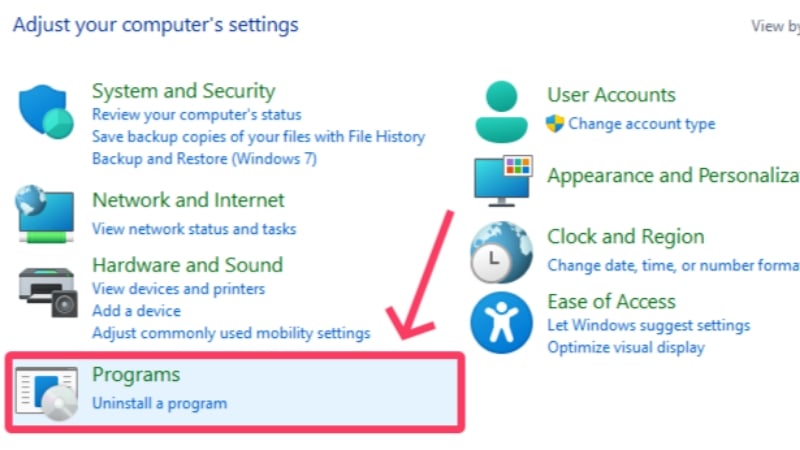
- Enter Programs.
- Select Programs and Features.
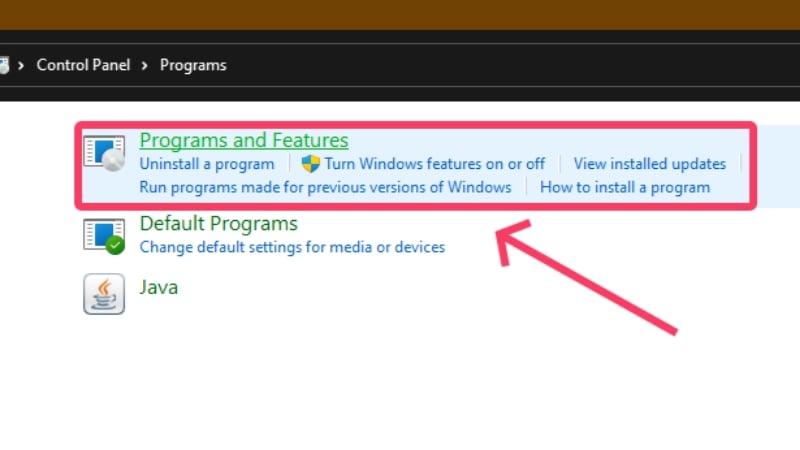
- Click on Turn Windows features on or off from the left pane.
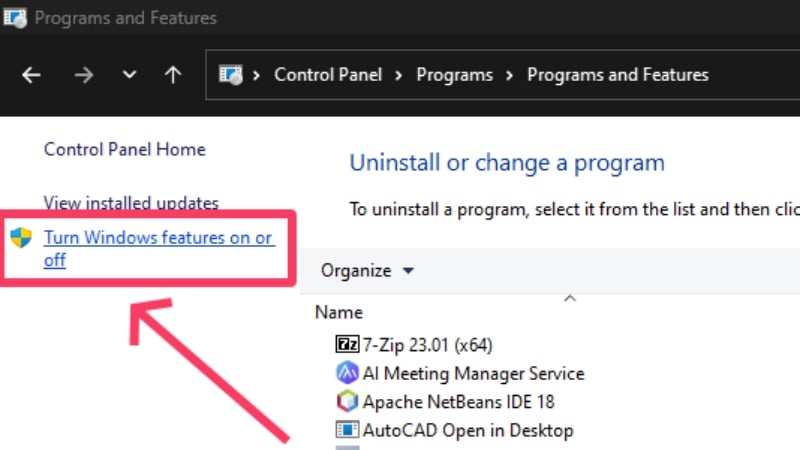
- Scroll down and disable the following features: Hyper V, Virtual Machine Platform, and Windows Hypervisor Platform.

- Click on OK and restart your PC to apply the changes.
With this, you have fulfilled all the formalities and are all set to run macOS on Windows. We’ll proceed with VirtualBox first, followed by VMware Workstation Player.
Run macOS on Windows Using VirtualBox
This method lays down the procedure to install macOS on Windows using VirtualBox virtualization software. Since we are talking about installing an entire OS, be prepared to handle large installation files, which can break your internet bandwidth, patience, or both. Nonetheless, here’s how the process goes.
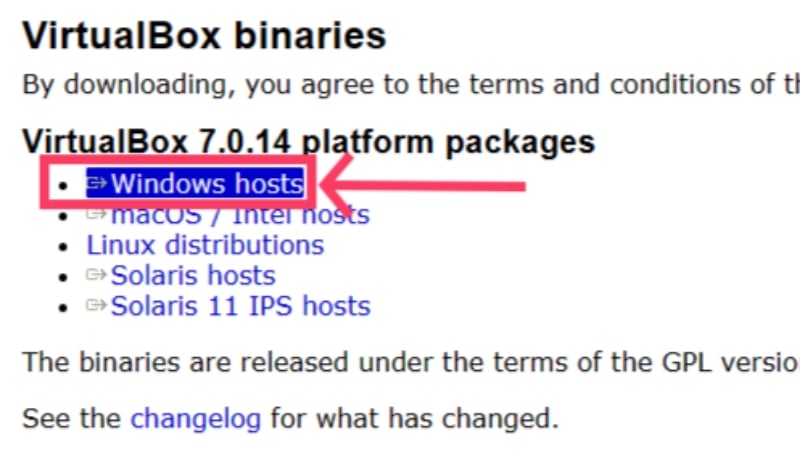
- Head to the downloads page of Oracle VirtualBox and install the latest version of Windows host on your PC.
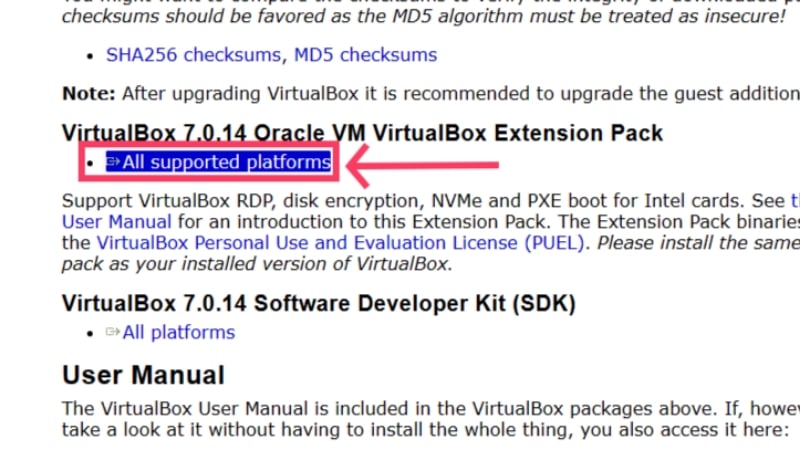
- Scroll down on the same page and download the VirtualBox Extension Pack. It is essential to grant crucial features over and above the stock version of VirtualBox, including necessities like connecting physical USB devices, host webcam passthrough, and more.
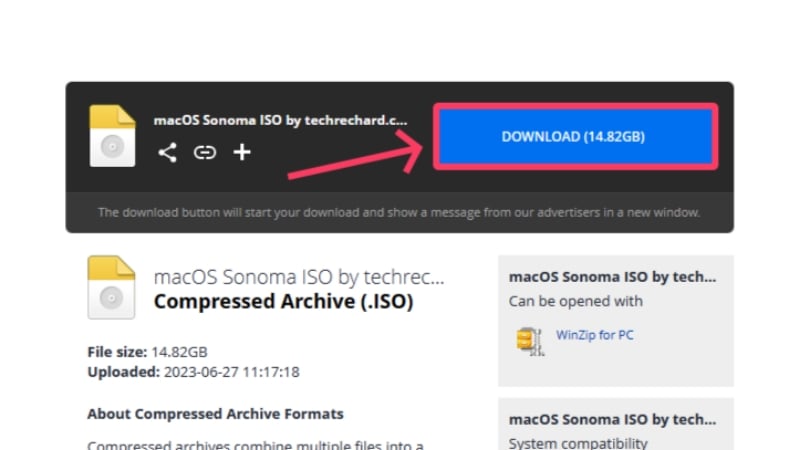
- Now, you must download the ISO file of macOS Sonoma, which, at the time of writing this guide, is the latest version of macOS available publicly. You can download it from here. Fair warning: the installation file is almost fifteen gigabytes, so ensure you are enjoying stable internet connectivity.
- Head to the downloads folder where the files exist and double-click the VirtualBox application icon to install it. Agree to the terms and conditions to confirm the installation.

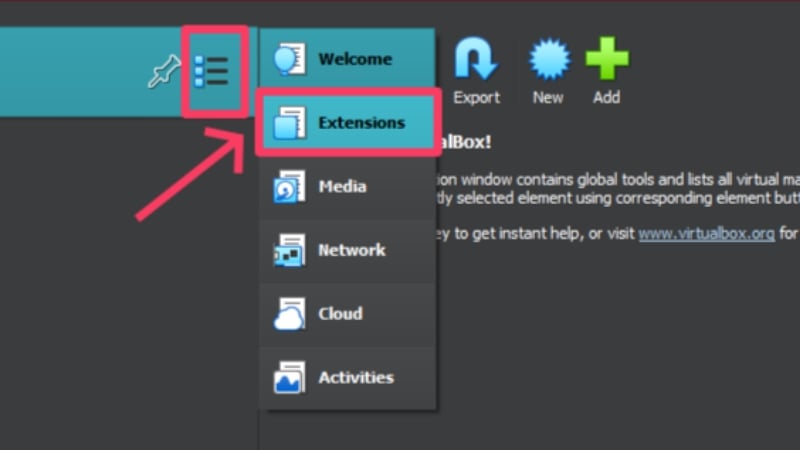
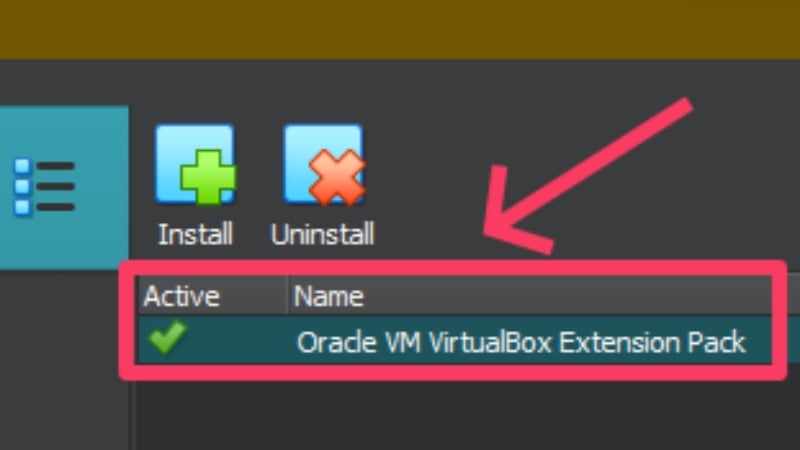
- After VirtualBox is installed, it’s time to load the extension pack now. Select the hamburger menu icon (☰) from the left pane and click on Extensions.
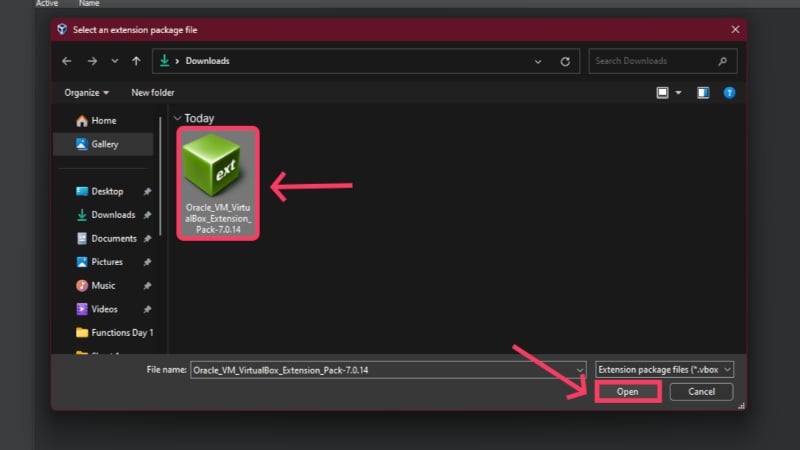
- Click on Install and choose the Oracle VM VirtualBox Extension Pack. Select Open.
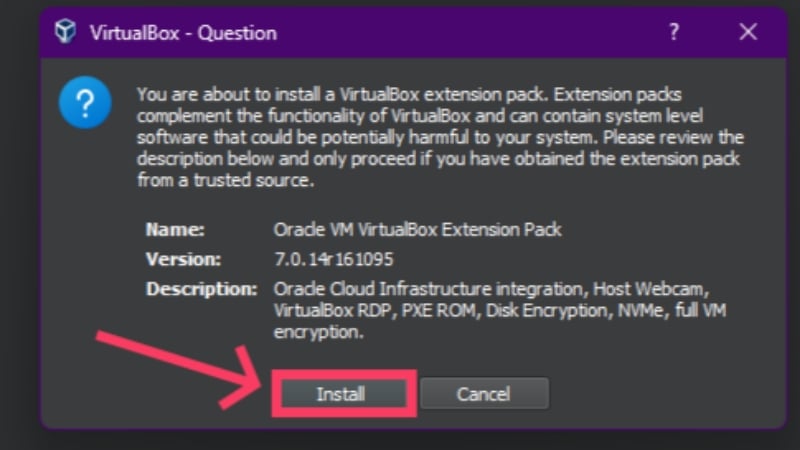
- Select Install to initiate the process.
- The extension pack should now show up under tools alongside a green checkmark that depicts its active and running.
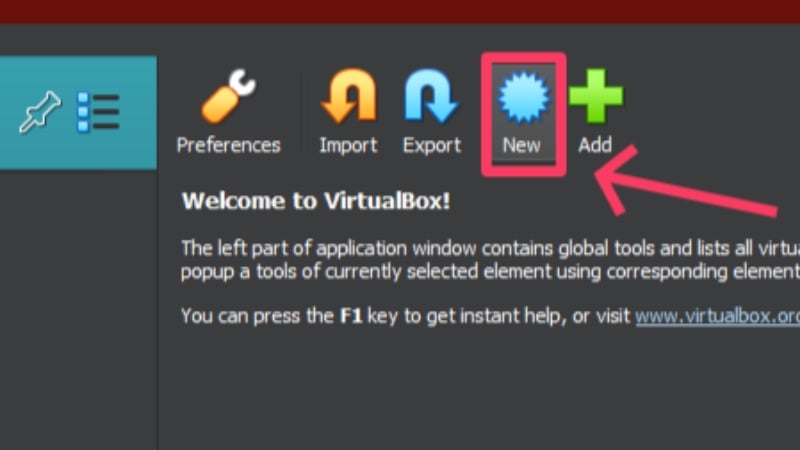
- Navigate back to the welcome page of VirtualBox and click on New from the top toolbar. This will let you create a new virtual machine.
- Give your virtual machine an uncomplicated and easy-to-remember name, as you’ll need to manually enter the name of your virtual machine multiple times in the subsequent steps. Set the type to Mac OS X and the version to Mac OS X (64-bit). Hit Next.

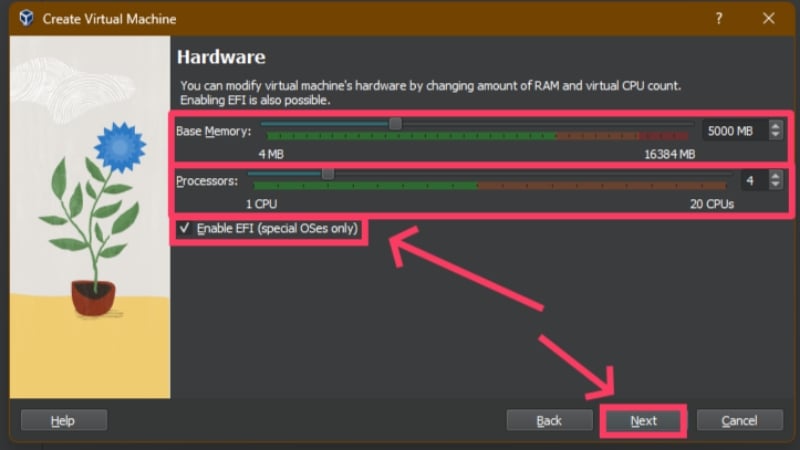
- In this step, you must allocate the virtual machine a part of the host system’s hardware in the form of RAM, CPU cores, and hard disk space. Since the host system must also function appropriately, we recommend dedicating at most 40-50% of your system’s onboard RAM. Since most CPUs are based on an eight-core architecture or more, give the virtual machine at least 3 CPU cores to work with. The upper limit of these numbers depends on the host PC’s specifications, as you obviously cannot devote more RAM or CPU cores than you already have. Don’t forget to select the checkbox beside the Enable EFI (special OSes only) option.
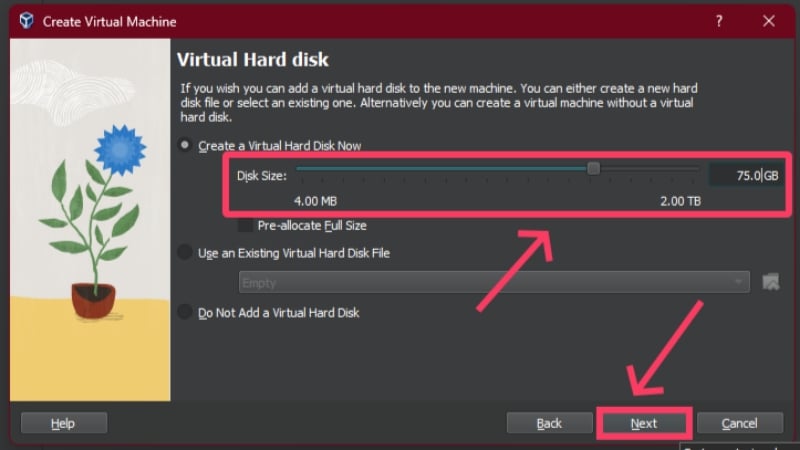
- Allocate the virtual machine at least 60GB of internal storage, as that’s the least macOS Sonoma requires. Select Next and then Finish.
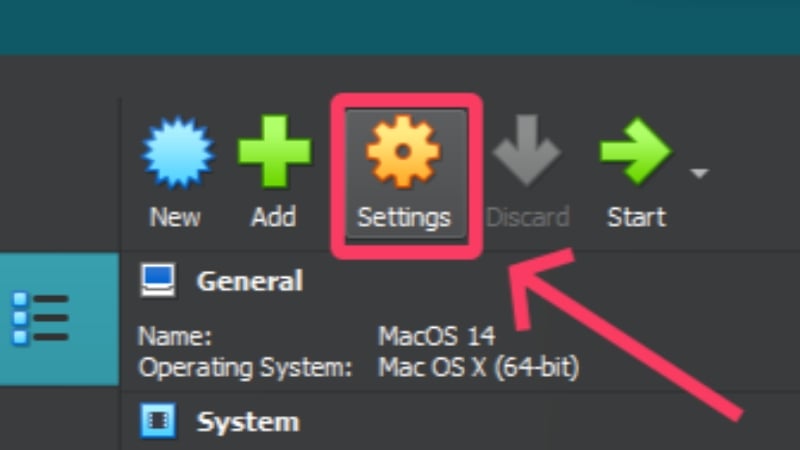
- You can edit the allocations and alter other attributes by clicking the Settings icon in the toolbar. This is where we’ll tweak a few more things.
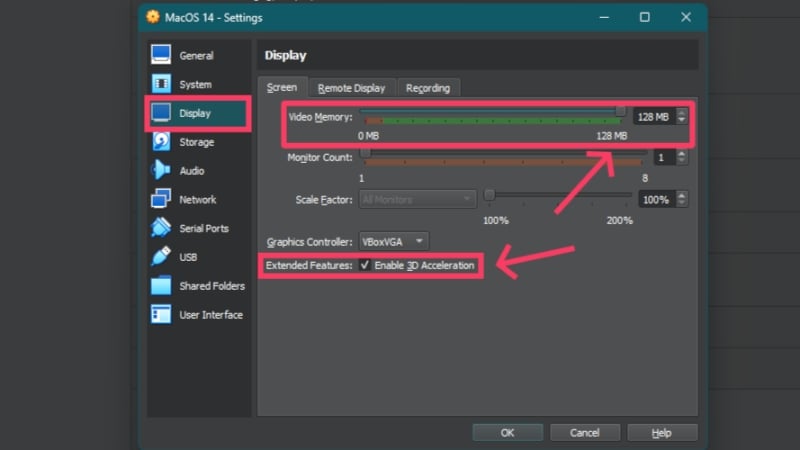
- Select Display from the left pane and drag the Video Memory slider till the end, which allocates 128MB of video memory to the virtual machine. On the same page, turn on 3D Acceleration.
- Switch to the USB tab and ensure USB 3.0 (xHCI) Controller is selected.

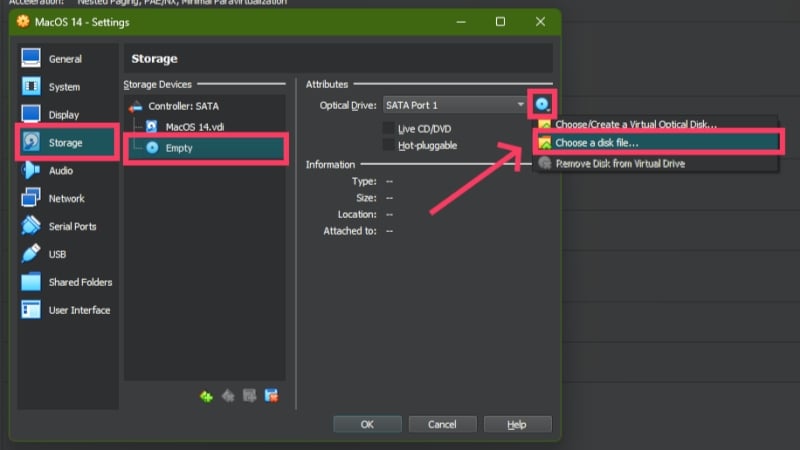
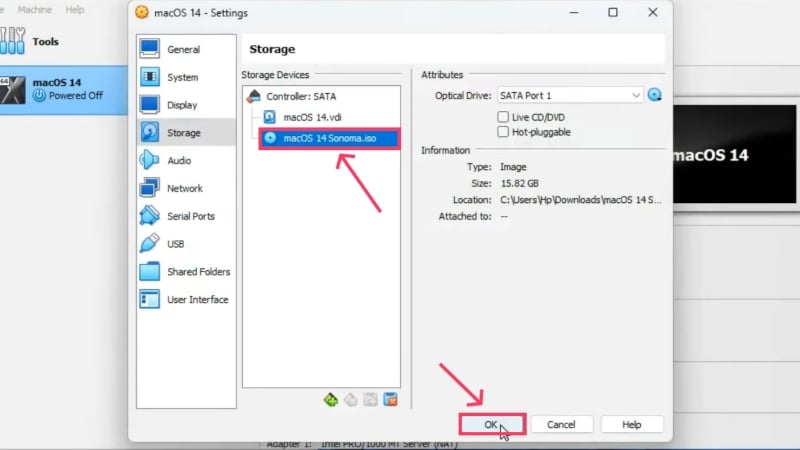
- Now, it’s time to load the macOS Sonoma ISO file. Head to the Storage tab and click the disk icon that states Empty. Click on the disk icon on the right and select Choose a disk file.
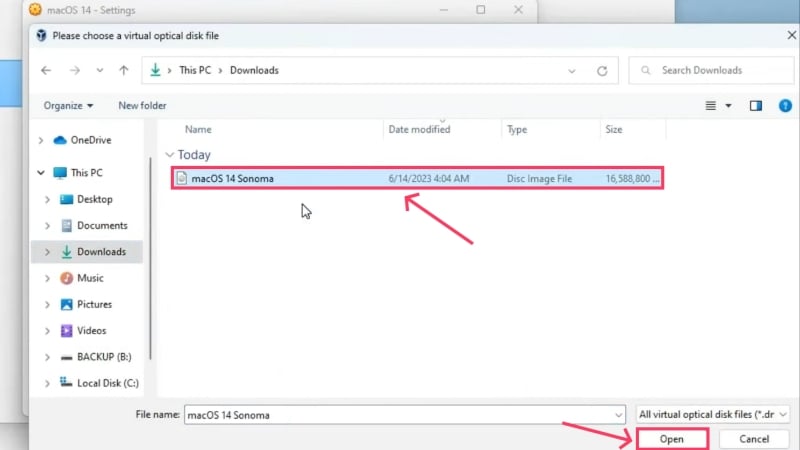
- Locate the downloaded macOS Sonoma ISO file within the file explorer window and click OK.
Credits: Everything Tech on YouTube - Select OK on the settings wizard to confirm the changes made.
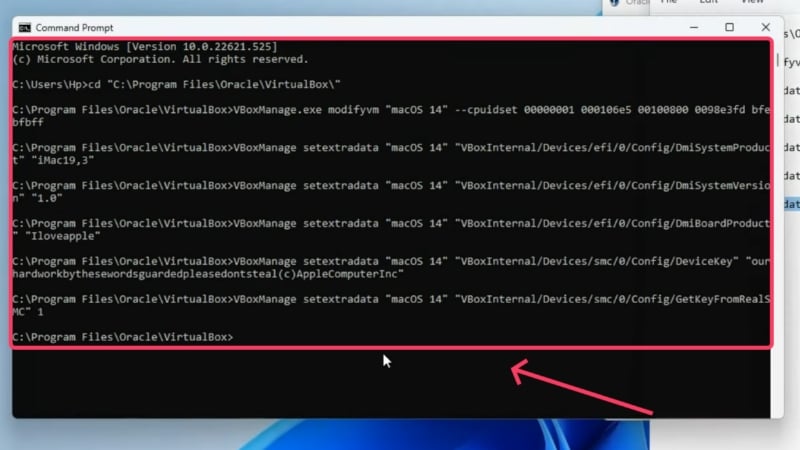
Credits: Everything Tech on YouTube - Press the Windows key and search for Command Prompt. Select Run as administrator to open it with administrative rights.
- Copy and run the following commands individually by replacing “name of virtual machine” with your virtual machine’s name in each command line. Enter the commands as they are so you do not face any errors. Close the command prompt window once the commands have been executed without witnessing any errors.cd “C:\Program Files\Oracle\VirtualBox\”VBoxManage.exe modifyvm “name of virtual machine” –cpuidset 00000001 000106e5 00100800 0098e3fd bfebfbffVBoxManage setextradata “name of virtual machine” “VBoxInternal/Devices/efi/0/Config/DmiSystemProduct” “iMac19,3”VBoxManage setextradata “name of virtual machine” “VBoxInternal/Devices/efi/0/Config/DmiSystemVersion” “1.0”VBoxManage setextradata “name of virtual machine” “VBoxInternal/Devices/efi/0/Config/DmiBoardProduct” “Iloveapple”VBoxManage setextradata “name of virtual machine” “VBoxInternal/Devices/smc/0/Config/DeviceKey” “ourhardworkbythesewordsguardedpleasedontsteal(c)AppleComputerInc”
VBoxManage setextradata “name of virtual machine” “VBoxInternal/Devices/smc/0/Config/GetKeyFromRealSMC” 1
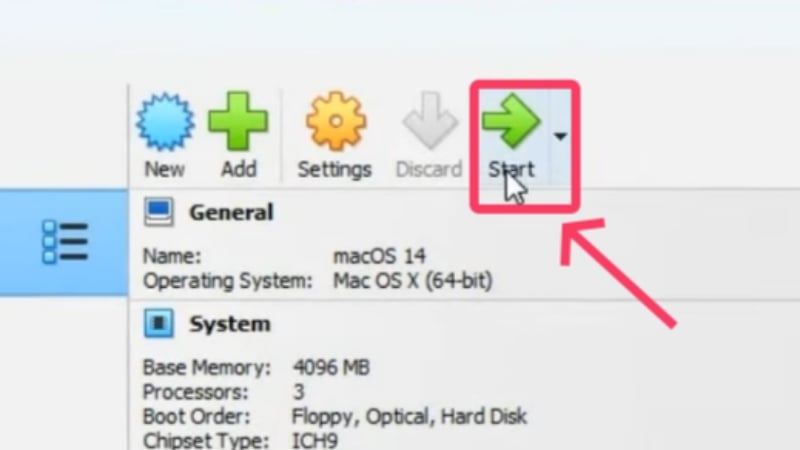
Credits: Everything Tech on YouTube - Select Start to initialize the installation process.
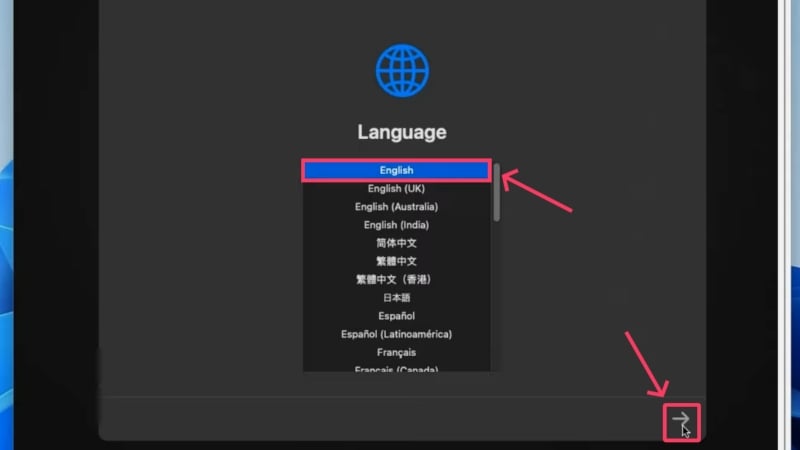
Credits: Everything Tech on YouTube - Wait until you arrive at the language selection page, where you can choose your preferred language. In our case, it’s English. Click the arrow icon at the bottom-right corner once you are done.
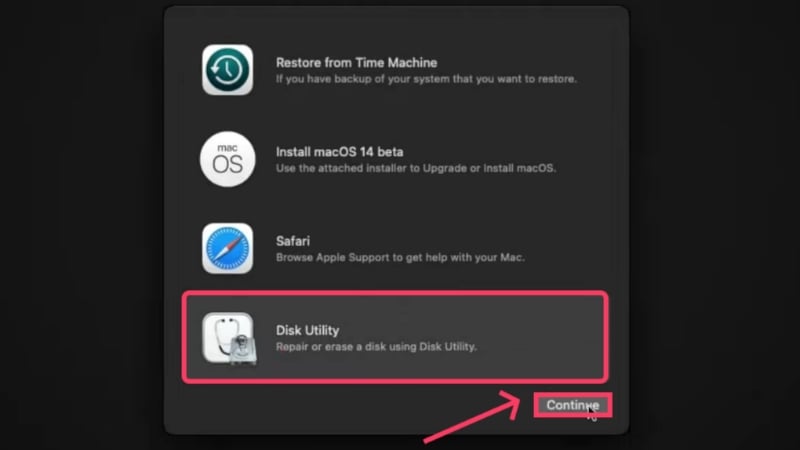
Credits: Everything Tech on YouTube - Installing a fresh macOS requires formatting of the allotted disk space. Hence, select Disk Utility and hit Continue.
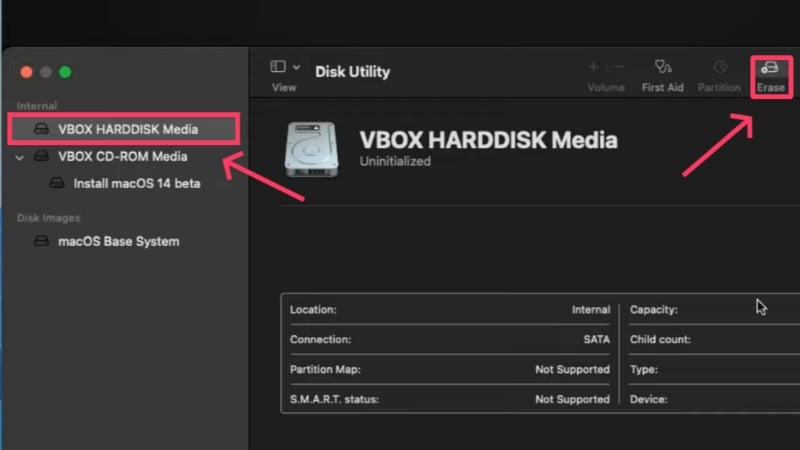
Credits: Everything Tech on YouTube - Switch to VBOX HARDDISK Media from the left pane. Select Erase from the top toolbar.
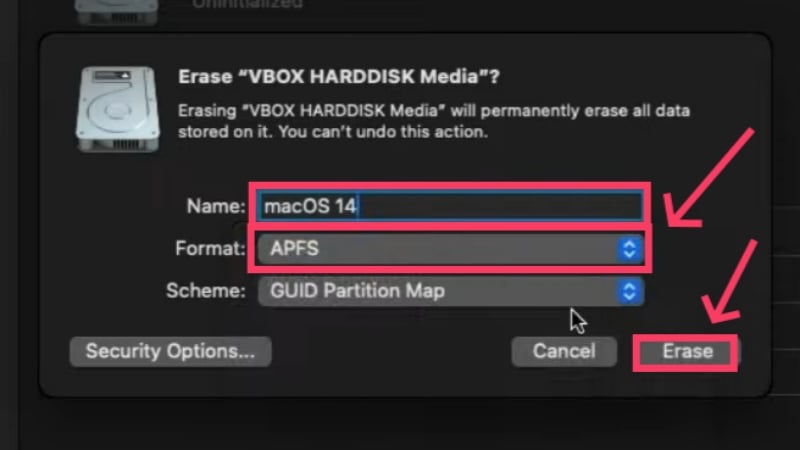
Credits: Everything Tech on YouTube - Rename your partition if you wish, and change the file format to APFS. Besides others, this is the most recommended file format, which you can know more about in this Apple Support guide. Select Done and close the window after the partition has been formatted.
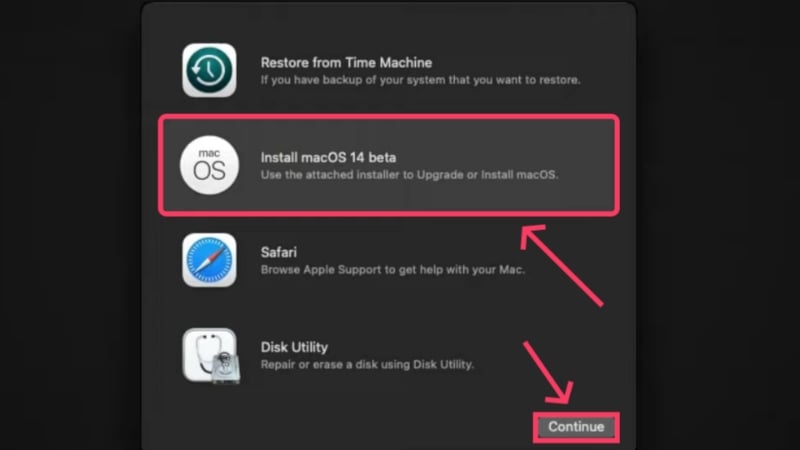
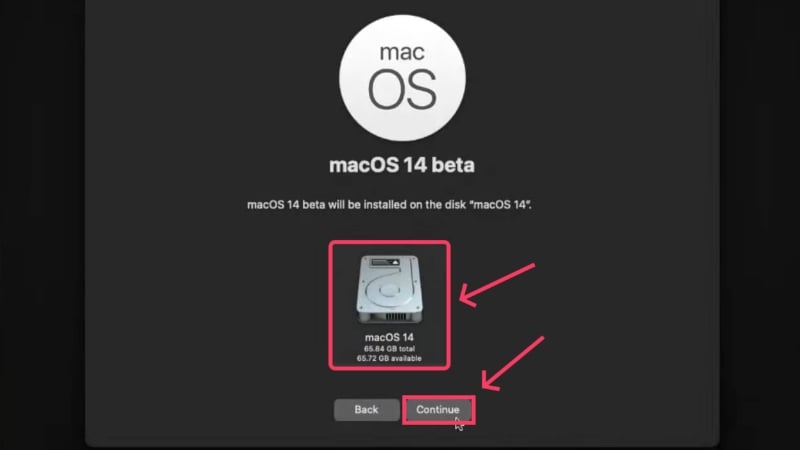
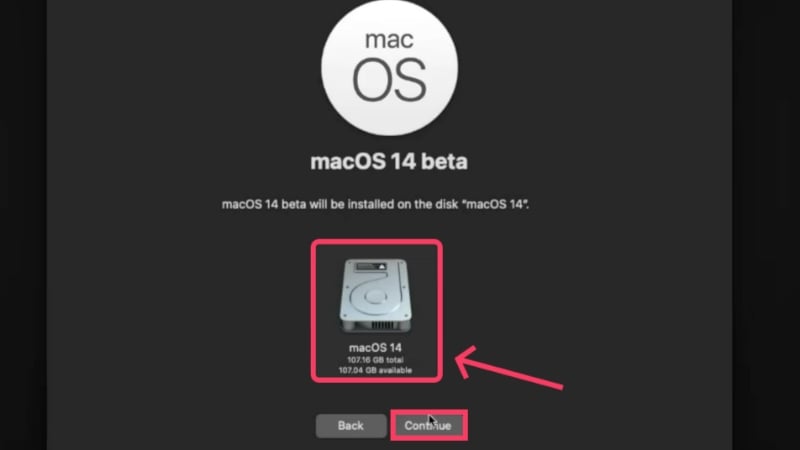
Credits: Everything Tech on YouTube - After heading back, select Install macOS 14 beta and click on Continue. Next, agree to the licenses and other permissions as asked accordingly.
Credits: Everything Tech on YouTube
Select the disk icon you created earlier, which should be present with the same name. Click on Continue to begin the installation. The waiting games will start now, so be patient since you will need it. Don’t fret if the installation takes a few hours to finish. Restart the process or look for solutions if the installation gets stuck midway.
You can set up macOS by filling in your details and credentials when it’s finished. If you still require help, here’s a guide on how to set up a new Mac like a Pro. Since Apple is known to restrict its services on third-party programs, you might be unable to log into your existing Apple ID. Thankfully, you can create a new one if you like or skip signing into your Apple ID entirely.
With this, you will be successfully running macOS on Windows!
Run macOS on Windows Using VMware Workstation Player
Another popular alternative to VirtualBox is the VMware workstation player. Here’s how you can get it running on your Windows PC.
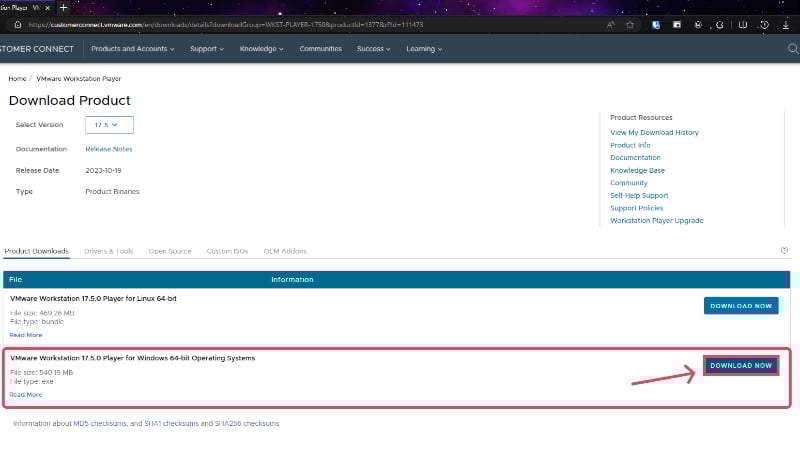
- Visit VMware’s website here and download the latest version of VMware Player for Windows 64-bit Operating Systems on your PC.
- Install the macOS Sonoma ISO file by heading here. Since it’s the same file as the one linked above, which is almost fifteen gigabytes, you must ensure it is connected to a stable and fast internet connection.
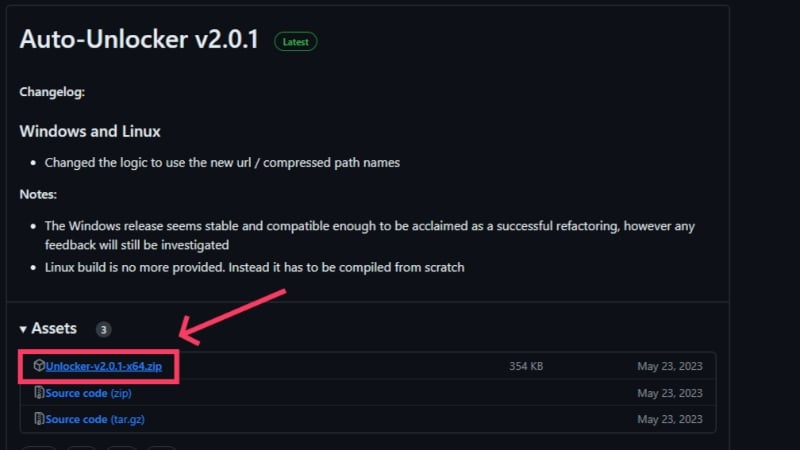
- Now, head over here and download the VMware auto-unlocker ZIP file. It is an essential tool to run macOS on Windows via VMware Workstation Player, as it doesn’t support the former OS by default.
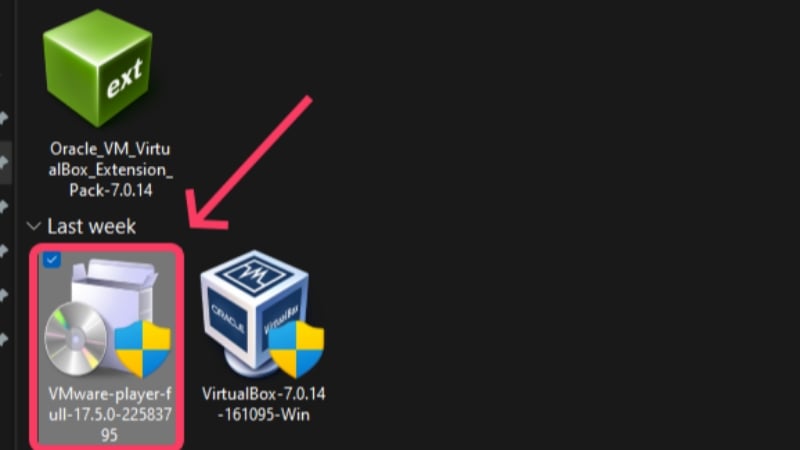
- Open your downloads folder and locate the VMware installer. Double-click to open it and initiate the installation process. Proceed through the initial setup by accepting VMware’s terms and conditions.
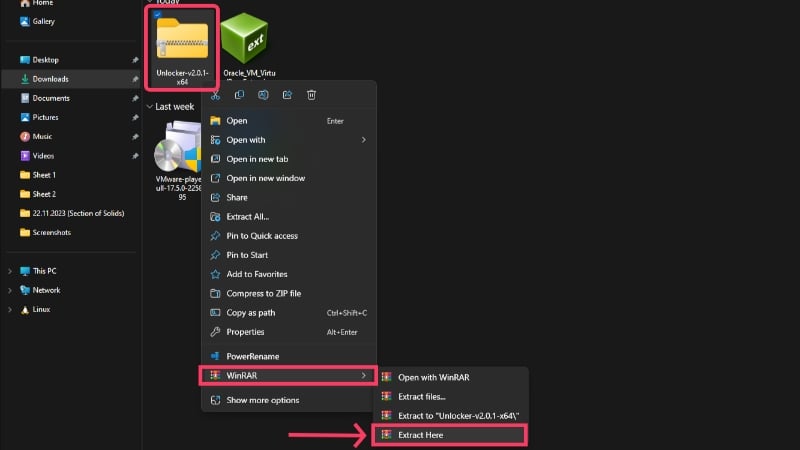
- Head to the file explorer to unzip the VMware auto-unlocker file by right-clicking it and extracting its contents.
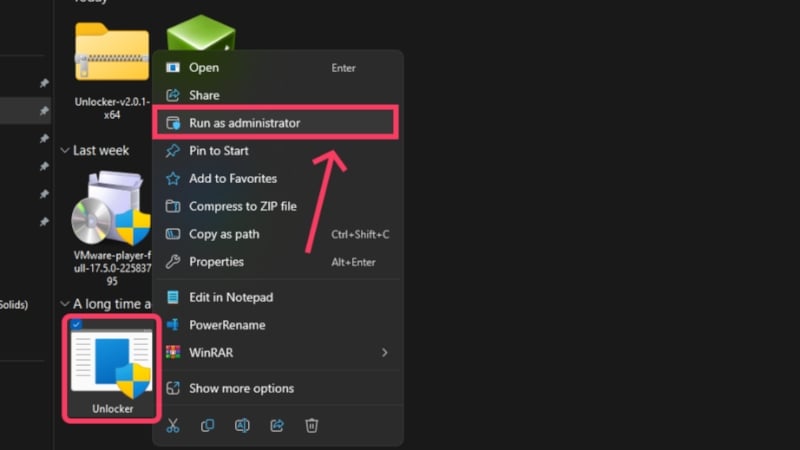
- Open the extracted folder and look for the Unclocker application. Right-click it and select Run as administrator.
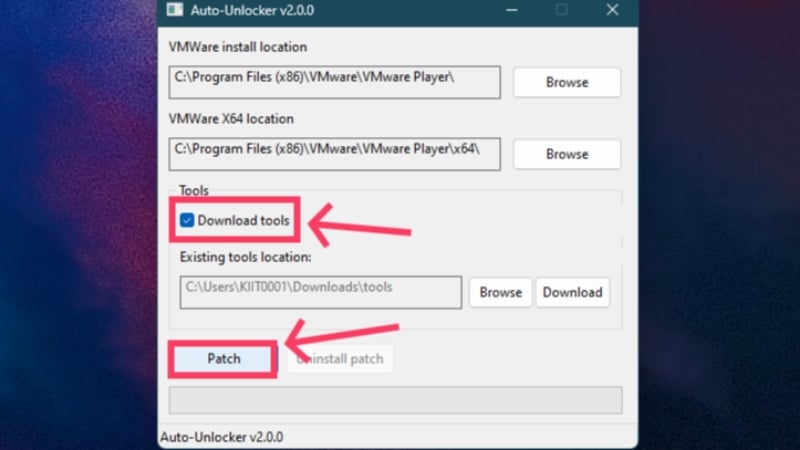
- Ensure that the Download tools option is checked, and then click on the Patch option within the auto-unlocker application window. This will patch VMware and allow you to run macOS on Windows using VMware.
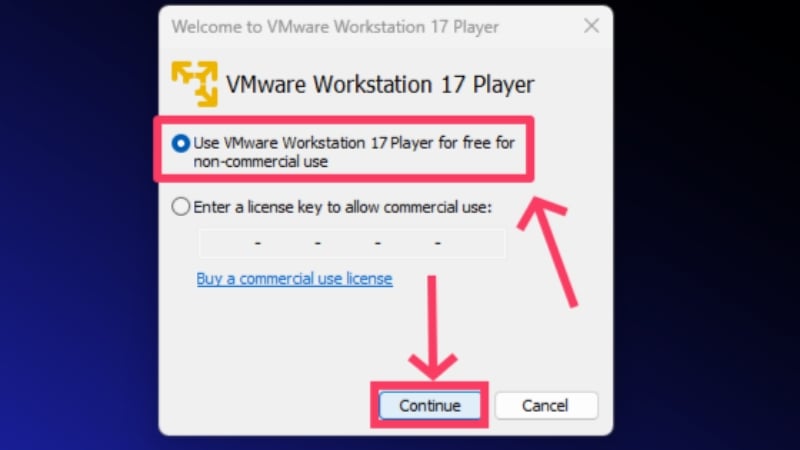
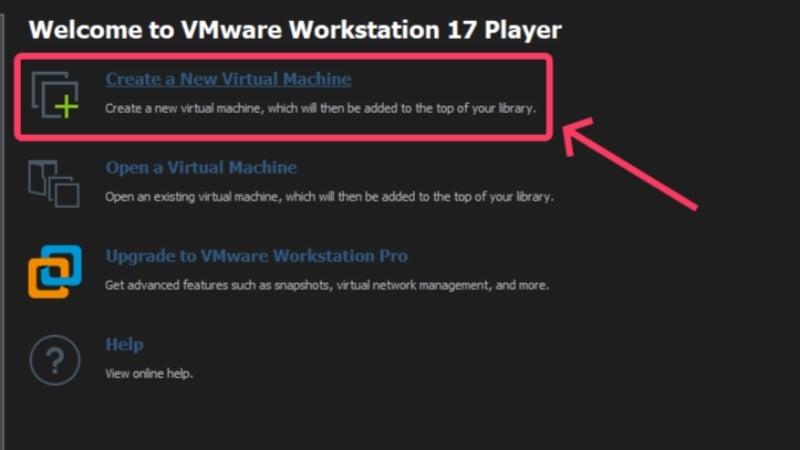
- Now, open the VMware Workstation Player application by double-clicking it. Select the Use VMware Workstation 17 Player for free for non-commercial use option if it asks for.
- Click on Create a New Virtual Machine.
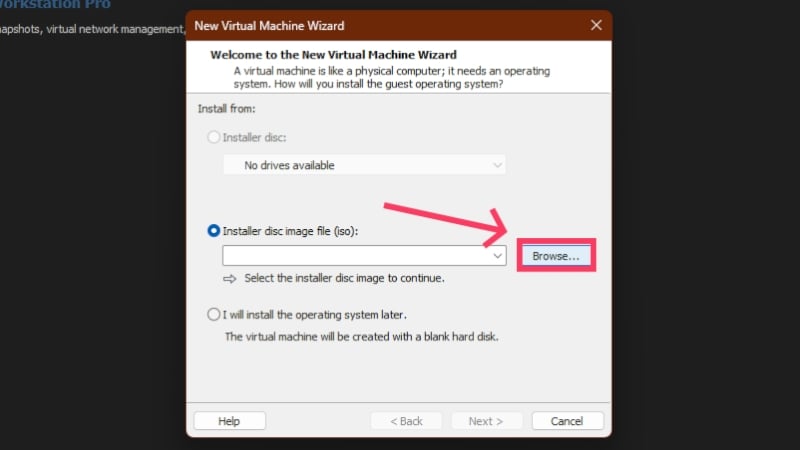
- Switch to the Installer disc image file (iso) option and select Browse.
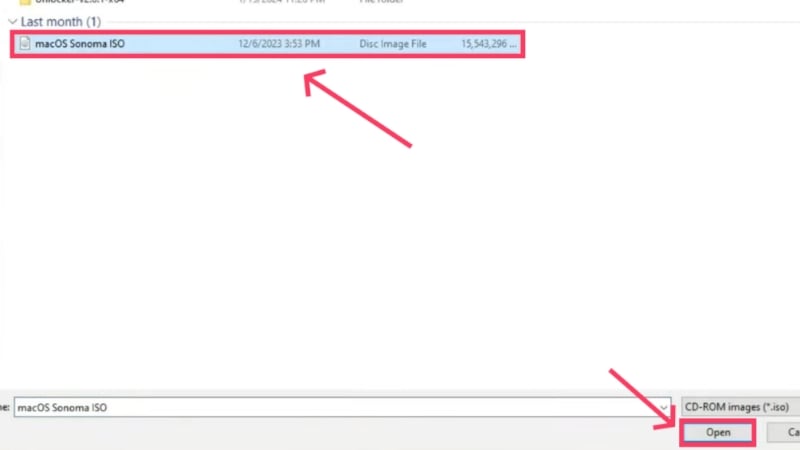
- Locate the macOS Sonoma ISO file from the file explorer window and click Open.
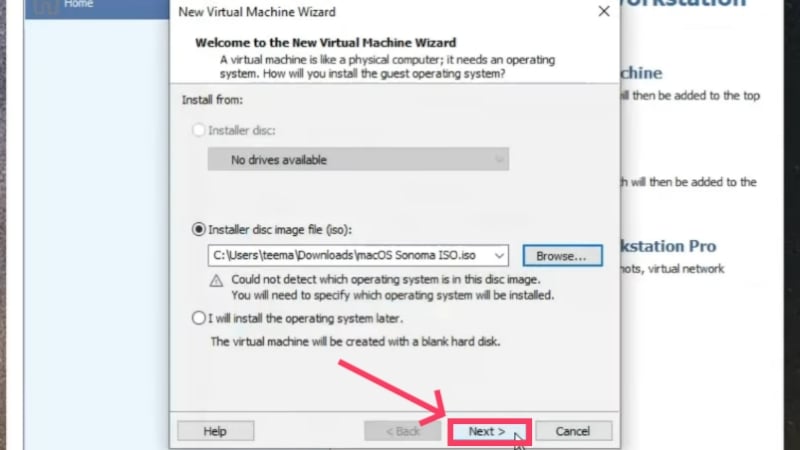
Credits: Everything Tech on YouTube - Click on Next.
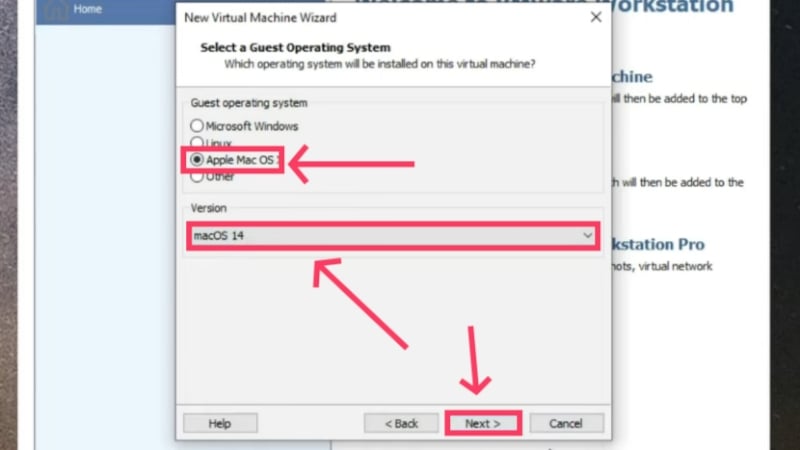
Credits: Everything Tech on YouTube - Set the Guest operating system type to Apple Mac OS X and the version to macOS 14. Select Next.
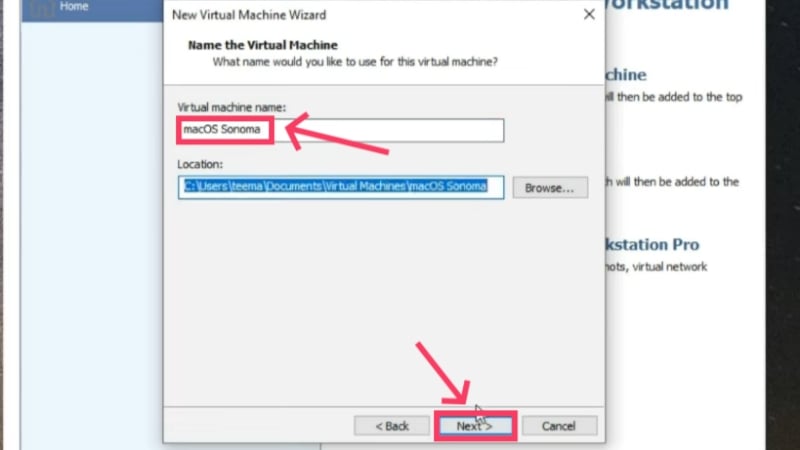
Credits: Everything Tech on YouTube - Give your virtual machine a name of your choice and hit Next.
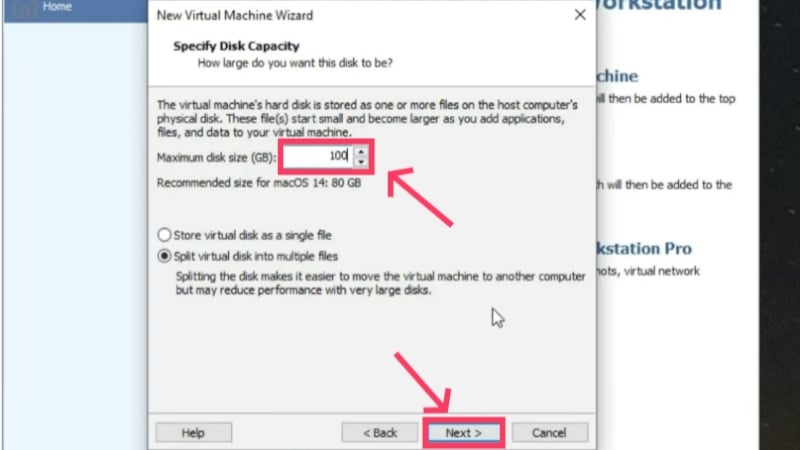
Credits: Everything Tech on YouTube - Now, you must specify the disk capacity you wish to allocate to the virtual machine. It is recommended to devote at least 80GB of storage space for macOS Sonoma. Indeed, you can allot more capacity if you want, but keep the host system’s disk space in mind. Also, enable the Split virtual disk into multiple files option. Select Next after you are done.
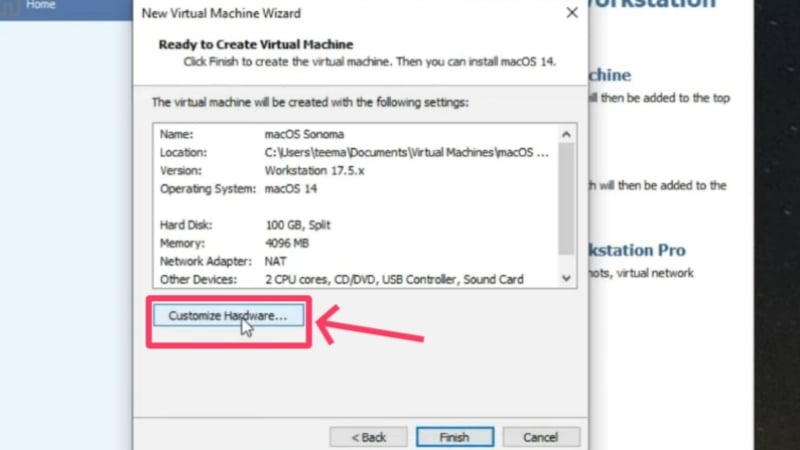
Credits: Everything Tech on YouTube - Select Customize Hardware in the next step.
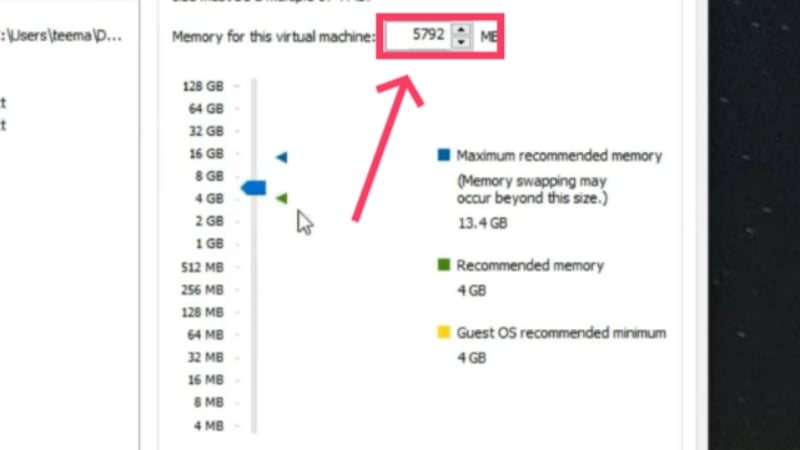
Credits: Everything Tech on YouTube - You can alter the amount of memory allocated for the virtual machine. You must take care not to dedicate more than 40-50% of the host system’s onboard memory, as it would slow down the computer. So, if your PC has 16GB of RAM, you should dedicate only about 4-5GB.
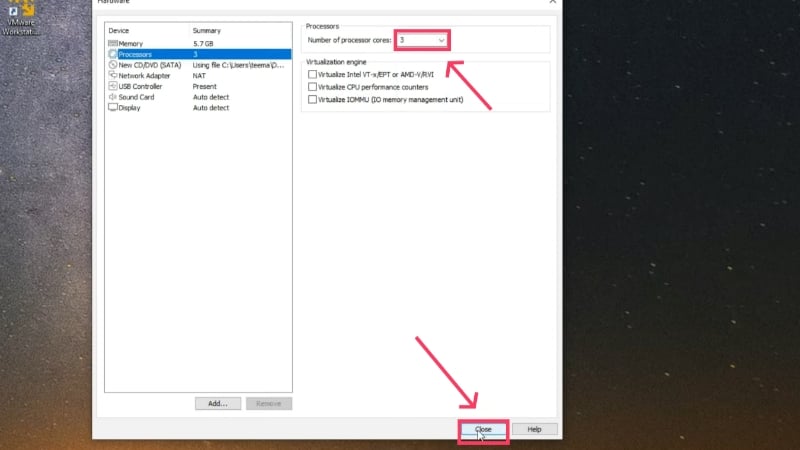
Credits: Everything Tech on YouTube - The following section lets you set the cores you wish to allocate. 3 CPU cores are adequate to ensure harmony between the host PC and the virtual machine. Close the window after doing so.
Credits: Everything Tech on YouTube - Click on Finish.

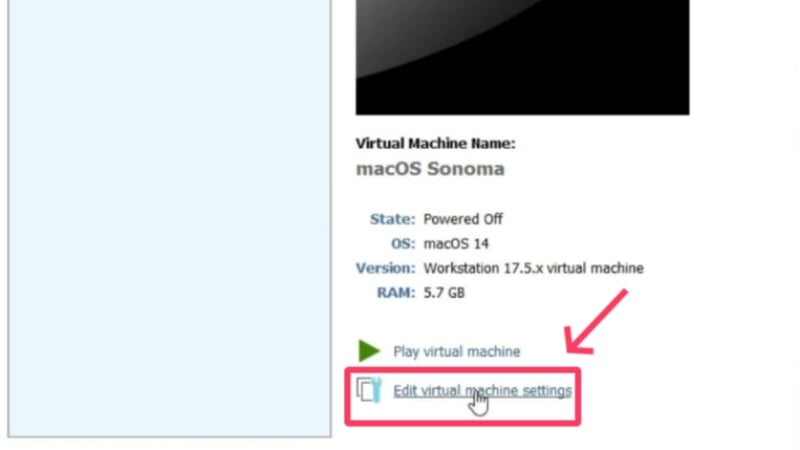
Credits: Everything Tech on YouTube - Select the Edit virtual machine settings option in the VMware application window.
Credits: Everything Tech on YouTube - Switch to Options from the top and look for Working directory. This is your virtual machine’s working directory, which will come in handy during installation.

Credits: Everything Tech on YouTube - Open your PC’s file explorer and locate the virtual machine’s working directory.

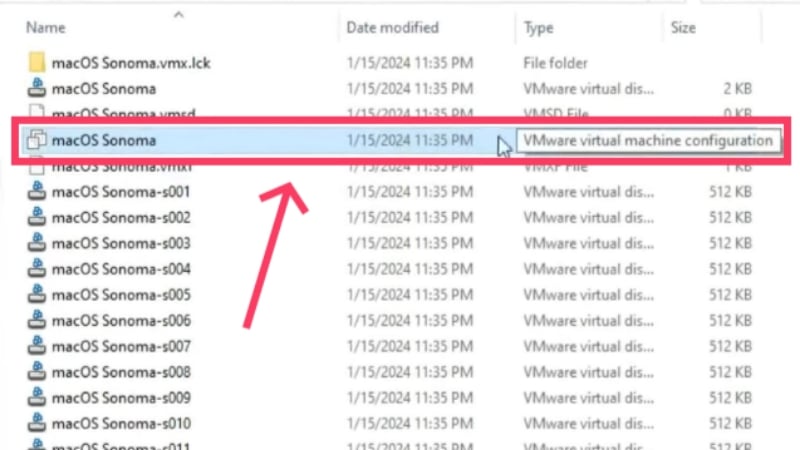
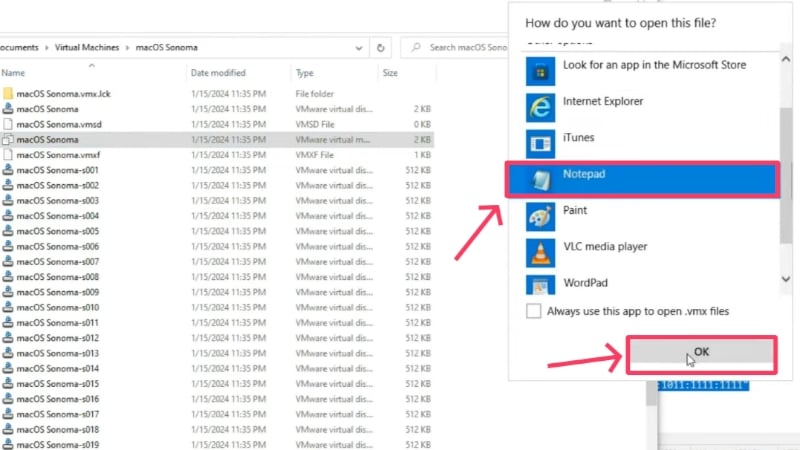
Credits: Everything Tech on YouTube - There will be multiple files, but you need to look for the VMware virtual machine configuration file type having the same name you had set for your virtual machine. To know the type of a file, hover the cursor over it to reveal its type.
Credits: Everything Tech on YouTube - Right-click the file and hover the cursor over Open with. Select Notepad from the dropdown menu.
Credits: Everything Tech on YouTube - Scroll down and add this line at the end: smc.version = “0”. However, if you rock an AMD CPU and not an Intel one, you need to add the following lines instead –smc.version = “0”
cpuid.0.eax = “0000:0000:0000:0000:0000:0000:0000:1011”
cpuid.0.ebx = “0111:0101:0110:1110:0110:0101:0100:0111”
cpuid.0.ecx = “0110:1100:0110:0101:0111:0100:0110:1110”
cpuid.0.edx = “0100:1001:0110:0101:0110:1110:0110:1001”
cpuid.1.eax = “0000:0000:0000:0001:0000:0110:0111:0001”
cpuid.1.ebx = “0000:0010:0000:0001:0000:1000:0000:0000”
cpuid.1.ecx = “1000:0010:1001:1000:0010:0010:0000:0011”
cpuid.1.edx = “0000:0111:1000:1011:1111:1011:1111:1111”
Save the changes made using the keyboard shortcut Ctrl + S.
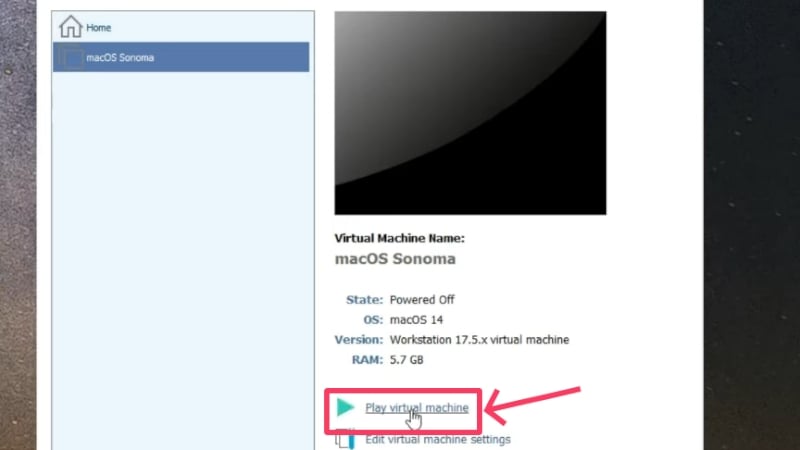
Credits: Everything Tech on YouTube - Close all windows except the VMware Workstation Player window and select Play virtual machine to begin installation.
Credits: Everything Tech on YouTube - Select the language of your choice and click the arrow button at the bottom-right corner to proceed. In our case, it’s English.
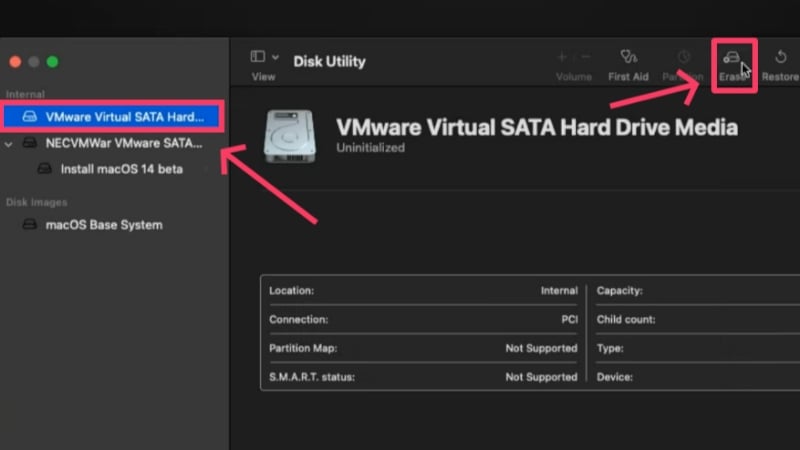
Credits: Everything Tech on YouTube - Like in the case of VirtualBox, you must format the allocated SSD before onboarding macOS. To do so, select Disk Utility and click Continue.
Credits: Everything Tech on YouTube - Switch to VMware Virtual SATA Hard Drive Media from the left pane and click the Erase icon from the top toolbar.
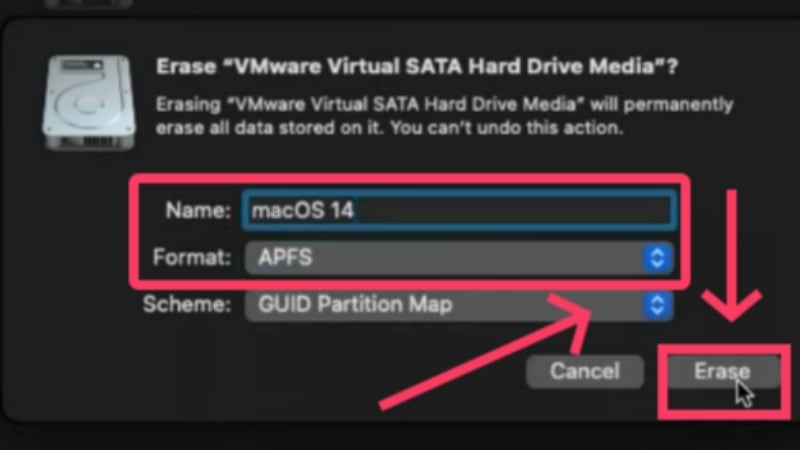
Credits: Everything Tech on YouTube - Rename the SSD partition if you want, and set the file format as APFS. Again, to know more about other file formats, visit the Apple Support guide. Hit Erase when you are ready.
Credits: Everything Tech on YouTube - Once it’s done, select Install macOS 14 beta and click Continue.
Credits: Everything Tech on YouTube - Agree to Apple’s terms and conditions to get going with the installation and select the allocated disk drive. Proceed by clicking Continue.
Credits: Everything Tech on YouTube
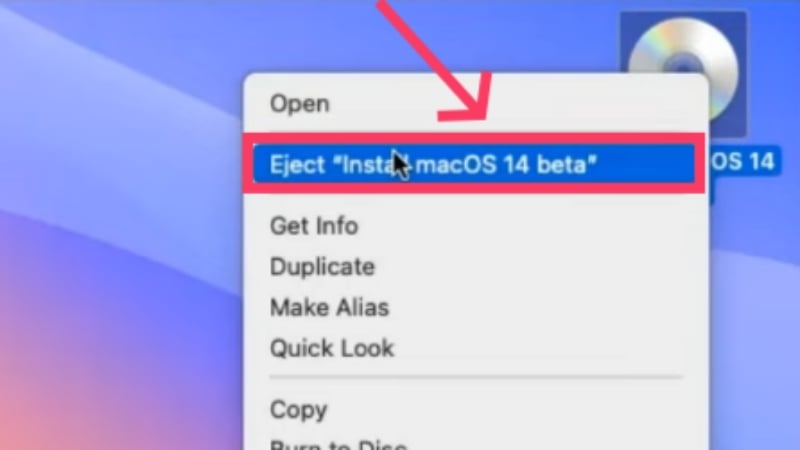
The installation of macOS under Windows will take a considerable amount of time. It should be noted that the system runs quite slowly by default. In addition, you cannot change the size of the application window. This is due to the severely undersized graphics card, which is set to 3 MB by default. To increase it, you need to install VMware Tools.
- For that, eject the macOS Sonoma ISO file first by right-clicking the icon on the home page and selecting the eject option. If the file isn’t showing on the desktop, head to Finder and eject the ISO file from there instead.
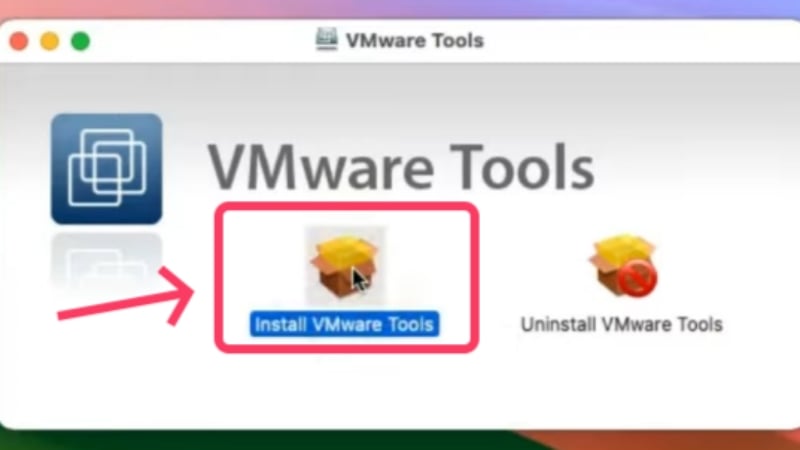
Credits: Everything Tech on YouTube - Click on the Player option from the top-left corner. Then, hover the cursor over Manage and select Install VMware Tools.

Credits: Everything Tech on YouTube - Double-click Install VMware Tools in the dialog box that follows and proceed with the installation procedure.
Credits: Everything Tech on YouTube - You may need to grant permission to authorize the installation by going to Settings > Privacy & Security > Scroll down and selecting Allow. Enter your virtual machine’s newly set password if asked for.

Credits: Everything Tech on YouTube - After this, a restart will be necessary, which can be performed by clicking the Apple logo in the top-left corner and clicking on Restart.
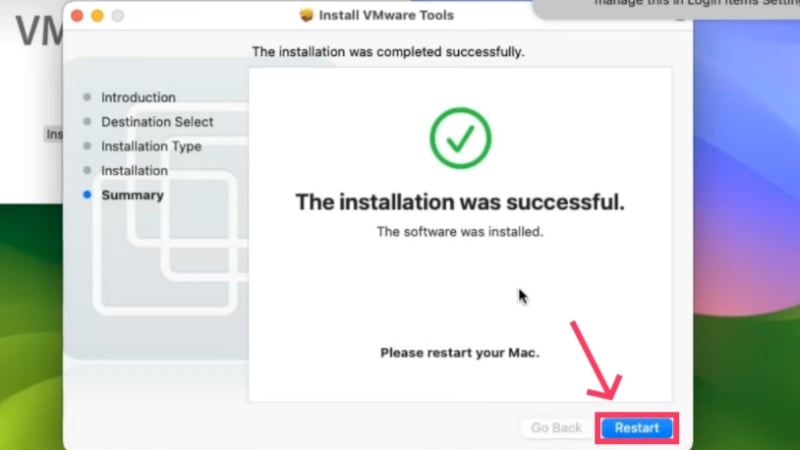
Credits: Everything Tech on YouTube
That’s it! The display graphics are now set to 128 MB, which makes a huge difference to performance. This brings you to the end of the installation process. As virtual machines are given a random serial number, you won’t be able to use Apple services such as iMessage and FaceTime on them. But don’t worry, there’s a solution for that too. Follow the procedure below after you have set up macOS via VMware.
- Open Safari within the virtual machine software and visit here. Click on the Download button to install Clover Configurator on your macOS virtual machine.
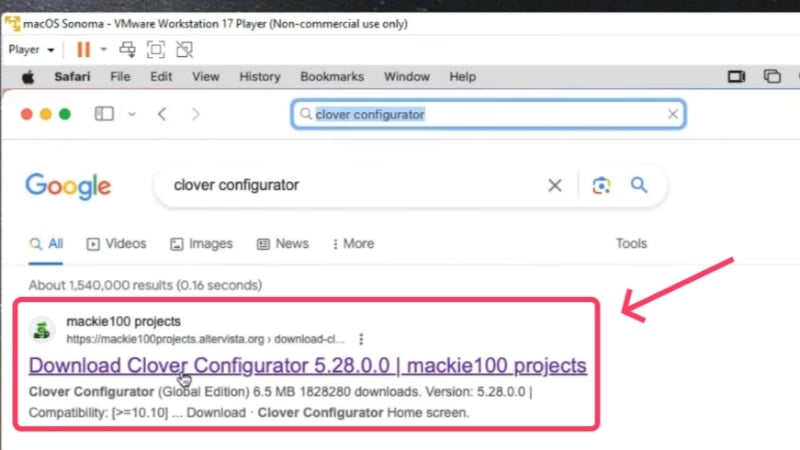
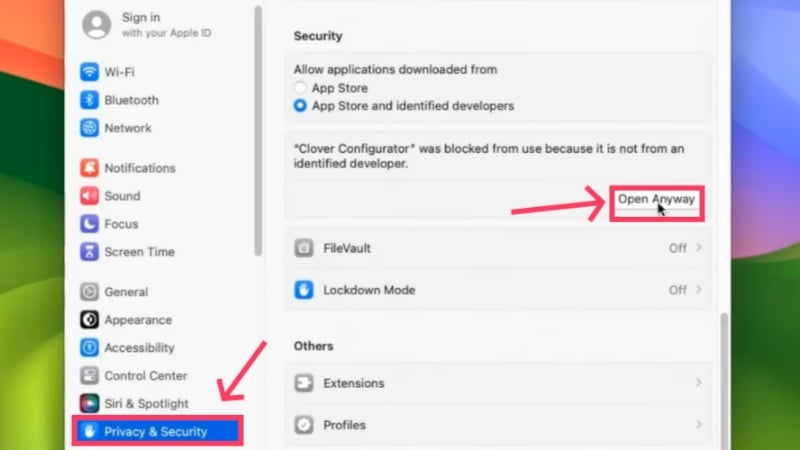
Credits: Everything Tech on YouTube - Open the downloaded file. You may be required to allow the installation as a part of the security measure of macOS, which can be done easily. Head to Settings > Privacy & Security > Scroll down and select Open Anyway.
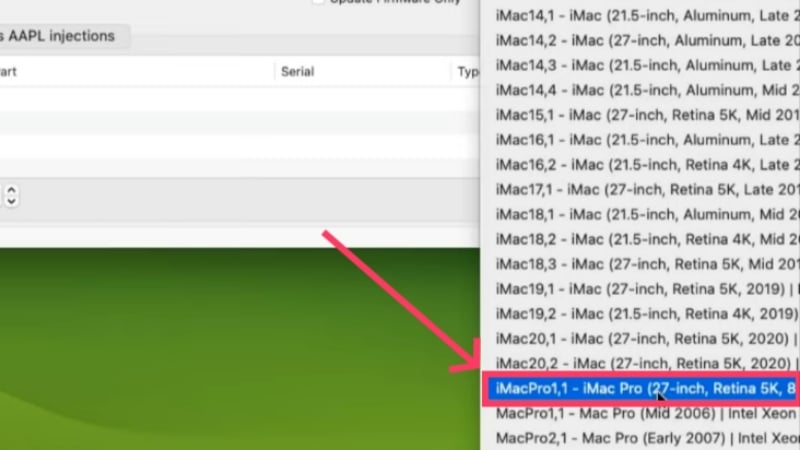
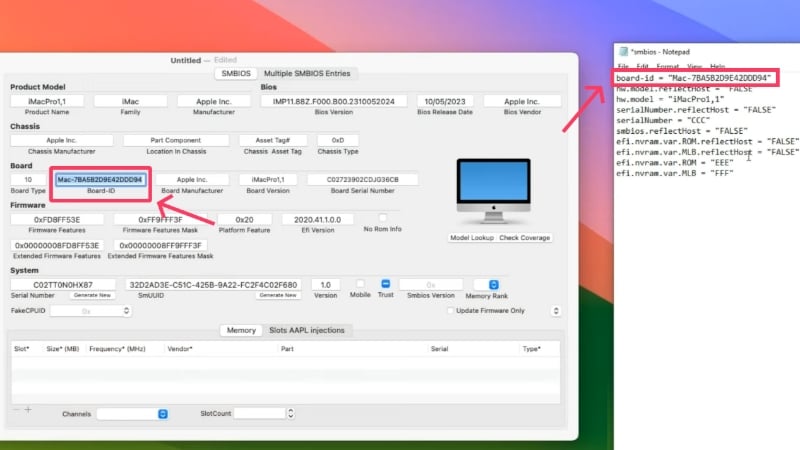
Credits: Everything Tech on YouTube - Open the application and switch to SMBIOS settings from the left pane. Then, click on the dropdown menu icon, as shown below.

Credits: Everything Tech on YouTube - This menu lets you choose the type of Mac the virtual machine will be based on. Select the option that says iMacPro1,1.
Credits: Everything Tech on YouTube - Now, you must alter a few commands to execute. Bear with us, as this is a little challenging. To simplify things, open the host system’s Notepad and paste the following lines.board-id = “AAA”
hw.model.reflectHost = “FALSE”
hw.model = “iMacPro1,1”
serialNumber.reflectHost = “FALSE”
serialNumber = “CCC”
smbios.reflectHost = “FALSE”
efi.nvram.var.ROM.reflectHost = “FALSE”
efi.nvram.var.MLB.reflectHost = “FALSE”
efi.nvram.var.ROM = “EEE”
efi.nvram.var.MLB = “FFF”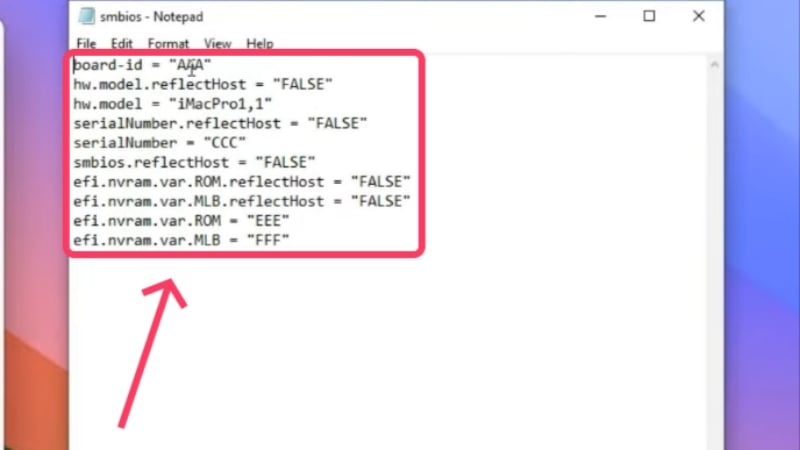
Credits: Everything Tech on YouTube Switch to the virtual machine window where SMBIOS settings are open within the Clover Configurator application. There, locate the Board-ID entry and copy it. Replace AAA with the copied text in the above code lines on Notepad. Be careful not to mess around with the double-inverted commas.
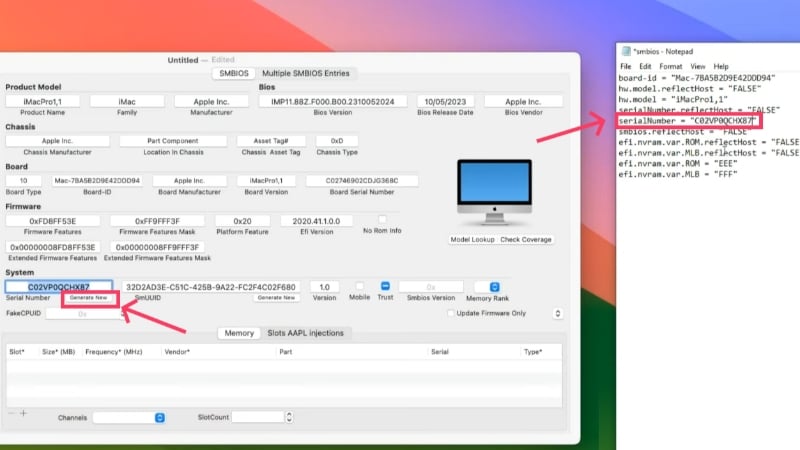
Credits: Everything Tech on YouTube Click Generate New beside Serial Number on the same page to generate a custom serial number for your macOS virtual machine. Paste the copied text in place of CCC in the above code.
Credits: Everything Tech on YouTube You are not done yet. In the Clover Configurator application window, switch to Rt Variables from the left pane. Click Generate beside ROM to get a custom value. Copy and paste it in the above lines of code in place of EEE.

Credits: Everything Tech on YouTube Locate the MLB value on the page and copy it. Replace FFF from the above commands with the copied text. Now, the alterations are complete. Select and copy the new code lines using the shortcut Ctrl + A followed by Ctrl + C.

Credits: Everything Tech on YouTube - After this, shut down the macOS virtual machine by clicking the Apple Logo from the top-left corner and selecting Shut Down.

- On the host system, locate the VMware virtual machine configuration file type with the same name as your virtual machine. This was explained in the preceding procedure’s 21st, 22nd, 23rd, and 24th steps. Again, right-click the file and hover the cursor over Open with to access it using Notepad.
Credits: Everything Tech on YouTube - Locate the line that says firmware = “efi”. It may be cumbersome to look for the line among a dozen others, so you can use the text-finder keyboard shortcut Ctrl + F to search for it. Don’t play with it, as we don’t have to do anything with this line of code.
- Move to a fresh line by pressing Enter, where you must paste the lines of cope that you had copied from Notepad. In other words, the new lines should be pasted just after the line mentioned in the previous step.

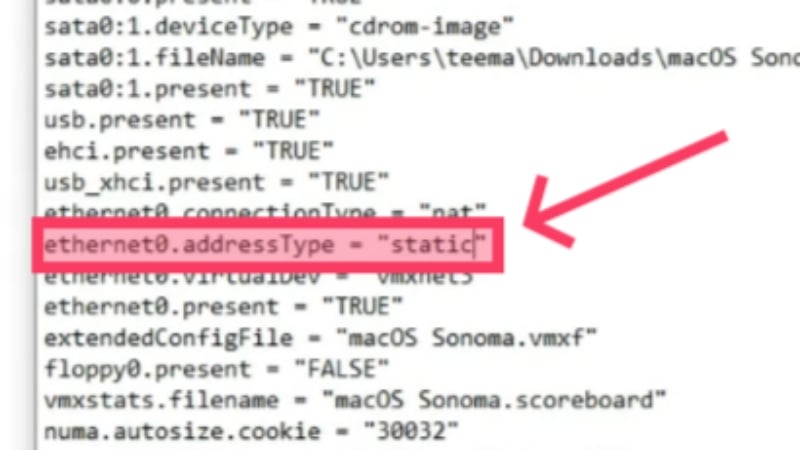
Credits: Everything Tech on YouTube - Next, search for ethernet0.addressType – “generated” and replace generated with static. This particular line of code should look like this – ethernet0.addressType – “static”.
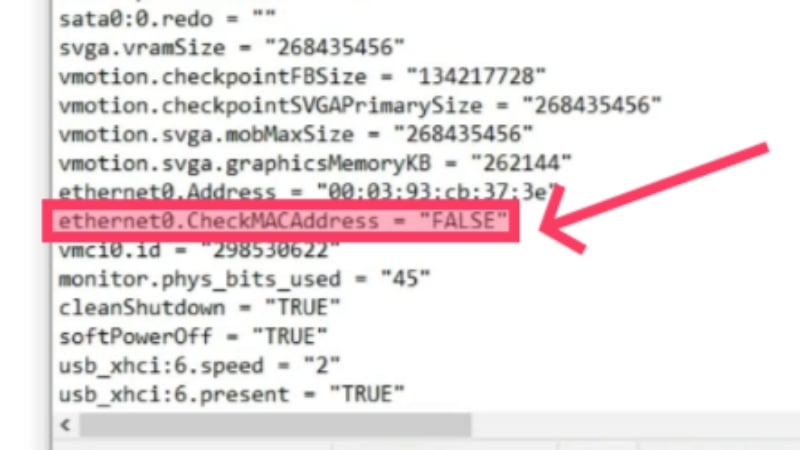
Credits: Everything Tech on YouTube - After that, search for this line – ethernet0.generatedAddress = “00:0c:29:cb:37:3e”. Remove generated from the text and replace the first three ethernet address values with any of Mac’s official ethernet address values, which can be found on this website (enter any value of your liking from the website). Here’s a sample of what it should look like – ethernet0.Address = “00:03:93:cb:37:3e”.

Credits: Everything Tech on YouTube - Search for ethernet0.generatedAddressOffset – “0”, which should be present just after the previous code. Change it to ethernet0.CheckMACAddress – “FALSE”.
Credits: Everything Tech on YouTube - Save the changes made using the keyboard shortcut Ctrl + S and exit the configuration file. Run the macOS virtual machine using VMware, and you are good to go!
Troubleshooting Tips for Common Problems You May Run Into
- If you don’t see the option of Apple Mac OS X while setting up the type of operating system on VMware, there’s a high chance that the patching process failed. Ensure you have installed VMware Auto-unlocker and patched VMware using it, as the latter doesn’t support macOS by default. Revisit the installation procedure to tackle this issue, and don’t forget to patch VMware using the auto-unlocker tool.
- If you are prompted with an error message stating “VMware Player unrecoverable error: (vcpu-0),” you probably missed adding the additional code lines mentioned in the 26th step of the procedure below, or worse, you forgot to save the changes. Shut down the virtual machine and head to VMware’s configuration file on the host PC. Open the configuration file using Notepad and add the requisite lines. As mentioned above, pay close attention to what you add, as the code lines differ for AMD and Intel CPUs. Save the file and exit.
- If the “Mac OS X is not supported with binary translation” message troubles you, chances are the host PC doesn’t have virtualization enabled, which was elaborated at the beginning of this guide. Do not fret; go through the procedure to enable virtualization on your PC, and the problem should be fixed.
Run macOS on Windows Without Barriers
This brings you to the end of this guide. Yes, the procedure is exhausting, but you can be sure that you’ll have a working version of macOS on your Windows PC afterwards. Thanks to its customizability and ease of use, VMware Workstation Player is the tool of choice for many. It even supports Apple services such as iMessage and FaceTime, which is a plus point in its favor.
VirtualBox is also a good choice as it’s relatively easy to set up. You can choose one of the two programs and use macOS on Windows. Don’t be put off if you run into bugs that require troubleshooting tricks; they’re effortless to overcome, and we’ve even mentioned some of them for you.
FAQs about Running Mac on Windows using Virtual Machine
1. Can virtual machines run the full version of macOS on Windows?
Just as the virtual world can never replicate the feel of the natural world, you can’t expect every feature of macOS to work on a virtual machine. After all, it’s just a virtualization, and Apple is aware of this and smart enough to limit features when they feel like it. For example, signing into your Apple account, using FaceTime and iMessage, and more can fail halfway through.
The main problem is that Apple only develops macOS for its own M-series CPUs, which run on completely different architectures and protocols. Running macOS on Intel- and AMD-based CPUs will therefore become even more difficult in the future. It could become even more difficult with AMD CPUs, as Macs, unlike Intel CPUs, were never developed for AMD CPUs from the outset.
As described in the guide above, VMware can make these things work for you. Since virtual machines are meant to provide an essence of the real thing, they’re designed to fulfill server requirements, test OS-specific applications, or try out new operating systems for fun. Trust us, you wouldn’t want to give up your plans to try macOS on Windows for this, so give it a go.
2. How much RAM and system storage should I ideally allocate for a virtual machine?
There’s no denying that more RAM and storage capacity will benefit the virtual machine. However, you must also care about the host system, as that is ultimately the engine of the virtual machine. Ideally, you shouldn’t allocate more than 40-50% of the host system’s memory to the virtual machine. For instance, if the host system has 8GB of RAM, allocate about 3GB of RAM to the virtual machine.
As for the storage capacity, it depends on the OS you are installing. Ideally, macOS Sonoma requires at least 60-80GB of free storage to work efficiently, so you can dedicate about 80-100GB from the host system. Dedicate more if the host system has ample storage space to work with.
3. Why did the installation process stop in the middle? What went wrong?
If you have not waited long enough for the installation process to complete, we recommend that you remember whether or not you have followed the steps exactly. If you are faced with an error message, the troubleshooting tips above should help you. You can search the internet for specific problems or, even better, go through the installation process again.
4. Do I need an existing Apple ID to run macOS on Windows?
Although an Apple ID is not mandatory, it is required to access Apple services such as iMessage and FaceTime. Fortunately, you have the option to create a new Apple ID if you don’t already have one. However, as this is a virtual machine, signing in to your Apple account may fail, in which case you will need to skip the sign-in process.
If you take the trouble to activate the Apple services on VMware, you can use them properly. You can find out how to do this in the instructions.
5. Why is the virtual machine’s performance not up to the mark?
There can be several reasons for this. If you have not allocated enough memory or CPU cores to the virtual machine, this can slow it down considerably and affect the experience. If you have allocated too much memory or CPU cores to the virtual machine, this can affect the overall performance of your PC.
The problem could also be caused by the graphics card not being properly equipped. For VirtualBox, refer to the 12th step in its installation guide and ensure the video memory is set to 128MB. For VMware, you must install an additional accessory, VMware Tools. It has to be done within the virtual machine, and the procedure for the same is mentioned under the VMware installation guide.
