Quick Answer
To safely downgrade from Windows 11 24H2 to 23H2, use the Go Back feature within 10 days via Settings > Windows Update > Advanced Options > Recovery > Go Back. If unavailable, manually install 23H2 by downloading the correct ISO from UUPdump.net, mounting it, and running Setup.exe. Alternatively, use Windows Recovery (WinRE > Troubleshoot > Advanced Options > Uninstall Updates).
Windows 11 version 24H2 is the latest operating system update. Some users find the 23H2 version much better than the latest version. If you have updated your Windows 11 to 24H2 and want to downgrade it to 23H2 safely without losing anything, follow this guide.

3 Ways to Safely Downgrade From Windows 11 24H2 to 23H2
Gamers and other Windows 11 users who rely on the performance of their PCs are finding 24H2 slower after upgrading from the 23H2 version. The only way to regain the previous experience is by downgrading to the 23H2 version. You can do it in the following ways.
Method | Time Limit | Requirements | Steps | Data Loss Risk |
|---|---|---|---|---|
Go Back Feature | Within 10 days of upgrade | Windows.old folder must be present | Settings > Windows Update > Advanced Options > Recovery > Go Back | Low (keeps files and settings) |
Manual Installation (ISO) | No time limit | Correct ISO file for system architecture | Download ISO from UUPdump.net, mount it, and run Setup.exe | High (requires clean installation) |
Windows Recovery (WinRE) | No time limit | PC must be bootable into WinRE | WinRE > Troubleshoot > Advanced Options > Uninstall Updates | Low (keeps files, may need reinstalling some apps) |
Using Go Back Feature
If you have installed the Windows 11 24H2 update and want to downgrade to the 23H2 version within 10 days, you can use the Go Back feature in the Windows 11 Recovery options. This feature is available for only 10 days after the installation of any Windows update.
After the upgrade to Windows 11 24H2 versions, the old Windows files related to 23H2 are stored in Windows.old folder in the installation drive. When you use the Go back features, the installation wizard will use these files and downgrade your PC to the 23H2 version without deleting your data.
To use the Go Back feature in the Recovery options on Windows 11,

- Open the Settings app using Win+I keyboard shortcut or from the Start menu.
- Select Windows update from the left side menu.
- Click on the Advanced options tab.
- Select Recovery under Additional options.
- Click on Go Back button.
- It will open a Go back to earlier build window. Click on Go back to earlier build.
- Your PC will now restart and install the Windows 11 23H2 version. The entire process will take some time, and your PC may restart multiple times during the installation.
Once the process is complete, your Windows 11 will run with the 23H2 version. You may upgrade it to the 24H2 version anytime using the Windows update settings.
Install Windows 11 23H2 Manually
If you do not see the Go back feature, you can manually install the Windows 11 23H2 version. To do that, you need to download the ISO file from a third-party source based on your system configuration. Back up any important files you have on the primary drive so as not to lose them while downgrading Windows 11.
Before downloading the ISO file for your PC, first find out your system architecture so you can download the correct ISO file. A wrong ISO file will not install. To find out the system architecture of Windows 11,
- Open the Settings app and Select System from the left side menu.
- Scroll down and click on the About tab.
- You will see the system architecture details beside the System type under the Device specifications.

- If the details are “64-bit operating system, x64-based processor”, your PC has x64-bit. You need to download the ISO file based on that. If your PC has a “64-bit operating system, ARM-based processor”, your PC runs on an ARM64 processor. You need to download the ISO file that suits the processor.
Once you find out the details of your system architecture, head to UUPdump.net. Click on Windows 11 under the search bar and select 23H2 from the dropdown options.

You will find all the available ISO files of the Windows 11 23H2 version. You will also find system architecture details and the dates the files are added. Click on the latest file that suits your PC based on the architecture.

Select the Language for Windows 11 23H2 and click Next.

Now, select the Windows 11 edition you want to download by checking the beside button. If you use Windows 11 Home, check the box beside Windows Home. After selecting the right Windows version, click Next.

You must select how to download the Windows 11 23H2 package. It is recommended that you select Download and convert to ISO option and leave other options to default. It makes the installation process easier. After the selection, click Create download package.

The package will now download to the Downloads folder on your PC. Unzip the package folder and run the uup_download_windows file as an administrator. It will open the Command Prompt window, which downloads all the components of the Windows 11 23H2 version and creates an ISO.

The commands will run in a Command Prompt window automatically. It downloads all the files and creates the ISO file. It will take a lot of time to complete the process. You need to wait for the process to complete.

After successfully creating the ISO, right-click and select Mount. It will open the ISO file as a drive. Open it and run the Setup.exe file to start the installation of Windows 11 23H2.
Follow the on-screen instructions and select Not right now on the Get updates, drivers and optional features page and click Next. Agree to the terms in the following pages, and select Nothing on Choose what to keep page. Then, on the Ready to install page, click Install.
After the installation, setup your PC by selecting country or region, keyboard, etc. When you are shown to restore your PC from the available backups, select Set up as a new PC.
Then, complete all the installation processes, install your programs, and copy your files.
Using Windows Recovery Environment
If your PC is experiencing a breakdown after upgrading to Windows 11 24H2 and is not starting properly, you can use the Windows Recovery Environment (WinRe) to downgrade it to Windows 11 23H2.
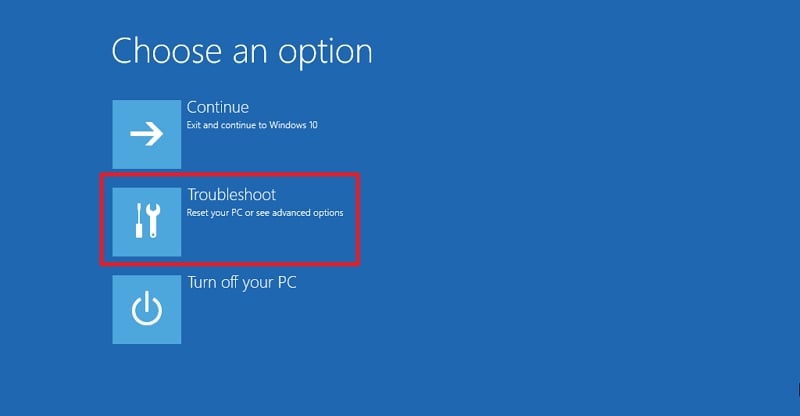
To enter the Windows Recovery Environment, power on your PC. At the same time, press and hold the power button. Repeat the same two times. Your PC will automatically go into Windows Recovery Environment.
You will see the Choose an option screen. Select Troubleshoot.
In the Troubleshoot screen, select Advanced options. Then, select Uninstall Updates on the Advanced options screen.
On the Uninstall Updates screen, select Uninstall latest feature update. Accept prompts that you see and let the uninstallation complete. Restart your PC after the process is complete. That’s it.
Note: Microsoft Windows 11 23H2 version is reaching its end-of-service on November 11, 2025. This means Microsoft will no longer support the version and give updates.
Rollback Windows 11 24H2 to Windows 11 23H2
Rolling back to the Windows 11 23H2 version from the 24H2 version is a no-brainer. If you choose to do it within 10 days of the installation, Windows 11 gives you the option to go back to the previous versions. If not, you can use ISO files or use Windows Recovery Environment.
