While Microsoft provides native way to enable dark mode on Windows 10 and Windows 11 operating systems, they don’t natively support the automatic theme switching functionality. So, if you prefer using your Windows PC in light mode during the day and dark mode at night, you’ve to switch between them manually.

This can be a little annoying. But thankfully, there are some workarounds to get around this. One such workaround involves using the Auto Dark Mode app to schedule dark mode on your Windows 10 or Windows 11 PC. Let’s check it out.
Table of Contents
Auto Dark Mode Makes Scheduling Dark Mode on Windows Easy
The easiest way to schedule dark mode on Windows 10 and Windows 11 is with the Auto Dark Mode app. It’s a free app, and it allows you to set up a schedule to automatically switch between light and dark modes on your Windows 10 or Windows 11 PC.
What’s more, the Auto Dark Mode app also offers a few extra features and options. These give you more control over theme switching and allow you to control how it affects the system and the apps.
Schedule Dark Mode on Windows 10 and Windows 11 Using the Auto Dark Mode App
Scheduling dark mode with Auto Dark Mode is easy enough. First, download and install the Auto Dark Mode app on your PC from the link below.
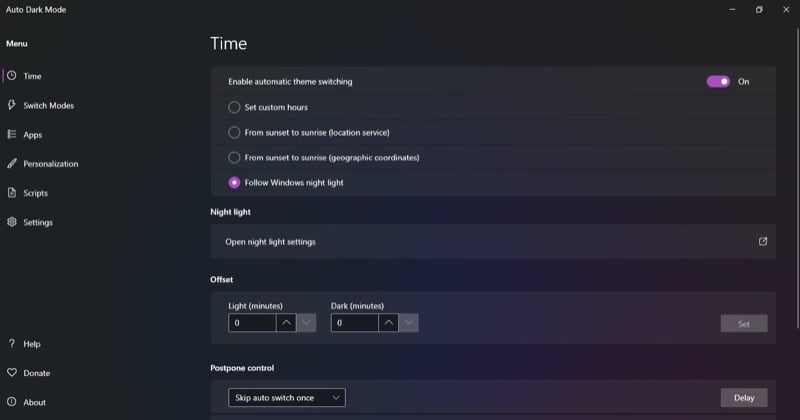
Once the app’s installed, open it. Now, select Time from the left menu bar and toggle on the switch next to Enable Automatic Theme Switching.

You’ll now see four options for setting up automatic switching:
1. Set Custom Hours
As the name implies, this option allows you to set the duration for when you want the light and dark themes to be active. After you do this, the app toggles the modes on and off automatically.
To use this option, select the Set Custom Hours radio button. Then, set the times for Light and Dark modes under Custom Start Time. Depending on what the current time is, Auto Dark Mode will then apply the appropriate theme.

2. From Sunset to Sunrise (Location Service)
If you don’t want to switch between light and dark modes at set times, you can schedule the automatic switch based on your location. Simply give Auto Dark Mode access to your current location, and it will automatically set the light and dark modes accordingly.
To do this, first, select the From Sunset to Sunrise option.

When this brings up the Settings window, turn on the Location Services permission.

Auto Dark Mode will automatically detect your location and set the sunrise and sunset times.
3. From Sunset to Sunrise (Geographic Coordinates)
Another way to schedule light mode and dark mode switching in the Auto Dark Mode app is by specifying your geographic coordinates. You need to enter your location’s accurate latitude and longitude for this to work properly.

Thankfully, the app Auto Dark Mode gives you a link to a website—shown right below the Geographic Coordinates section—that helps you find the coordinates for your location easily.
4. Follow Windows Night Light
Lastly, you can schedule dark mode on your Windows PC to toggle when the Night Light feature kicks in. Night Light essentially turns your screen warmer as the day progresses to reduce eye strain and improve sleep quality, and the Auto Dark Mode app requires access to your Night Light settings to analyze when it’s time to turn on and turn off dark mode on your computer.
To use this option, simply select Follow Windows Night Light, and it will take care of the rest. Just make sure you’ve set the schedule for Night Light correctly. Click the Open Night Light Settings option to bring up Night Light settings.
Here, set the time according to your preference. You can also adjust the warmness from here using the Strength slider.

Other Auto Dark Mode App Options
As mentioned initially, Auto Dark Mode doesn’t just let you schedule automatic switching between light and dark modes on your computer. But it also gives you more control over automatic switching and allows you to personalize the way the interface—from themes to apps—appears when it switches between light and dark modes.
Here’s a look at some of the options Auto Dark Mode gives you to do this:
1. Switch Modes
If you’ve scheduled automatic mode switching on your PC, but there are certain scenarios where you don’t want it to trigger, Switch Modes can help you do that. The app has several conditions that you can use to achieve this, and you can set one by simply checking off the checkbox next to it. You can even select multiple conditions if you want.
For example, if you don’t want Auto Dark Mode to switch modes while you’re playing games, check off the Don’t Switch While Playing Video Games checkbox. Likewise, you can avoid mode switching when certain processes are running on your PC. Select the Don’t Switch While Certain Processes are Running option and search and add the processes whose presence in the background shouldn’t trigger a theme switch.
Alternatively, you can tell Auto Dark Mode to switch themes only when the system is idle. To do this, tick the Don’t Switch Themes Unless the System is Idle checkbox. Then, set the idle time.

Or better, you can set Auto Dark Mode to notify you before automatically switching the themes. All you need for this is to check off the Notify Before Automatically Switching Themes checkbox and set the time based on your preference.
2. Hotkeys
Another useful Auto Dark Mode option is hotkeys. With hotkeys, you can toggle a theme, force a theme switch, or stop a switch, among other things.
Start by setting up a hotkey in Auto Dark Mode. Click the box next to the action for which you want to set up a hotkey and press the hotkey (or keyboard shortcut) you want to assign to it. Then, toggle on the Enable Hotkeys option under Hotkeys on the Switch Modes page.

Now, whenever you want to perform the operation (for which you’ve set up the hotkey), just press the keyboard shortcut, and Auto Dark Mode will trigger it.
3. Apps
When Auto Dark Mode switches themes, the changes are applied to both the system as well as the supported apps. However, if you don’t want this to happen, you can change this behavior and apply the changes to just the system or the apps.
To do this, go to the Apps tab in the left-hand menu. Click the dropdown next to Apps or System and select your desired option.

When tweaking settings for System, you can also enable and set accent colors for the Taskbar, title bars, and window borders.
4. Personalization
Lastly, the Auto Dark Mode app also gives you a bunch of personalization options. These affect how the app’s scheduled theme changes come into effect and affect different system elements.
For example, you can set Auto Dark Mode to change the wallpaper when it switches between the light theme and the dark theme. Similarly, you can customize the color scheme for accents in each mode and configure separate mouse cursors for both modes.
Go into the Personalization tab from the left menu bar. From here, head into the options you want to configure and modify their properties based on your preference.

Automatic Theme Switching Should Be a Built-In Feature
As you’ve seen, the Auto Dark Mode app makes scheduling dark mode on Windows 10 and Windows 11 super easy. However, the ability to do this has been a standard feature on other operating systems, like Linux and macOS, for years, and it’s high time Microsoft acknowledges this and brings it to Windows.
