Quick Answer
If KDE Connect stopped working after upgrading to macOS 26, try ClipCascade as a reliable alternative. It’s open source, works seamlessly on macOS and Android, and lets you sync clipboard content and files privately using Docker or community hosting, without the hassles of manual transfers.
Ever since I switched to Android from iPhone, KDE connect has been a lifesaver to sync clipboard content and share files between Android and Mac, however after upgrading to macOS 26, I have been facing issues and unable to connect Android with Mac to sync clipboard or even share files, as a result, I have to manually use WhatsApp to send text and local send to share files between Mac which is not only time taking but also takes away all the convenience that it has offered for all these months.

Fortunately, there are plenty of methods that already exist, like blip, and more; however, ClipCascade has become my top pick because it is open source and also works without any issues even on the latest macOS 26. Here is everything that you should know about ClipCascade and how to set it up on your device and share clipboard history.
Table of Contents
How to Set Up and Use ClipCascade on macOS & Android
There are multiple ways you can host ClipCascade depending on your requirements.
1. Community Server (Easy Setup but Less Private)
First is using the community server where you can install the app on your devices and point it any public server, it is the faster way and also requires zero setup, however this isn’t ideal if you care about privacy, all the clipboard content passes through the community server, and not just that, the community server that you have connected to should be online to use.
2. NAS or Raspberry Pi Hosting (Advanced Users)
Next is hosting this file server on a NAS or hosting it on a Raspberry Pi; however, in most cases, these external devices should run 24/7 and also require a compatible NAS to sync content between devices.
3. Using Docker on Your Mac or PC (Best Option)
Finally, the best method, and I personally use and recommend, is hosting the app using Docker on your device. This is not only a low-cost setup but also keeps your data private. Since Docker is free to use and works without any issues, you can simply host the app on your device and connect your device to the same IP and access the clipboard.
However, the only downside of this method is that both devices, meaning that your personal computer and mobile, should be connected to the same WiFi network to sync the clipboard, and if you want to access your clipboard content outside your local network, you have to use a VPN to access your content outside of your local network.
How to Set Up and Use ClipCascade using Docker
Step 1: Install Docker on macOS
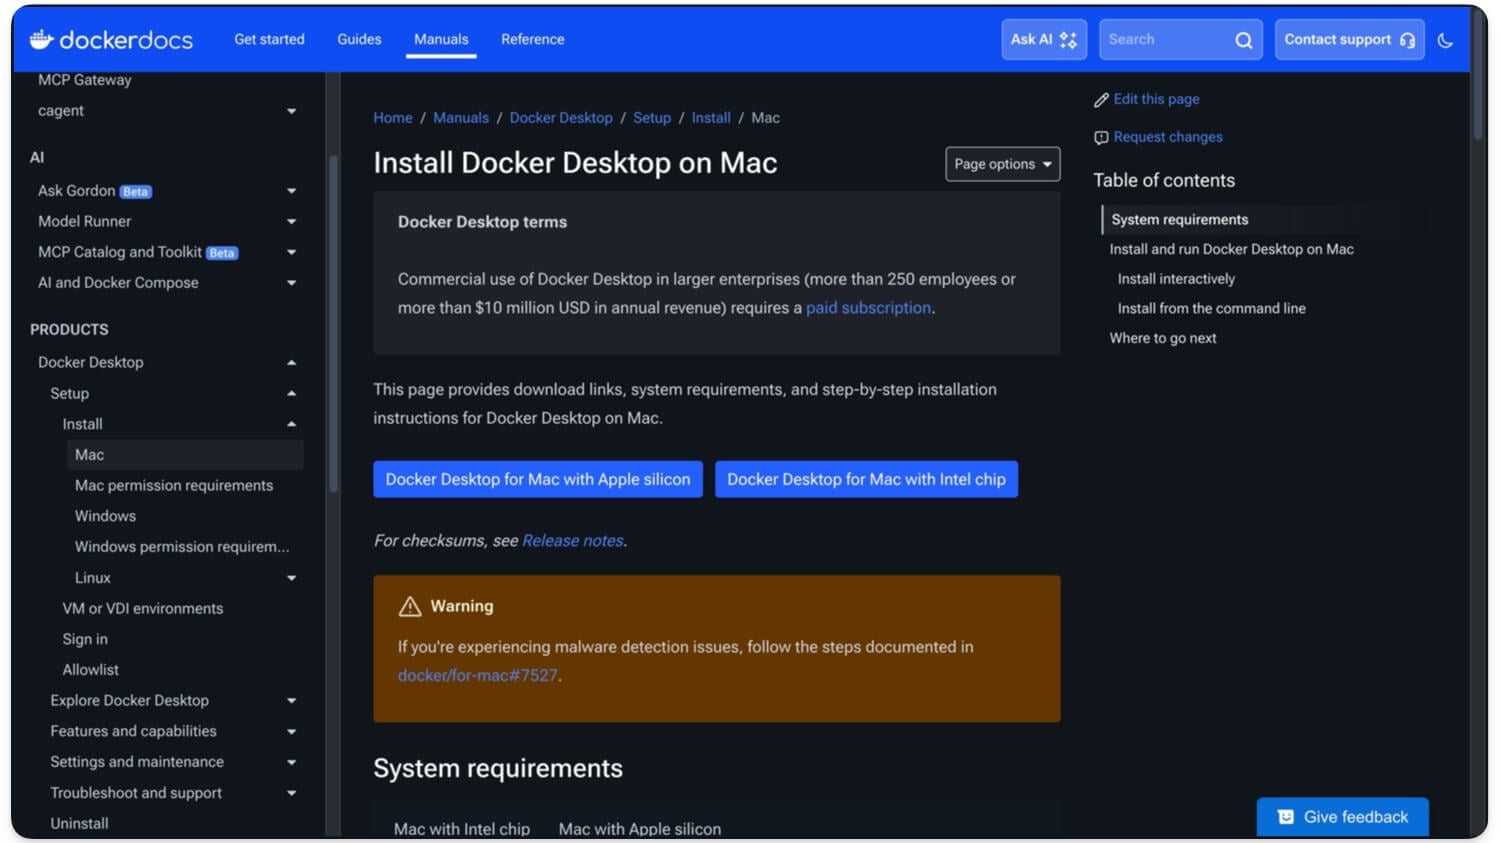
First, install the Docker app on your device. It works on both Intel and Silicon Mac.
Download Docker on Mac using the following links –
Step 2: Install Docker on macOS
Install the Docker app on your device, leave the default settings, and complete the setup using on-screen instructions. If you have already installed the Docker app, open the app and start running it in the background.
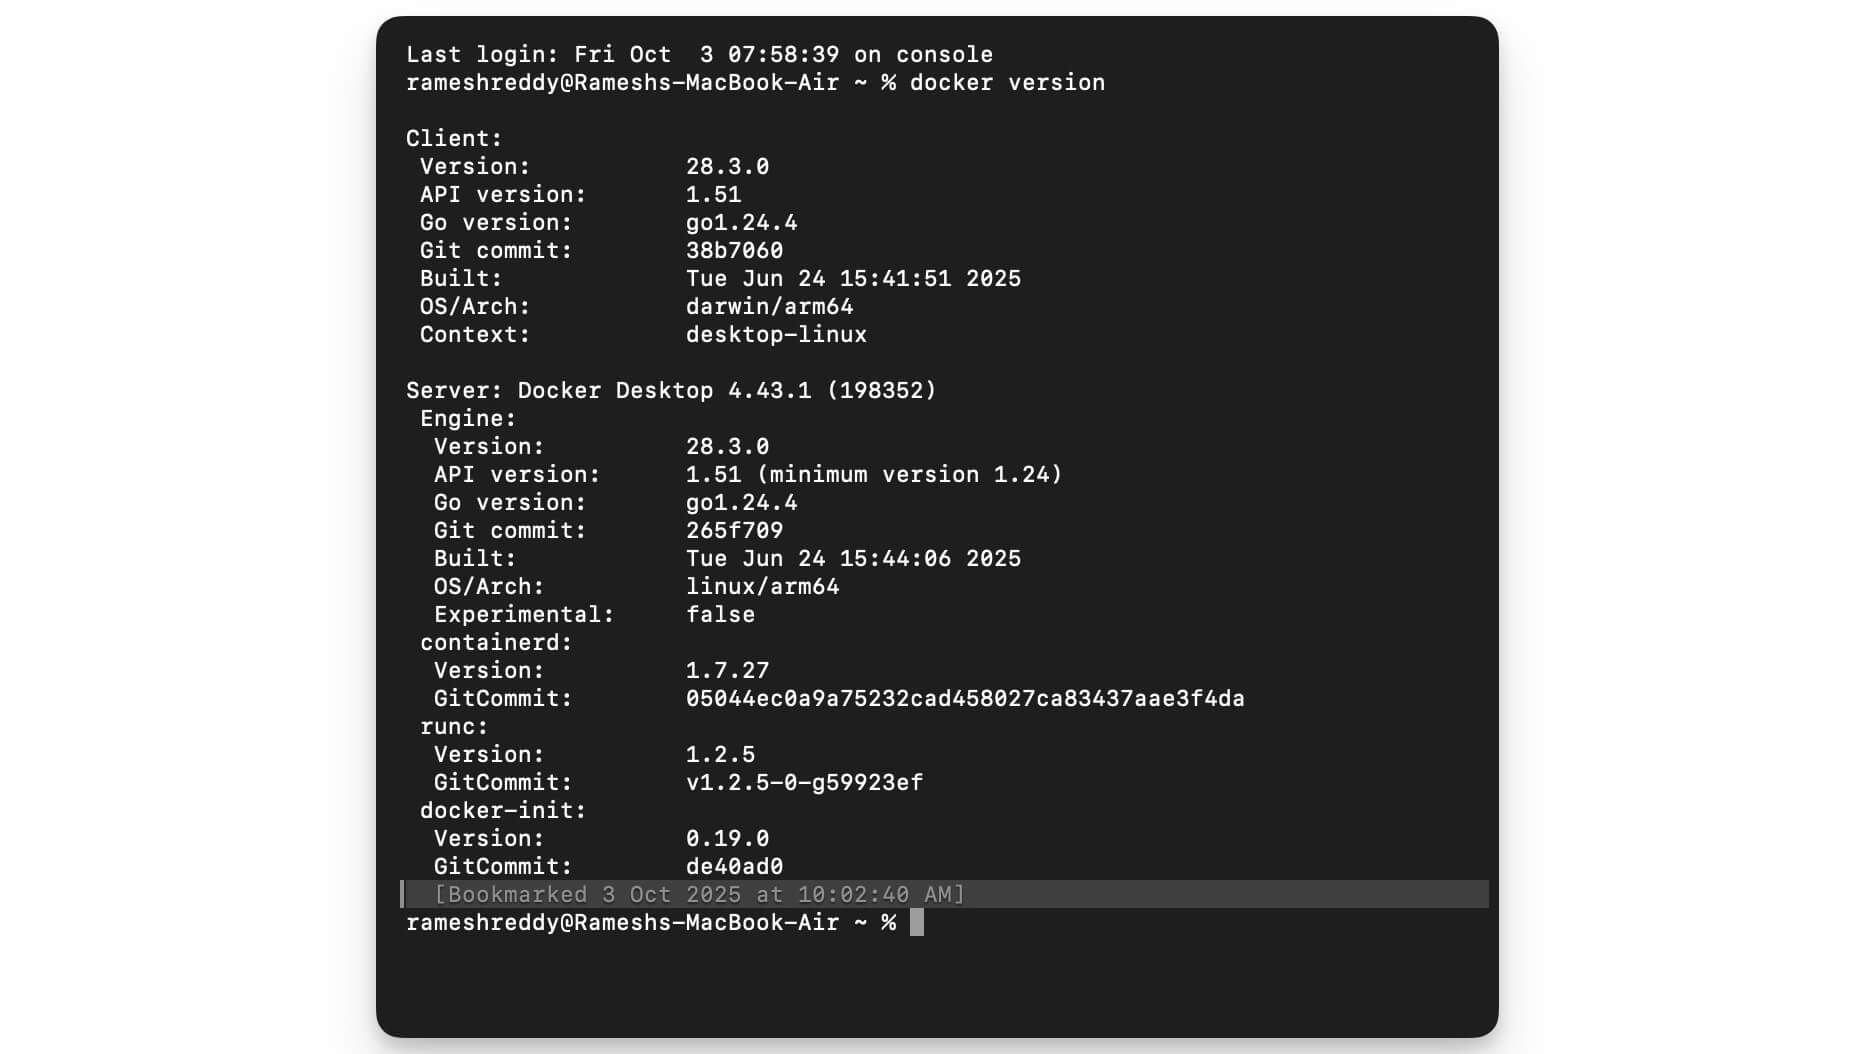
To ensure Docker is successfully running in the background, open the terminal and follow this command: docker version
If it displays Docker version, that means Docker is successfully set up and running on your Mac.
Step 3: Create a Folder for ClipCascade
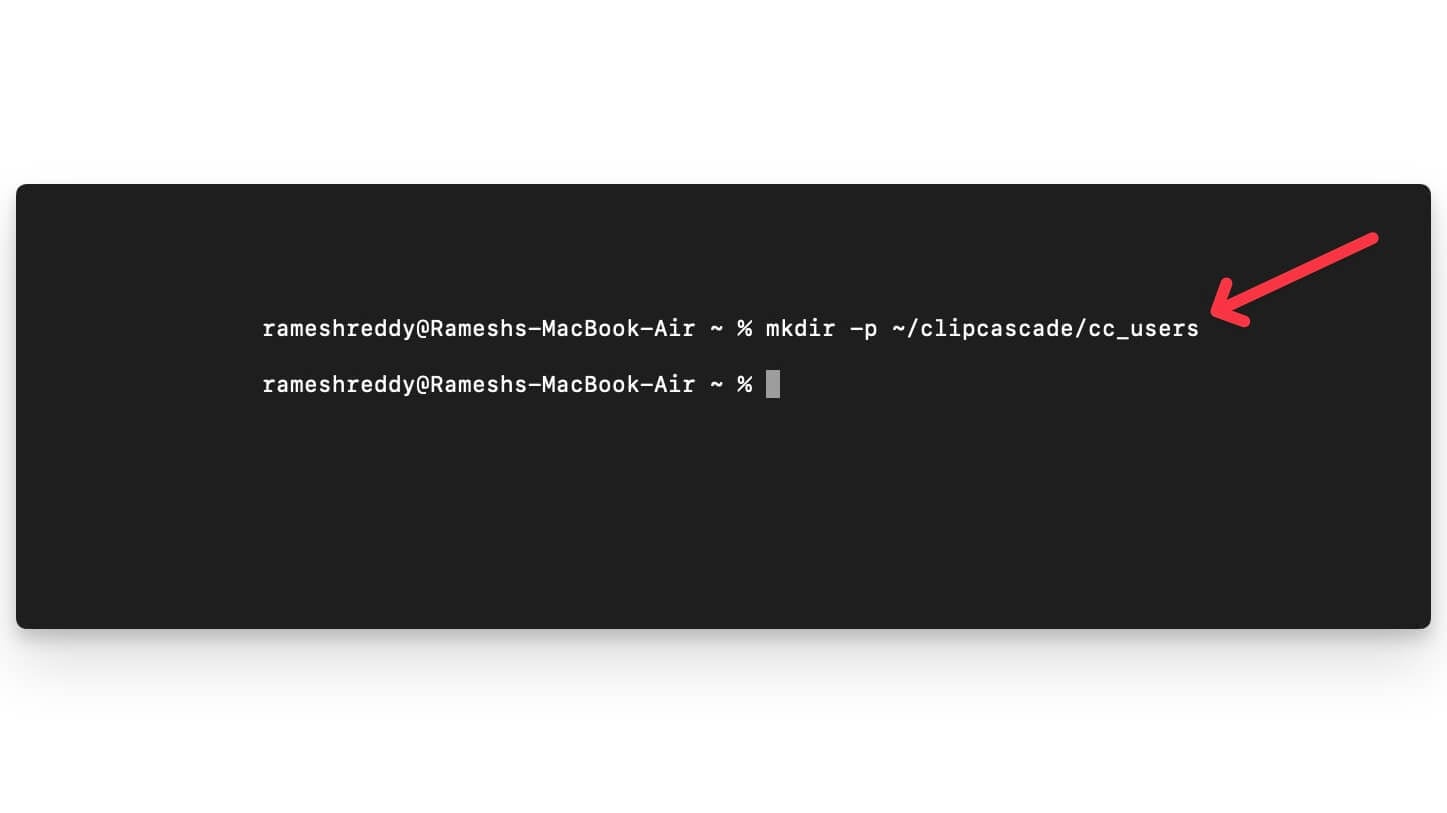
Next, create a folder to store all your clipboard content. You can use the following command to create a folder on your Mac.
Command: mkdir -p ~/clipcascade/cc_users
Open Terminal on your Mac and enter the command. This will create a new Folder on your Mac. Once created, follow the next step.
 Step 4: Run ClipCascade with Docker
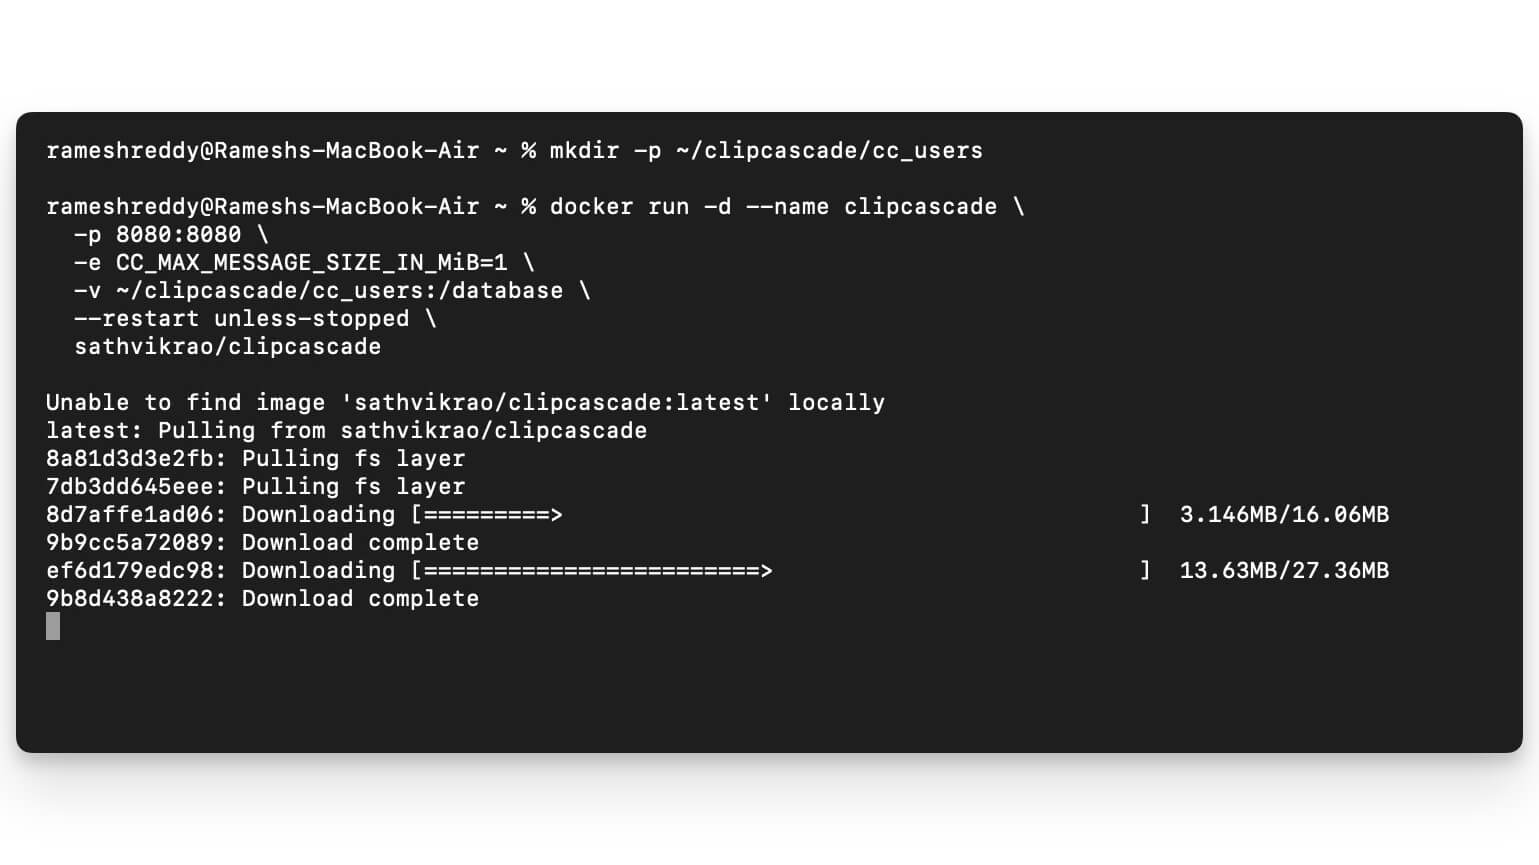
Now, once you have created the folder, run this command using the terminal on your Mac. It pulls all the data from GitHub and installs it locally on your device. Wait for the download to complete, and it finishes. And you can use this command to check if Docker is up and running.
Open the Terminal on your Mac and paste this command and click on Enter. This will pull the Clipcasace app and load iit into the folder
command:
docker run -d –name clipcascade \
-p 8080:8080 \
-e CC_MAX_MESSAGE_SIZE_IN_MiB=1 \
-v ~/clipcascade/cc_users:/database \
–restart unless-stopped \
sathvikrao/clipcascade
Step 5: Access ClipCascade on Your Web Browser
Once your process is complete, copy this URL: http://localhost:8080/ and paste it into your browser. If you see an error, ensure Docker is running. Open Terminal again and enter this command: docker ps, and ensure Docker is running on your device. Open the Docker app on your device, and under action, click on the play button, and ensure the Docker container is running on your device. Now, open the URL again, http://localhost:8080, and see if ClipCascade is running on your device.
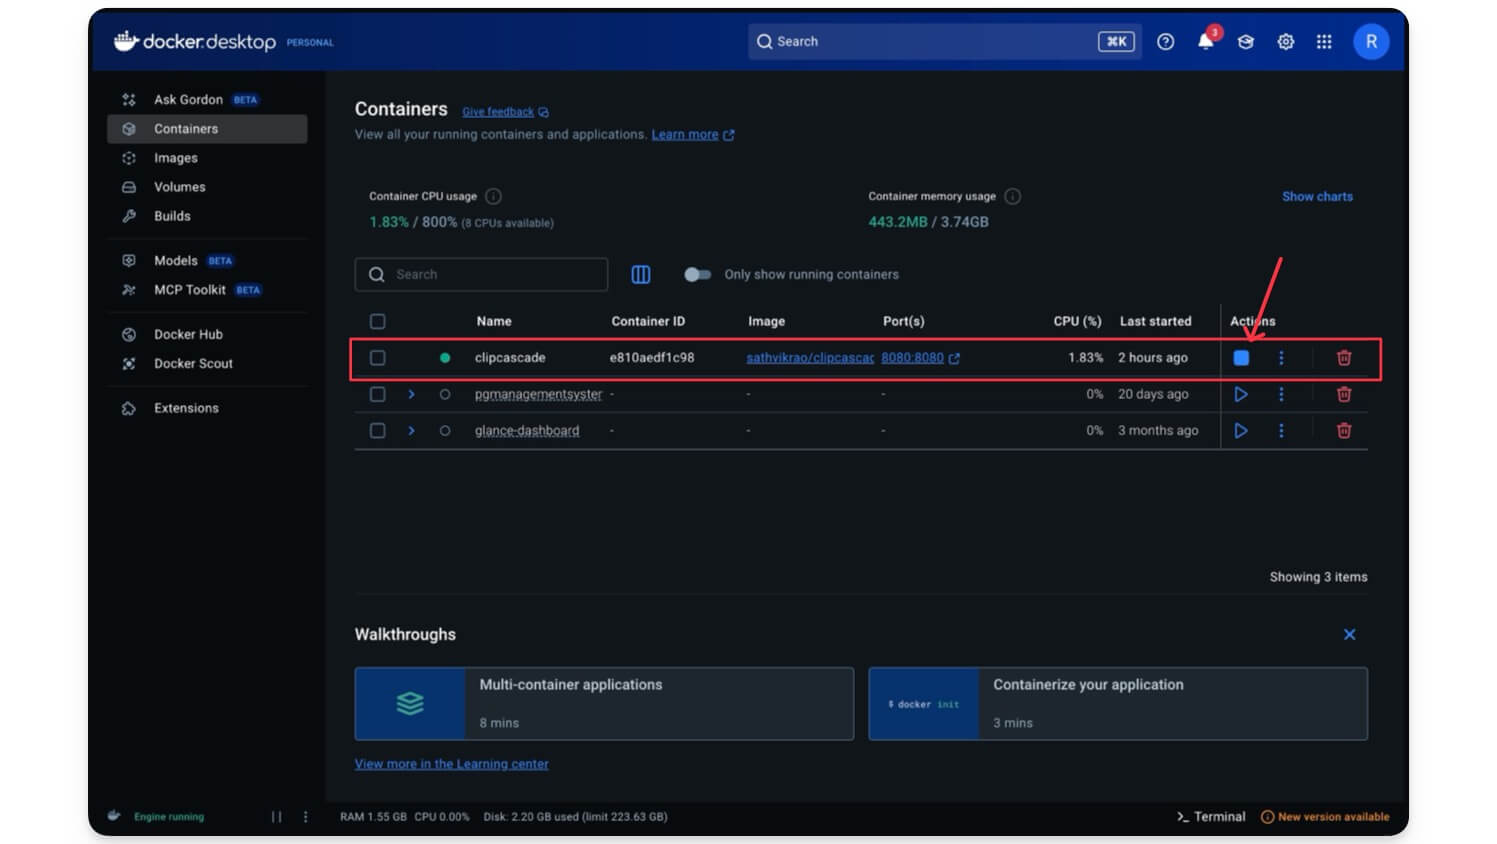
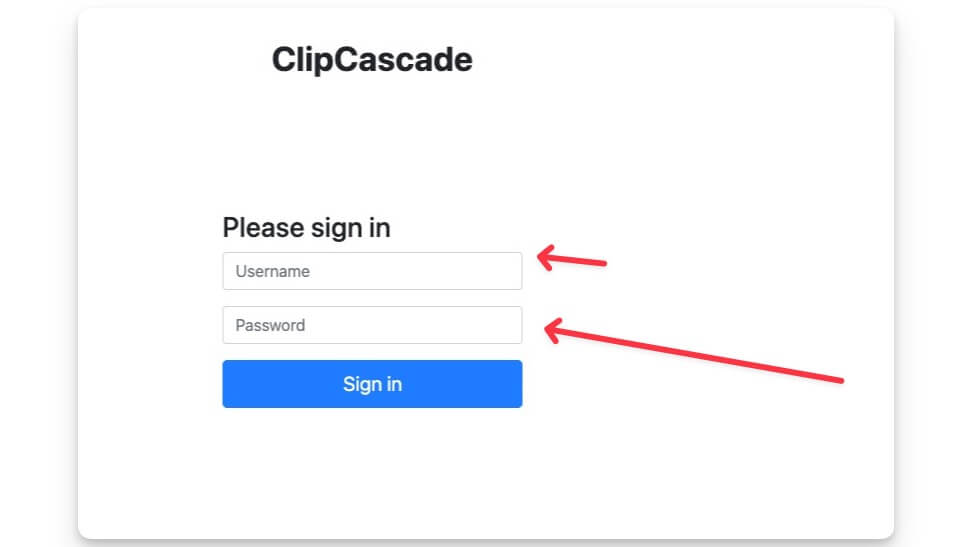
Now you can see that ClipCascade is running successfully on your localhost. Now you can use the default credentials to log in to the app.
- Username: admin
- Password: admin123
Step 5: Change the Default Password
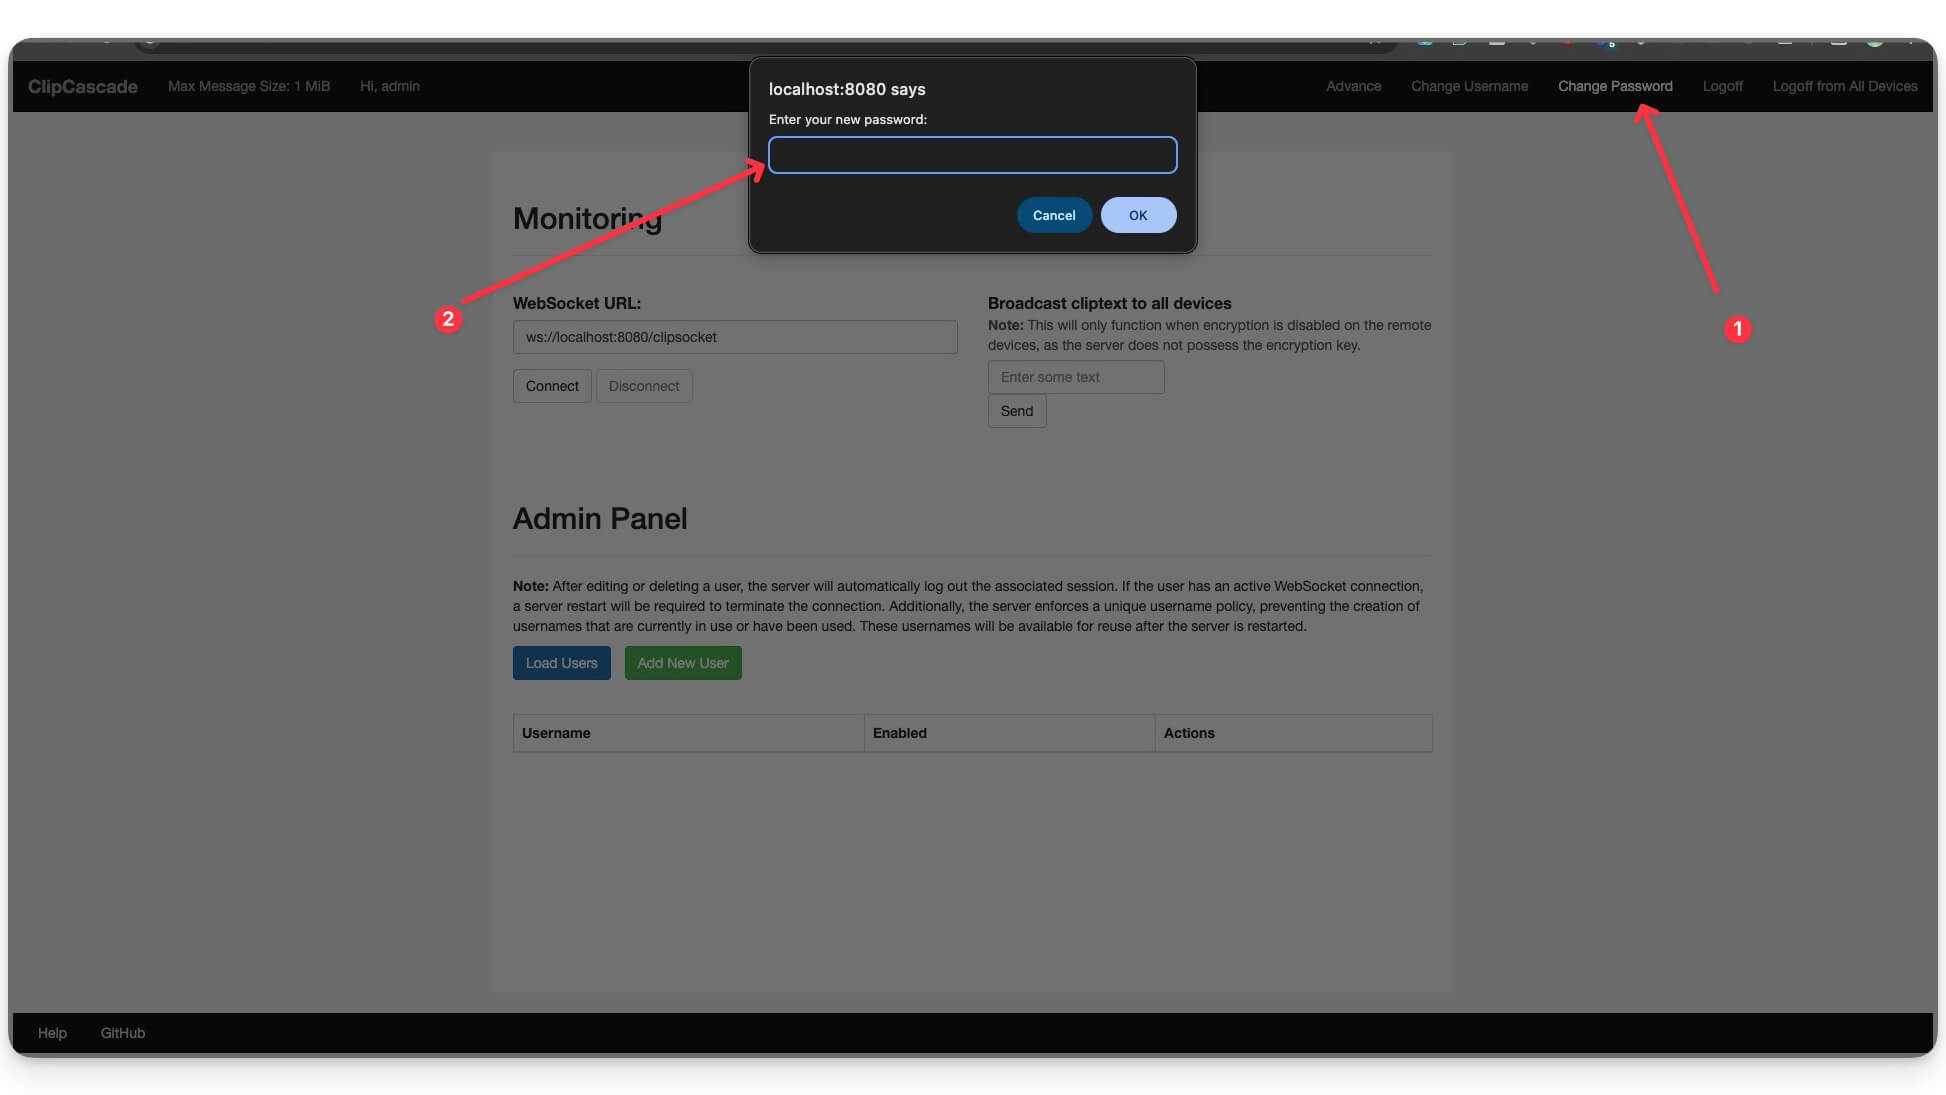
Change the default credentials once you have successfully logged in to the app. To change, once logged in, click on the Change Password option in the header and enter your new password.
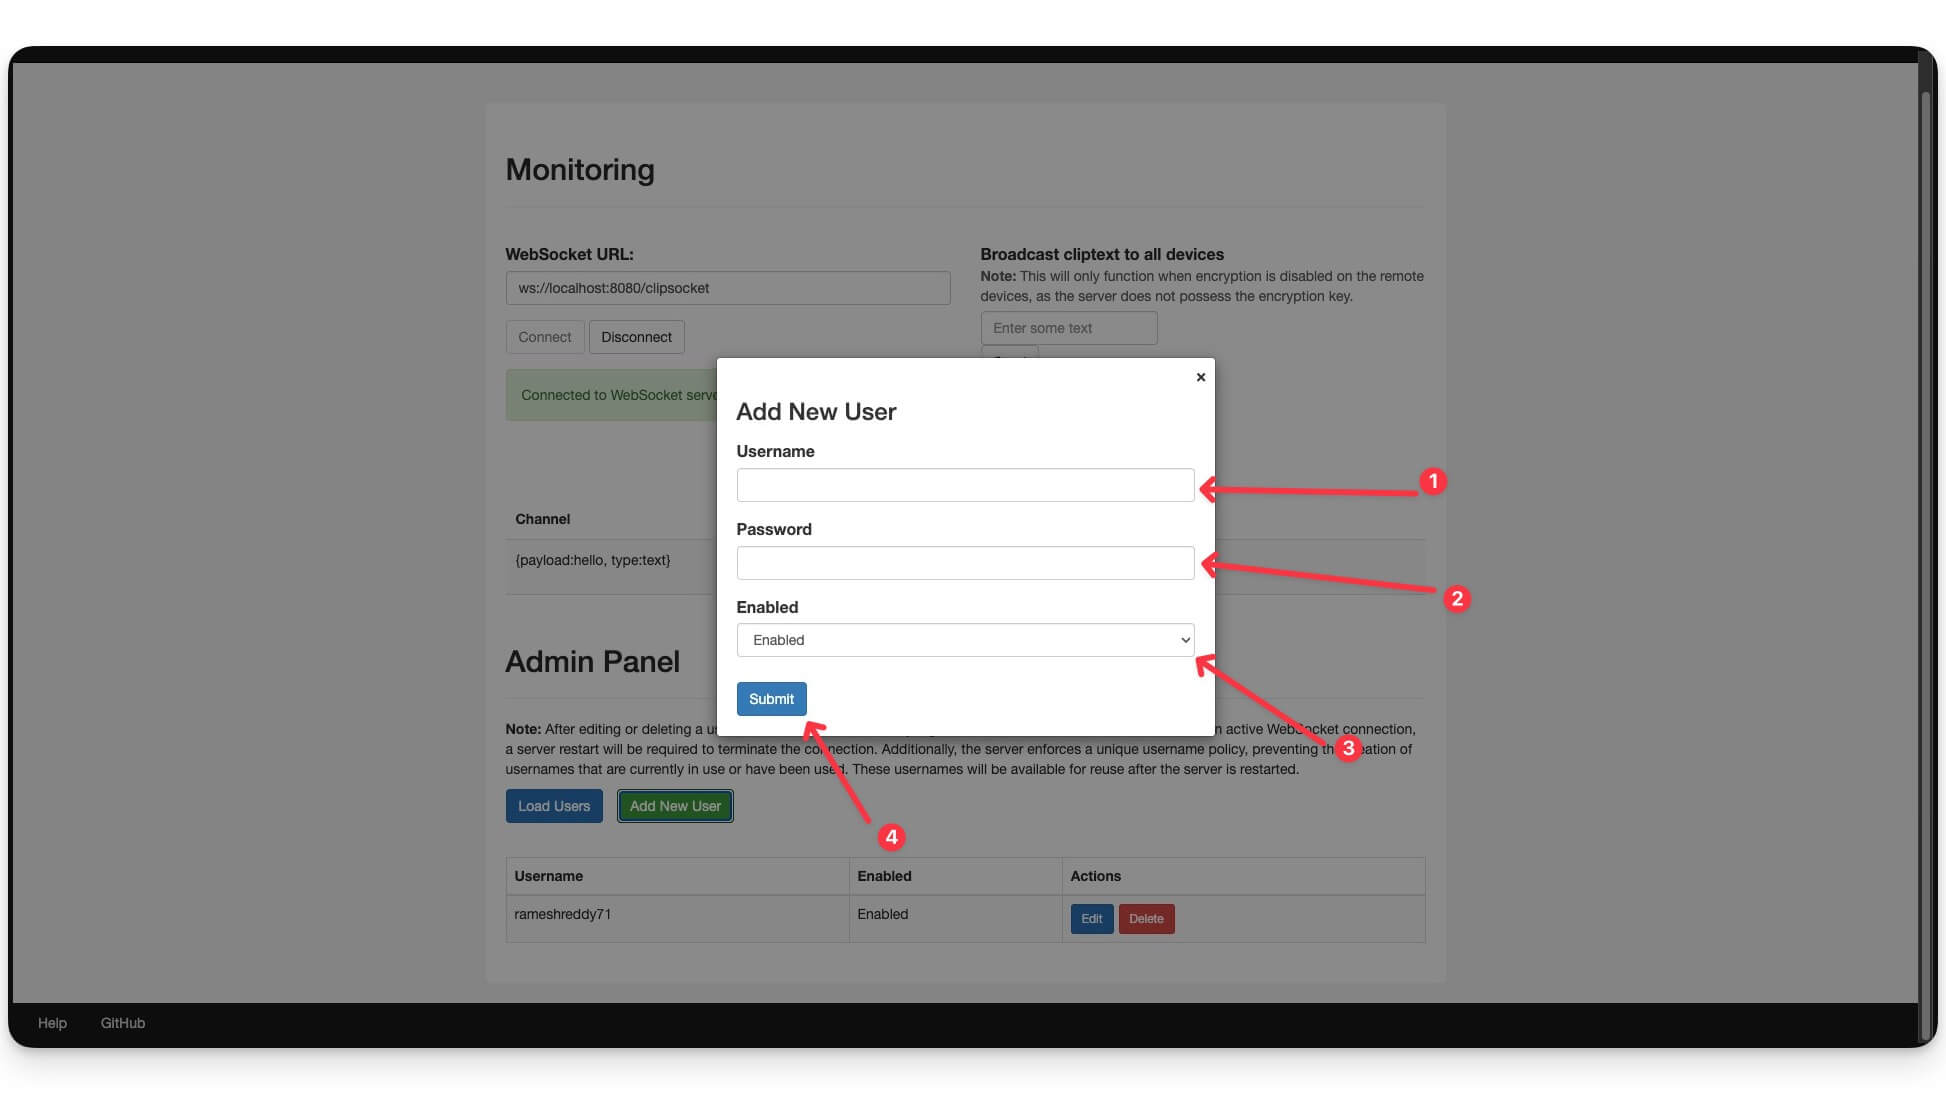
Step 6: Create a New User
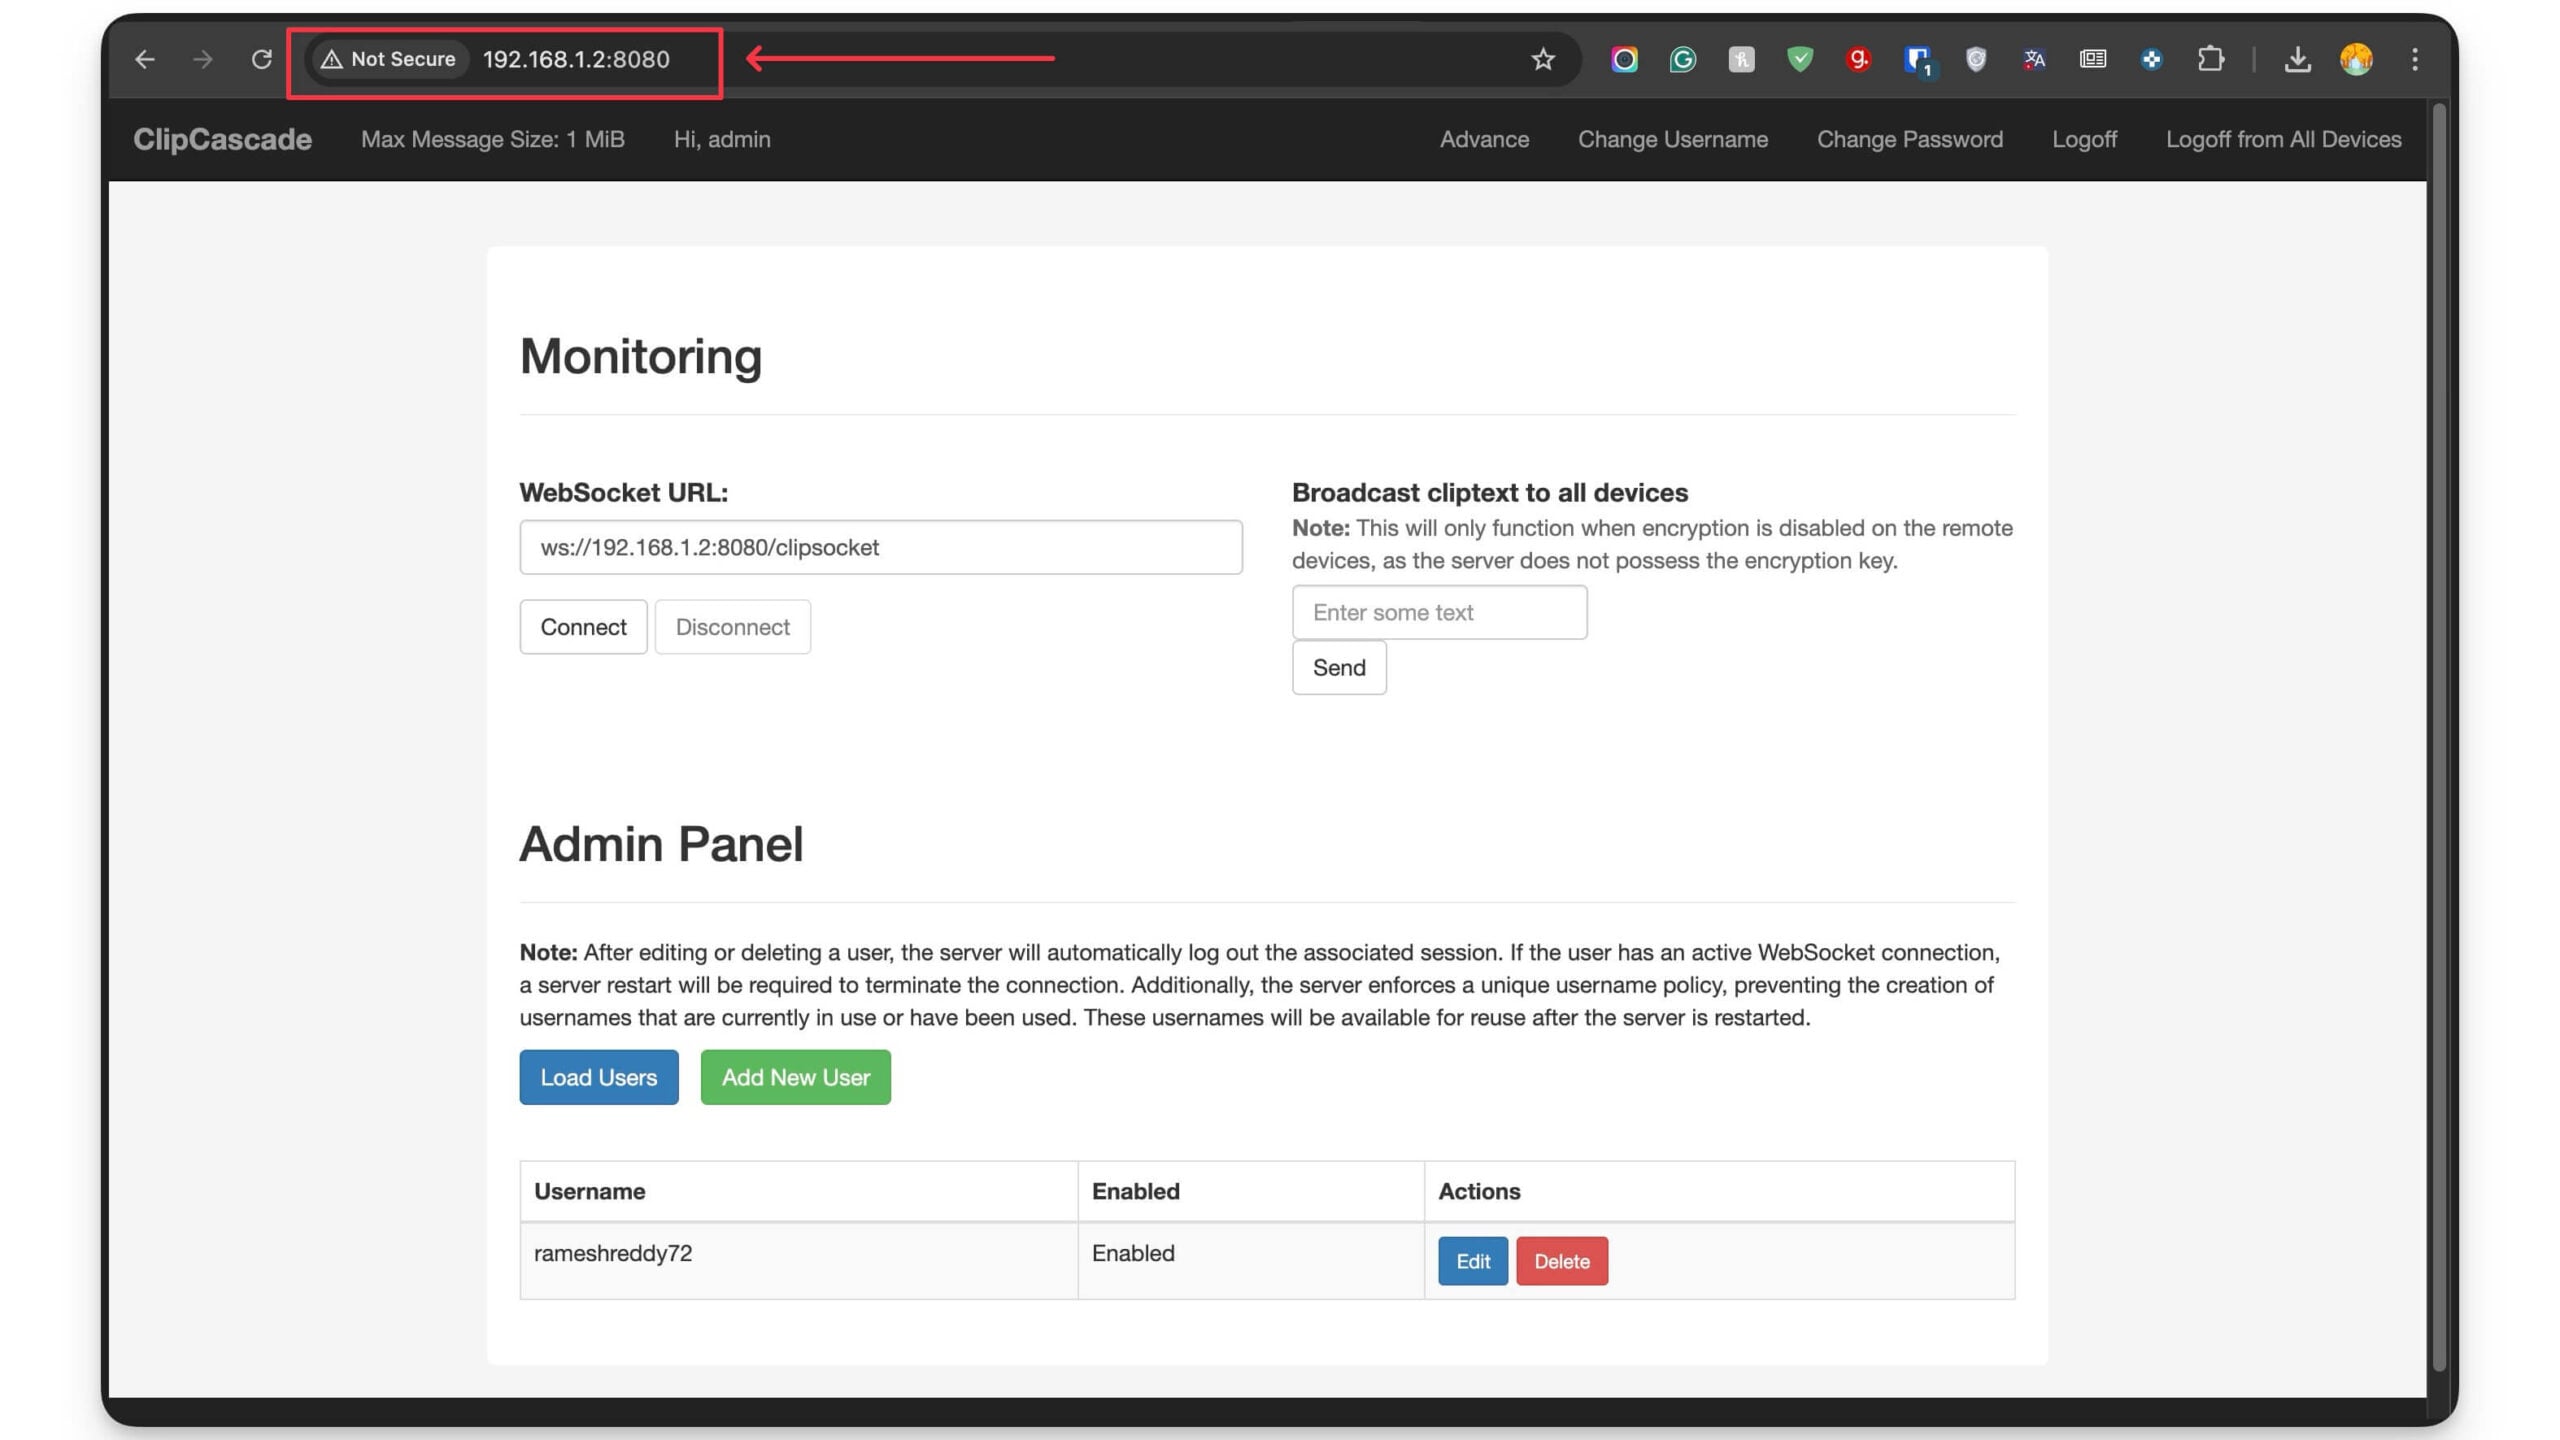
Once you set up Clipcascade on your Mac or Windows, go to the dashboard and under the Admin Panel. Click on Add New User.
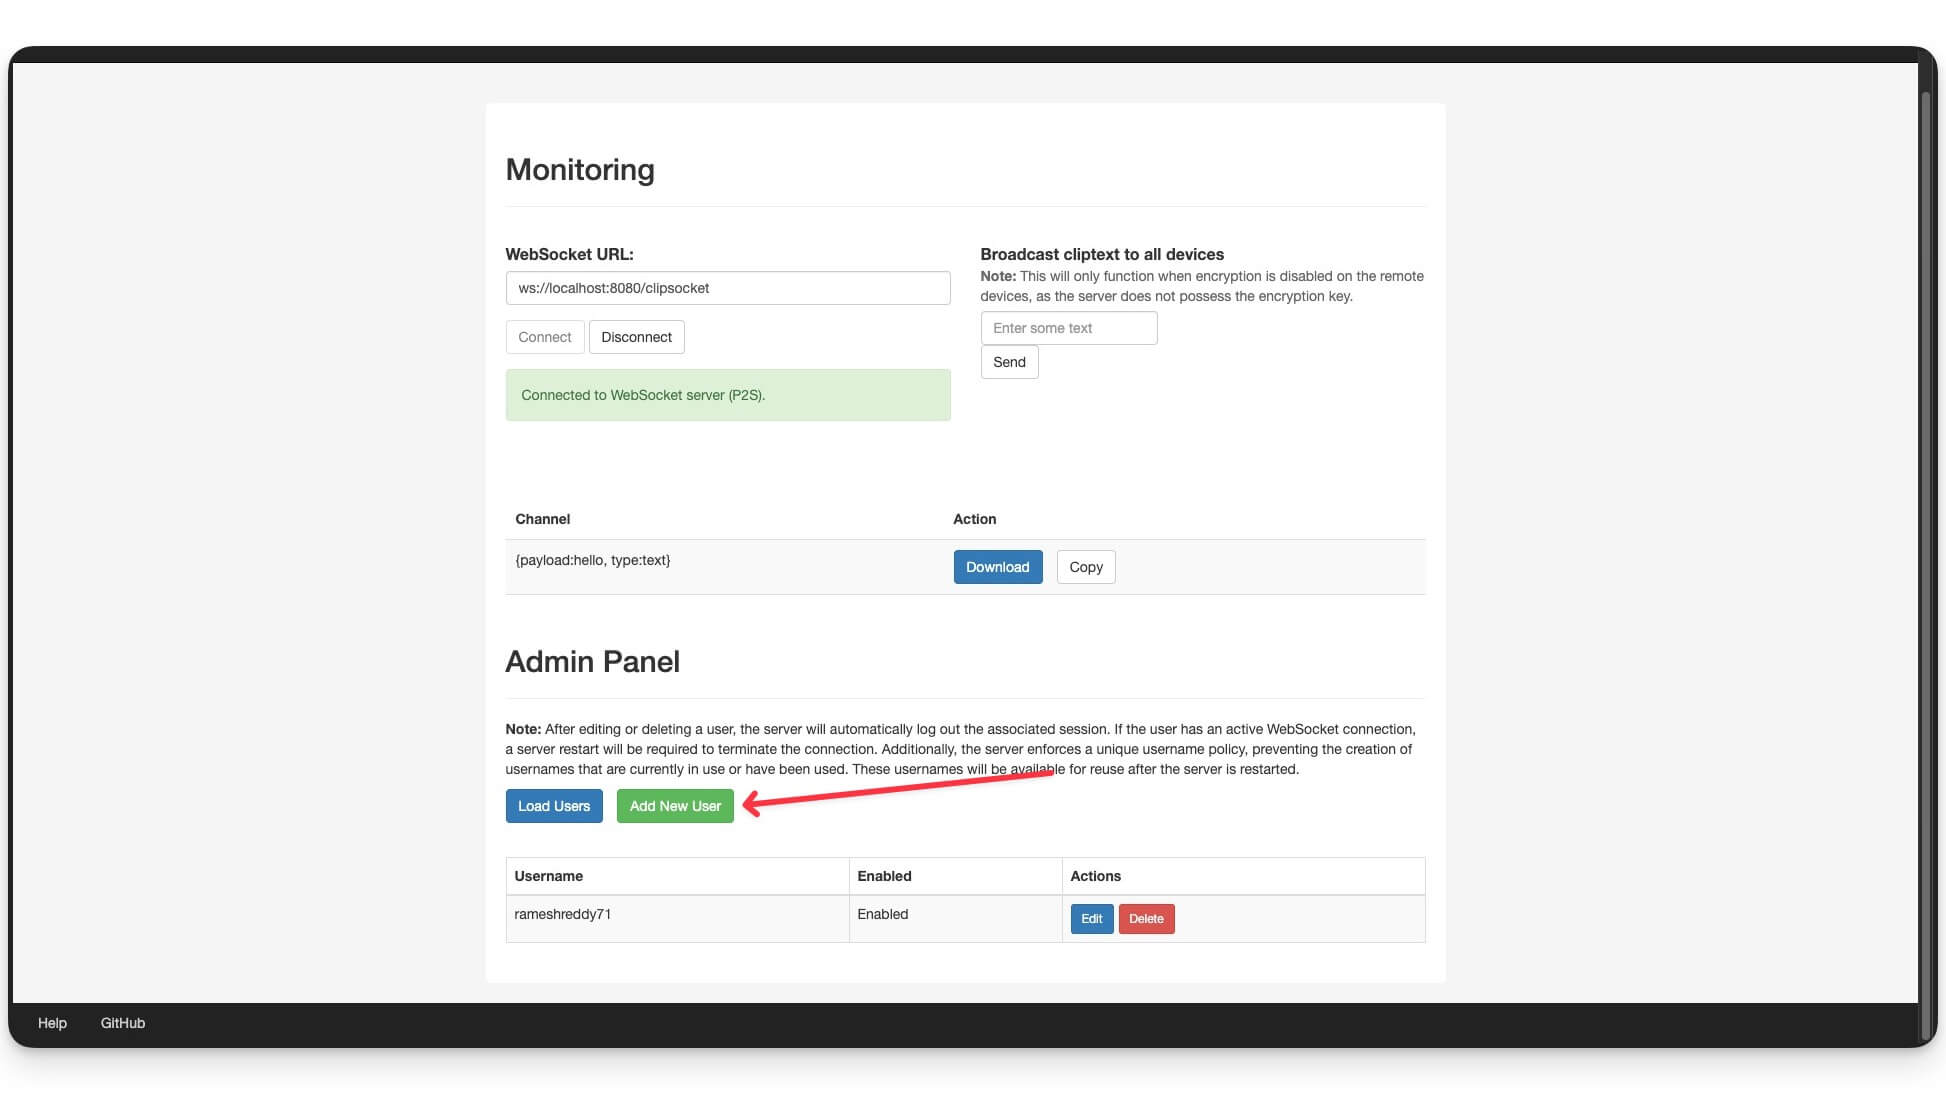
Now, enter the user Username and Password, select Enabled from the drop-down menu, and add the new user. And that’s it, once the user is created, you can use the same creds to connect to the service on another device.
Step 7: Find Your IP Address
Now, open the Terminal on your device and enter the prompt to get your current IP address of your device. On Windows, you can use this command: ipconfig. On Mac, you can use the following command: ipconfig getifaddr en0.
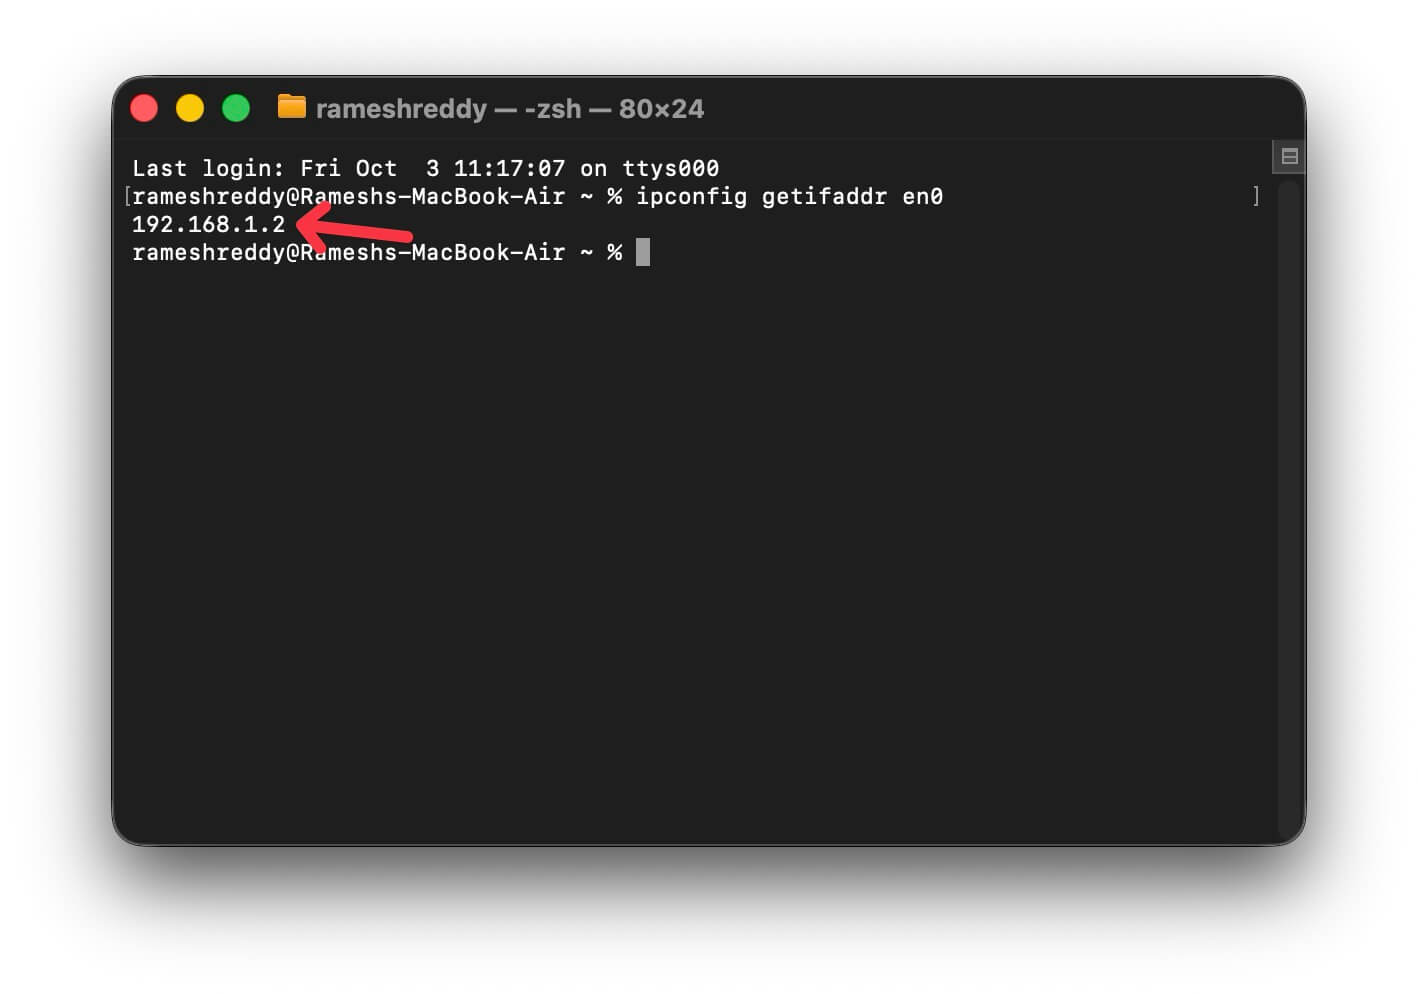
For example: 192.168.1.2:8080 and ensure ClipCascade is currently running on this address. You can enter the URL with the port in your browser. You can again sign in without an account and click on the load user if it asks you to sign back in. Once the ClipCascade is running on this address, you can use the same address URL to log in to other devices.
Step 8: Install ClipCascade on Mac and Android
Next, install the ClipCascade on the devices you want to sync the clipboard. In this case, I am using Mac and Android. You can install it on any device, including Windows and Mac.
On macOS
To install and use ClipCascade on Mac, download the app on your Mac
How to set up the ClipCascade app on your Mac:
- Install the app on your Mac. Follow the on-screen instructions. Once the app is installed on your Mac. Open it and follow the steps below.
- Now, enter the Username and Password that you created when adding a new user in the ClipCascade. If you forget, you can find these credentials using the admin page.
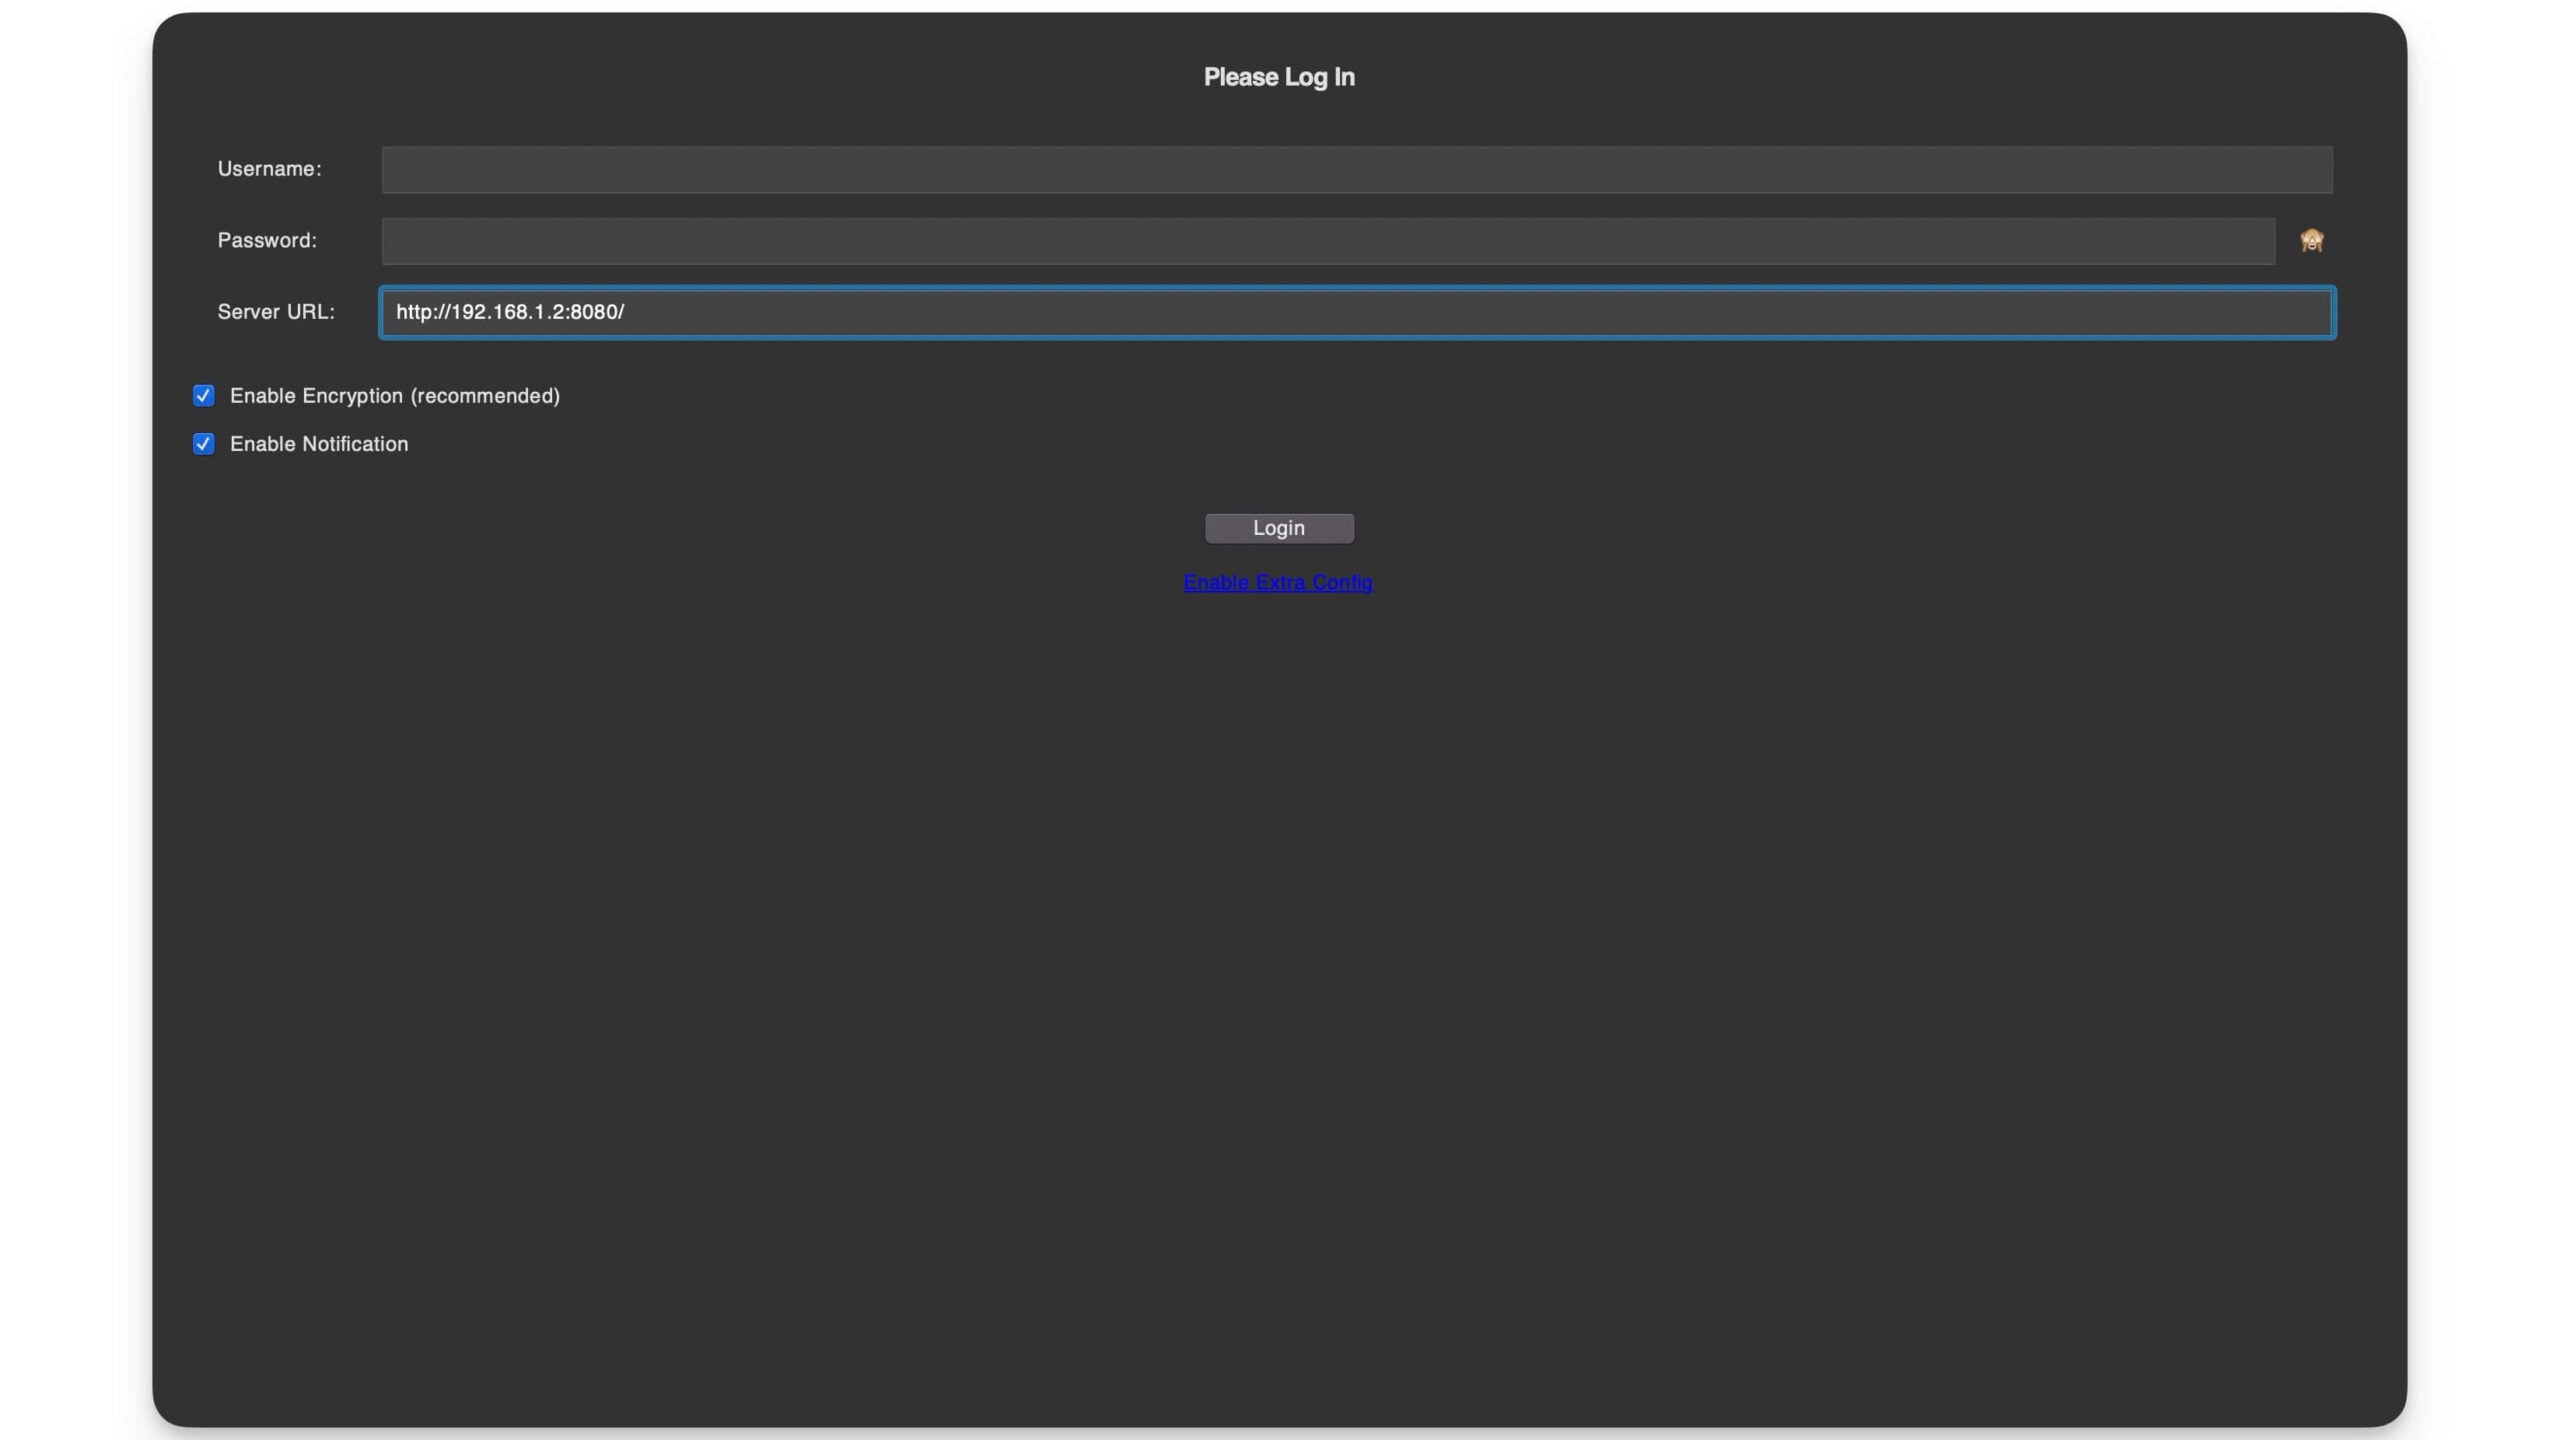
- Once you enter the username and password, enter the URL and click on Login. Once you have successfully logged in, you are now connected to the ClipCascade server on your Mac.
- To share text to Android or any other device, you can just copy the text on your Mac, and it will be automatically copied to the other device. You can simply long-press and paste it on the other device. Ensure the ClipCascade app is running in the background on both your devices and the content you want to copy to the other device.
On Android
Next, you need to install and use ClipCascade on Android
- Now download the ClipCascade app using this link – Download the ClipCascade app for Android.
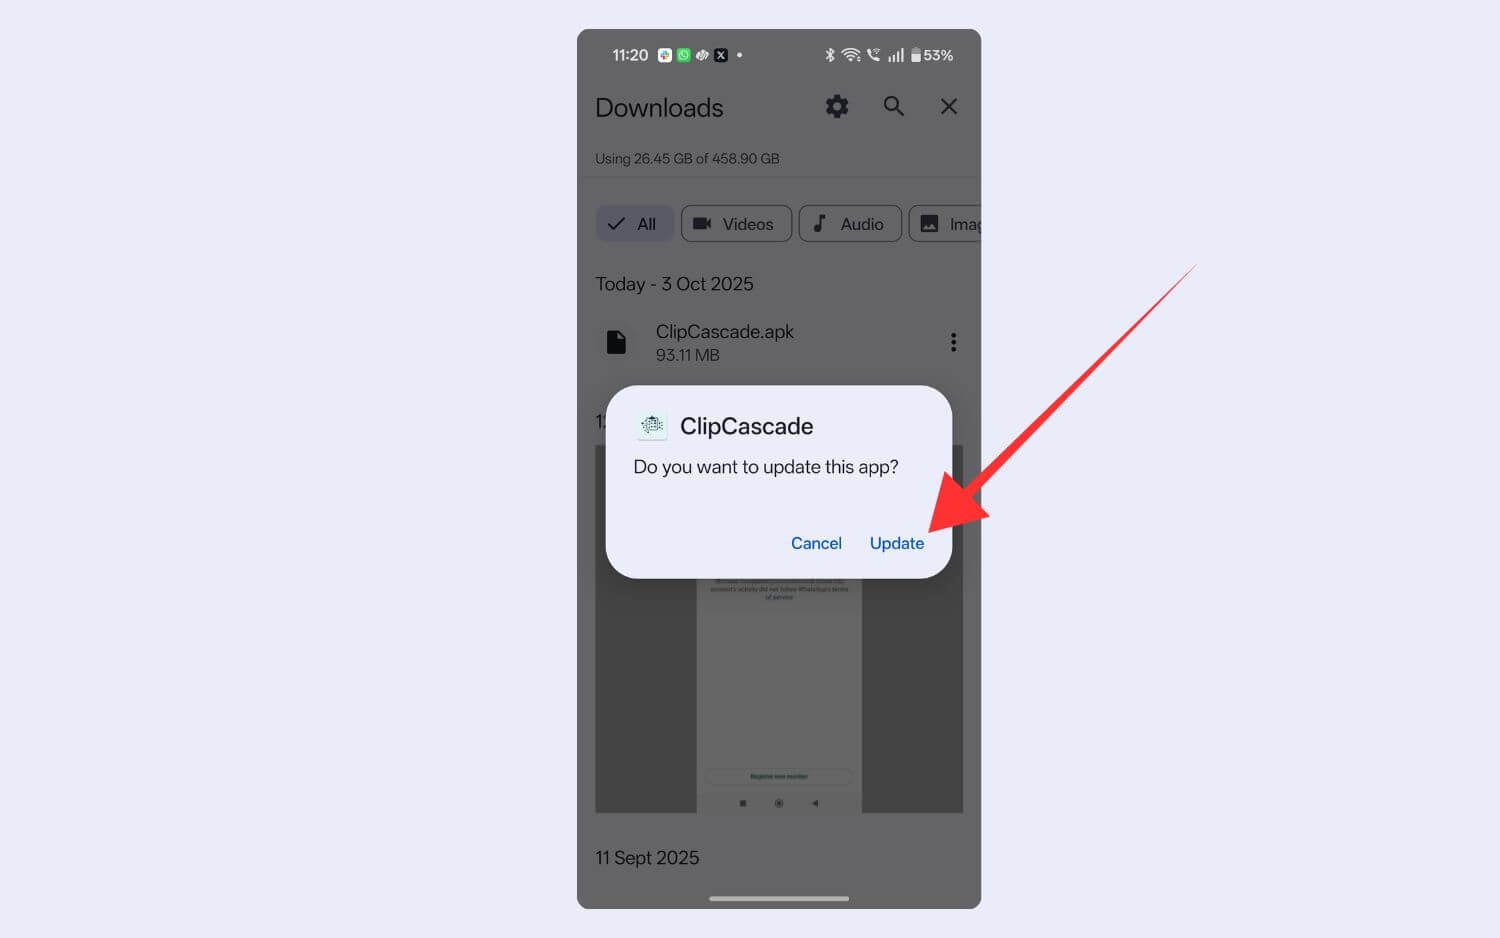
- Install the app on your device. If your device blocks external downloads, you need to allow installation from unknown devices.
- Once installed, open the app and enter the login details, including the username and password (if you changed your password, enter the new password here). You can use the user credentials that you have created under the admin panel.
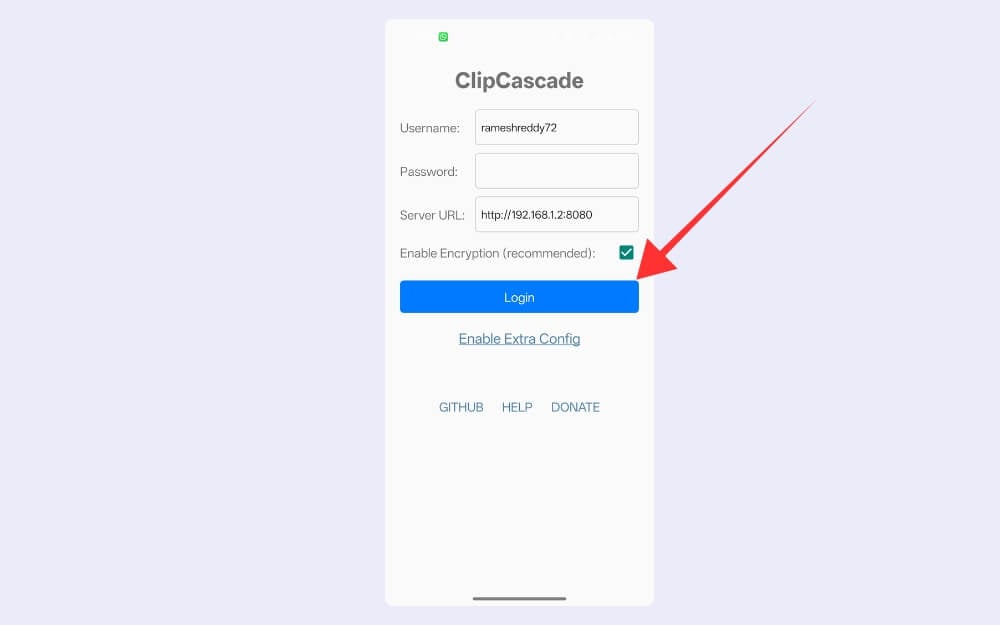
- Next, in the server URL, enter the server URL where ClipCascade is currently running on the device (to find, follow Step 6) and click on the Login. Once you have successfully logged in, click on Start.
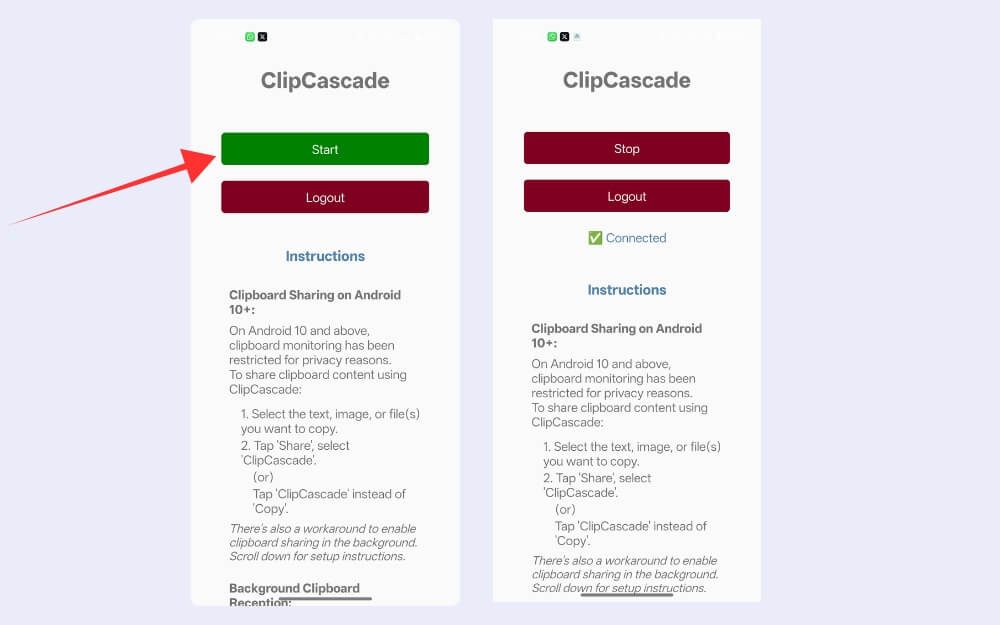
- Similar to KDE Connect, to share clipboard content from your Android, you need to share the content with the app. Once you copied the text, click on the share and select the app, or once you copied the text, you can tap on the ClipCascade notification on the notification bar, and that’s it. Now you can paste the content directly on your Mac.
How to Share Clipboard Content From Android to Mac
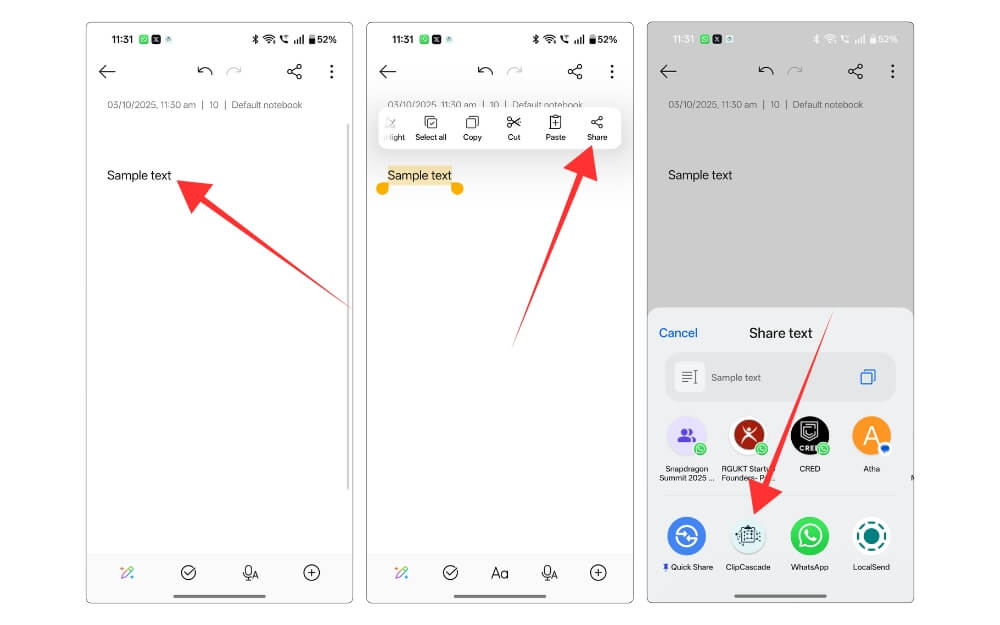
To share content between Android and Mac, you need to go through one extra step. Ensure ClipCascade is running on the server, on your Mac, and on your Android smartphone. Now copy the content on your Android smartphone, click on the share button, and select the ClipCascade app. Now you can directly copy and paste the content on your Mac.
How to Share Clipboard Content From Mac and Android
Ensure the clipcascade app is running on your Mac and Android smartphone. You can directly copy the content on your Mac and paste it on your Android smartphone.
FAQs on Sharing Clipboard Content Between Android and Mac
1. Can ClipCascade sync clipboard data when my Mac is asleep?
No, you cannot sync clipboard content when your Mac is in sleep mode. Since we used Docker to run this service, your Mac should be awake, and Docker needs to be running in the background to sync clipboard content between the devices.
2. Does ClipCascade only sync text, or can it also handle files and images?
You can also copy and paste images and all files between the content. Similar to text, when syncing images from Android to Mac, select the image in your Android smartphone, click on the share, select the ClipCascade app, and on Mac, you can enter command + V to paste the image on your Mac. You can directly copy the image on your Mac and paste it directly on your Android smartphone.
3. Do I need to reconfigure the Android app every time I restart Docker?
No, as long as the server is running on the same IP and port, you don’t need to reconfigure the Android app every time you restart the Docker app on your Mac. However, if the Mac local IP changes, you need to re-enter the credentials and the URL, and you have to reconnect to the server on your Mac.
4. How do I access ClipCascade when I’m outside my home Wi-Fi?
If you are outside of your network, you can set up a VPN such as Tailscale or Wireguard. Once you have set up the VPN, you can access your Mac content from anywhere, even from outside of your network, to access the clipboard. Install the free Tailscale app on your macOS and install it by signing in with your Mac address. Once you have created a new account, your Mac will now have a new Tailscale IP address. Now install the Tailscale app on your Android smartphone, and log in with your same account, now on your Mac ensure the docker is running on the server, now install the ClipCascade app on your Android smartphone and enter the new Tailscale IP address in the server URL and connect to your Mac and thats it, now you can access the Mac clipboard content outside of your local server.
5. Can multiple people in the same household use ClipCascade?
Yes, you can create separate users in the ClipCascade admin panel and sync clipboard content between the devices. For instance, from the admin panel, click on Add New User and create a new user. Use the same credentials on the device you want to sync the clipboard. For instance, on a new Windows device or Android device, you can log in with the new credentials and sync the clipboard content between them. Ensure these users are different so that clipboard data won’t interfere with other devices.
