Slack is a popular messaging platform for team communication. It’s the go-to communication app for teams/organizations with remote workforces.

If your team, too, uses Slack for communication, familiarizing yourself with the best Slack features and tricks can help you use it more effectively and be more productive.
Here are all the best Slack tips and tricks you must know to get more out of your Slack usage.
Table of Contents
1. Create Channels
Slack revolves around workspaces. If you’ve got a workplace on Slack, you can get more out of it by creating various channels.
A channel in Slack allows you to keep all your discussions organized and improve your collaboration experience. For instance, if you have a workspace for your ongoing project that relies on a huge software stack, you can create channels for different modules to maintain relevancy locally and make it easier for users to discuss and find related conversations.
Here’s how to create a channel in Slack:
- Head over to your workspace in Slack.
- Tap on the + icon next to Channels and select Create a Channel.
- On the next page, give your channel a name and add a telling description about its purpose.
- Finally, hit Create.
Additionally, Slack also allows you to create private channels for when you need to keep conversations restricted to a few team members. Such Slack channels are only accessible to those with an invitation link.
2. Enable Two-Factor Authentication

We can’t stress how crucial it is these days to have a second factor of authentication—in addition to the password—across all your different online accounts. [Guide to enable two-factor authentication]
Follow these steps to add a 2FA to your Slack account:
- Upgrade to a premium tier subscription.
- Head to the Settings & Permissions page and go to the Authentication tab.
- Click Expand besides the Workspace-wide two-factor authentication option and tap on Activate two-factor authentication for my workspace.
- Finally, choose between text messages or the Authentication app to get your authentication codes.
3. Integrate Third-Party Apps

For teams that rely on third-party apps to get things done, Slack offers the option to integrate these apps into your workspace. Some of the available apps include Google Drive, Google Sheets, Box, OneDrive, 1Password, Giphy, IFTTT, and RSS, among others.
Here’s how to integrate a third-party app to your Slack workspace:
- Go to your Slack workspace on the web and log in.
- Tap the hamburger menu on the top left, and from the list, choose Configure apps.
- Go to the App Directory to find all the supported third-party apps.
- Select the app you want to integrate into your workspace and tap on Add to Slack.
- Finally, grant it access to the required permissions.
Alternatively, you can open the Slack app, go to your workspace, and tap on Apps to find all the supported third-party apps and integrate them from there.
4. Allow Video Calls and Change the Default Calling App
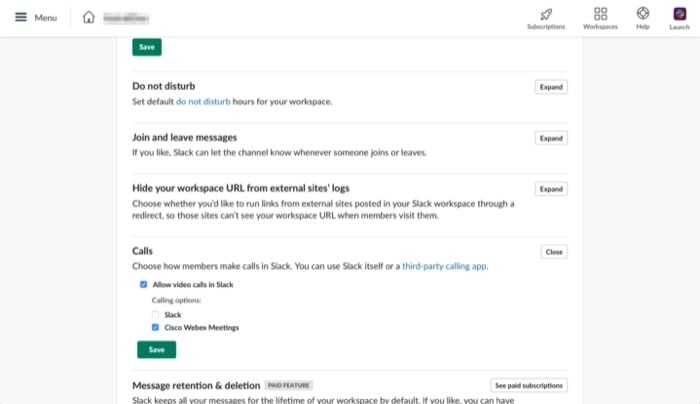
If you often need to be on video conference calls with your peers, you can take help from the above tip to integrate your preferred third-party video calling app of choice into your workspace. Once done, you need to change the default calling app, which you can do using these steps:
- Head over to your workspace on the web and log in.
- Go to Settings & permissions under Administration.
- Scroll down until you find Calls and mark the checkbox that says Allow video calls in Slack.
- Select the checkbox next to the app you want to set as the default calling app on Slack.
5. Create Better Polls
Companies with a large number of employees working in different departments often find the need to get collective feedback or other valuable input on different matters. If you happen to have a startup or you lead a team at an organization, and you need to conduct surveys (or polls), Slack has you covered, thanks to third-party integration.
Here’s how to take advantage of this feature to create a poll in Slack:
- Open the workspace in which you want to create a poll and go to the Slack app directory.
- Enter the term poll to view a list of all the poll-taking apps and hit Add to add the app to your workspace. We recommend Polly and Survey Monkey, which are two of the most popular poll and survey apps.
Once added, you can easily conduct polls in your Slack workspace.
6. Limit Third-Party App Installation

When you get started with Slack, the ability to install third-party applications is enabled by default. However, if you want, you can disable this to limit the number of third-party app installations on your workspace. After you do this, if a member tries to install an app in the workspace, it will require you to approve the installation at your end before it’s added.
Here’s how to disable third-party app installation on Slack:
- Head over to App management settings.
- Toggle the button next to Approve apps. From here, you can also customize the settings further and permit people who can install apps without requiring your approval.
7. Filter messages

Given you’re always on and off with Slack throughout the day, you’ll likely end up with an inbox full of messages related to different subject matters. To cope with such situations and avoid missing out on important messages, Slack offers the keyword filter feature to help you get to the messages with the most relevance.
Follow these steps to use this feature:
- Open your workspace in the app and head to Preferences.
- Here, with Notifications selected from the left corner menu, select the radio button that says Direct messages, mentions & keywords.
- Finally, under My keywords, enter the relevant keywords to your related field or for the subject that you’re anticipating the incoming messages.
8. Hide Email address from Profiles

If privacy is one of the concerns for you or your team members, you can hide their email addresses from their profiles and make them private. Follow these steps to do this:
- Open your workspace on the web and go to Settings & permissions.
- Scroll down to Email address display and tap Expand.
- Uncheck the box next to Display members’ email address and hit Save.
9. Limit Invitations

By default, Slack gives all members of a workspace the ability to invite new members. Although this can be useful sometimes, in general, you should disable this option to keep a check on who gets to add people to the workspace. Here’s how to do this:
- Go to the Permissions and hit Expand next to Invitations.
- Check the checkbox next to Require admin approval, and from the available options under Send invitation requests to, select either Add admins or This channel. While the former requires the approval of admins, the latter sends the requests to a channel, which then needs to be approved.
10. Set a Reminder for Yourself

When you work with teams, tasks often get distributed among team members to improve the team’s efficiency and maximize output. For such times, setting up a reminder to finish a task in the stipulated time frame can help you stay on top of your work.
Follow these steps to create a reminder:
- Go to the channel where you want to create a task.
- Tap on the lightning icon in the message box and select Set myself a reminder.
- On the next screen, give your reminder a suitable name, time, and description.
- Finally, click Create, and you should have your reminder set.
11. Take a Quick Note
The need to jot down something can arise anytime. While your trusted note-taking app can surely help you with this, if you’re in conversation with someone on Slack and need to note down things often, the easiest way go about it is to use the direct messaging feature.
Simply open a direct message to yourself and start enter text. Just like other direct messages, it will save your entire message history, and you can find it under the Direct messages section on the app. Besides notes, you can also use direct message to list your to-dos or keep files or links handy.
12. Create Custom Slackbot Responses

Slackbot is a bot in Slack that helps you send messages, deliver reminders, or notify people when they’re mentioned in a channel. While it’s pretty responsive at what it does, Slack offers you the option to create custom Slackbot responses for times when you need to respond to a particular set of queries in a specific manner.
For instance, if you get a lot of queries around passwords, links, etc., you can have the Slackbot send automated responses to such queries for you.
Follow these steps to set a custom response in Slackbot:
- Go to Customise your workspace.
- Enter the most asked questions under the When someone says input box and the response under the Slackbot responds box.
- Finally, hit Save response.
To add more such responses to common queries that you often come across, hit the Add new response button, and repeat the same steps.
13. Create a To-Do List
Working with team members requires you to be on top of the tasks allotted to you or checking-in on others if you’re the lead. Although you can leverage the potential of starred messages, saved messages, and pinned messages to keep a tab on tasks and revisit them later, a better way to do this is to create a to-do list for yourself and other team members.
Here’s how to create a to-do list in Slack:
- Open the channel in which you want to create a to-do list and hit the lightning icon in the message window.
- Choose Create a post from the options and start creating your post.
- To list to-do items, select the text and tap on the checklist button in the pop-up window.
- Finally, hit the Share button, select where you want to share it, and click Share.
14. Use Emojis to Respond Quickly
For times when you need to respond to a text message with something as trivial as, say, “completed”, “taking a look”, etc., Slack has dedicated emojis to save you the effort of having to type out such messages.
To respond to a message with an emoji, go to the message to which you want to respond and click on the Add reaction button (with the emoji icon). Now, search for your desired emoji in the search bar and select it to use it as your response.
15. Save Important Messages
Slack allows you to save messages you find useful for reference later. All your saved messages are added under the Saved items tab, which you can access anytime from the left menu bar.
Here’s how to save a message in Slack:
- Open the channel or direct message window that contains the message you want to save.
- Hover over the message and tap on the Add to save items button (with the bookmark icon) in the toolbar.
16. Universal Search
While you can move around messages, channels, or workspaces in Slack by clicking through the shortcuts in the left sidebar menu, there’s a quick and efficient way to do this to save yourself those few extra clicks.
For this, from anywhere in the workspace, hit the Command + K or Ctrl + K keyboard shortcut, enter the name of the workspace, channel, or thread that you want to go to, and hit Enter / Return.
17. Power Search

Search in Search works pretty fine. However, it fails to offer results when you request complex deep-rooted queries. For such instances, there are a few hidden key modifies that you can use to modify your search based on things like time/day/date, channels, type, and more, and get a response for your query.
Some of these modifiers include:
- from: [name of Slack user] or to: [name of Slack user] — to find relevant messages from/to a particular team member
- in: [channel name] — to restrict search to a particular channel
- type: [text, image, etc.] — to specify the type against your search
- before: [date] or after: [date] — to modify results based on date
- has: [link, image, etc.] — to filter results that contain the modifier
Learn mode about search modifiers here.
18. Limit Incoming Notifications
By default, Slack notifications are set to send you alerts for all activities in the workspace. As you can imagine, this can be quite annoying and distracting, especially when you’re trying to focus on your work.
Fortunately, you can change the notification preferences in Slack to limit distractions. Here’s how to do this:
- Go to the workspace whose notification preferences you want to change.
- Hit the Command + , or Ctrl + , keyboard shortcut to open Slack Preferences.
- Select Notifications from the sidebar.
- Now, if you only want to receive incoming notifications for direct messages, mentions, or specific keywords, select the radio button next to Direct messages, mentions & keywords under Notify me about. Alternatively, select Nothing if you want to disable notifications.

19. Take Advantage of the Shortcuts Menu
Slack’s shortcuts menu allows you to perform certain actions quickly and easily. To access these shortcuts, click on the lightning bolt icon to the left of the message field, start entering an action name, and click on it to execute it.
Or alternatively, you can also use slash commands to find and perform such specific actions in Slack. There are three types of slash commands in Slack: built-in, app-specific, and customized. However, for the purpose of this guide, we will stick to built-in slash commands.
To use slash commands, type a forward slash (/) in the message field and enter the specific keyword for the slash command.
List of built-in slash commands:
- /archive: Archive the current channel
- /dm: Send a direct message to someone
- /msg [#channel]: Send a message to a channel
- /collapse: Collapse inline images and videos in the channel
- /expand: Expand all inline images and videos in the channel
- /status: Set or clear your status
- /topic: Set the channel topic
- /search [your text]: Search Slack messages and files
Learn more built-in slash commands here.
20. Use Keyboard Shortcuts
Although Slack has a pretty neat and easy-to-use UI that lets you navigate your way and perform different functions easily, you can carry out the same operations a lot quicker and easier using its keyboard shortcuts.
List of useful Slack keyboard shortcuts:
- Command + K or Ctrl + K: Jump to a conversation
- Command + shift + K or Ctrl + Shift + K: Open direct messages menu
- Command + shift + L or Ctrl + Shift + L: Browse all channels
- Option + Shift + ↑ or Alt + Shift + ↑: View previous unread channel or DM
- Option + Shift + ↓ or Alt + Shift + ↓: View next unread channel or DM
- Command + , or Ctrl + ,: Open Preferences
- Command + Shift + S or Ctrl + Shift + S: View Saved items
- Command + F or Ctrl + F: Open search window to find perform a quick search
- Command + Shift + [ or Ctrl+ Shift + Tab: Switch to previous workspace
- Command + Shift + ] or Ctrl + Tab: Switch to next workspace
- Command + U or Ctrl + U: Upload a file
- Command + Shift + J or Ctrl + Shift + J: View all downloaded files and documents
- M: Mute audio
- V: Toggle video
- E: Edit message
- R: Add an emoji reaction
- T: Open or reply to a thread
- Command + B or Ctrl + B: Bold selected text:
- Command + Shift + X or Ctrl + Shift + X: Cross out selected text (strike through)
- P: Pin/unpin a message
- S: Share a message
- A: Save a message
- D: Delete a message
Learn more Slack keyboard shortcuts here.
Do More On Slack! And With Greater Efficiency
Using the Slack tips and tricks listed above, you should now be able to use the different features of Slack to your advantage and get more out of the platform. While we can’t guarantee these Slack tips will turn you into a Slack expert, you can certainly incorporate them in your daily workflow to streamline it, and in turn, get better at managing your projects and organizing teams and collaborations.
