Quick Answer
Dark patterns in Windows 11 quietly push ads, data tracking, and Microsoft services. In 2026, users should disable notification tips, ad IDs, diagnostic data, personalized search, Start menu and lock screen recommendations, startup apps, bloatware, and forced defaults to protect privacy and performance.
Windows is undoubtedly the most popular PC operating system available in the market. Users praise Windows for its customization, ease of use, feature set, and more. However, Windows is notorious for several dark patterns throughout its UI, which are only increasing in number and hampering the user-friendly nature of Windows. It’s similar to how smartphone brands ship phones with pre-installed unwanted apps, showcase ads throughout the interface, and heavily promote their own services by sending notifications and pop-ups. You’d be astonished to witness the sheer number of ways Windows implements dark patterns.
As a responsible user, you must safeguard yourself from such ill practices. Such dark patterns usually appear in the form of ads, recommendations, services, usage and diagnostic data, and more. Thankfully, it’s easy to get past them by setting up your PC carefully and tweaking a few settings. Doing so will ensure you don’t fall victim to such dark patterns, safeguard your privacy, and reduce your system’s overall vulnerability. Read along to know more about tackling dark patterns in Windows 11.
Table of Contents
How Harmful are Dark Patterns in Windows 11?
If you’re wondering why we’re stressing the importance of addressing dark patterns on your PC, there are a couple of reasons. For starters, it’s your privacy, and you have every right to safeguard it. Several pre-checked options in Windows settings are whitewashed versions of data-capture methods. Your PC can work fine without turning them on, so why not disable them? Not just that, the captured data can be shared with third-party vendors, often referred to as “trusted partners,” which is as bad as it sounds. Your data will then be used for pushing targeted ads and services.
Furthermore, since your PC will need to work a little harder to support some features, you may experience noticeable system slowdowns and faster battery drain. In simple terms, such background processes can affect your system’s performance and battery life. Lastly, some of the settings, in the form of news, recommendations, and tips, are straight-up ads, meaning they’re not only distracting and unpleasant to look at, but also somewhat inappropriate, considering it’s your PC you paid for.
Change These Settings on Your Windows PC
Notification Settings
The sole purpose of notifications is to grab your attention, which is an ideal way for Microsoft to push recommendations, tips, suggestions, and more. Furthermore, several apps you don’t necessarily use may have been granted notification permissions by default, so you should revoke them as well. Here is how you can do so on your PC:
- Open Settings, or use the keyboard shortcut Windows + I.
- Navigate to System settings from the left toolbar and enter the Notifications section.
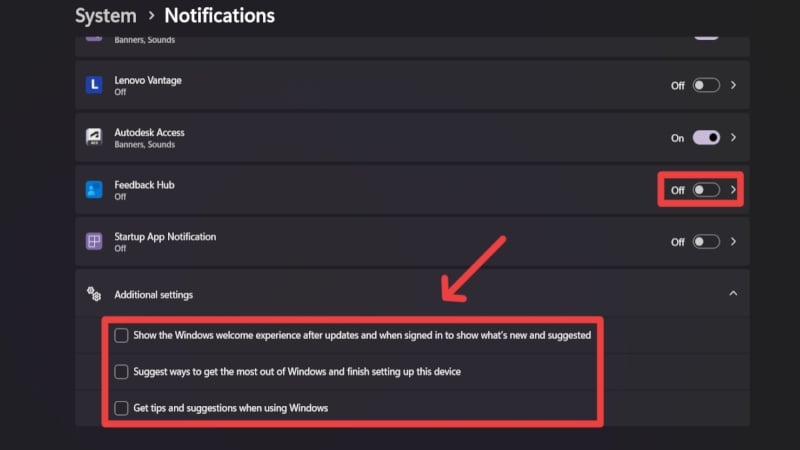
- Go through the app list and disable the notification permissions of the apps you don’t use. You can also adjust permissions for other apps by selecting the app from the list.
- Scroll down to the bottom and expand the Additional settings menu. Deselect all of the following options:
– Show the Windows welcome experience after updates and when signed in to show what’s new and suggested
– Suggest ways to get the most out of Windows and finish setting up this device
– Get tips and suggestions when using Windows
Privacy & Security Settings
By default, Windows enables every possible option to track your usage, show ads, and “improve” your usage through various other means. Windows’ Privacy & security settings house most of these options, which we strongly recommend disabling right away. It will go a long way in ensuring your privacy. To do so on your PC, follow the steps below:
- Open Settings, or use the keyboard shortcut Windows + I.
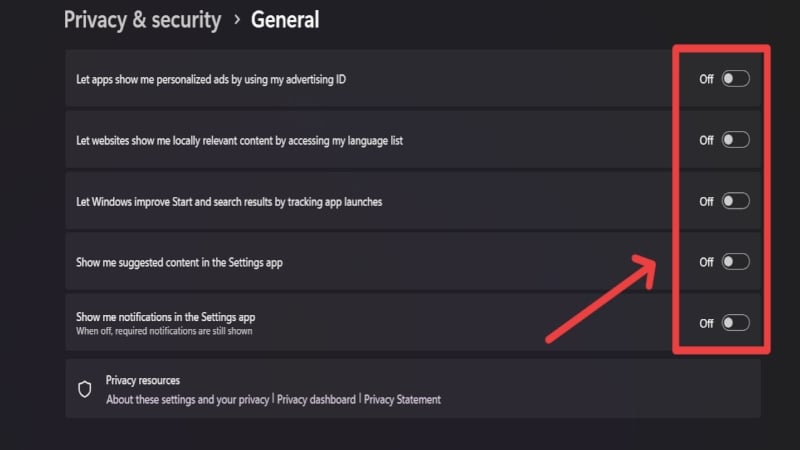
- Navigate to Privacy & security settings from the left toolbar and enter the General section.
- Disable all of the following options:
Let apps show me personalized ads by using my advertising ID
Let websites show me locally relevant content by accessing my language list
Let Windows improve Start and search results by tracking app launches
Show me suggested content in the Settings app
Show me notifications in the Settings app
While you are at it, we recommend reviewing the Speech and Inking & typing personalization settings on the Privacy & security page. If you don’t use the voice commands or handwriting features on Windows, it’s better to disable the online speech recognition and Custom inking and typing dictionary features within the settings to safeguard your privacy further.
Diagnostics & feedback Settings
Diagnostics & feedback permissions are the way companies acquire your data in plain sight to improve their products and software, and Microsoft is no different in this regard. While the claim is arguable, we still think it’s better to opt out. Unfortunately, Microsoft mandates sending some required data regardless, but we can still disable the rest. To do so:
- Open Settings, or use the keyboard shortcut Windows + I.
- Navigate to Privacy & security settings from the left toolbar and enter the Diagnostics & feedback section.
- Expand the Diagnostic data menu and disable the toggle beside Send optional diagnostic data.
- Ensure that the Improve inking and typing option below it is set to Off.
- Expand the Tailored experiences menu and disable it using the toggle present.
- Under the View diagnostic data menu, ensure that Diagnostic Data Viewer is turned off. It takes up valuable disk space and is of no use if you have disabled other diagnostic and feedback settings.
- Lastly, don’t forget to delete your previously collected diagnostic data by expanding the Delete diagnostic data menu to prevent Microsoft from using it.

Default Browser
While Microsoft Edge has dramatically improved in terms of performance, system load, user interface, and more, it’s still not the first choice for many users. However, Microsoft thinks otherwise and likes to set Microsoft Edge as the default browser on every PC. What’s worse is that even if you set another browser as the default, many specific links will still open in Microsoft Edge, which needs to be changed for the complete browser switch. Here’s what you need to do after installing your preferred browser:
- Open Settings, or use the keyboard shortcut Windows + I.
- Navigate to Apps settings from the left toolbar and enter the Default apps section.
- Scroll through the app list and select your preferred browser. In our case, it’s Google Chrome.
- Select the Set default option at the top.
- Under Set default file types or link types, make sure to select each entry and choose your preferred browser instead of Microsoft Edge.

You can follow the same procedure for other apps if you wish to set them as the default ones instead of Microsoft’s recommended apps.
App Permissions
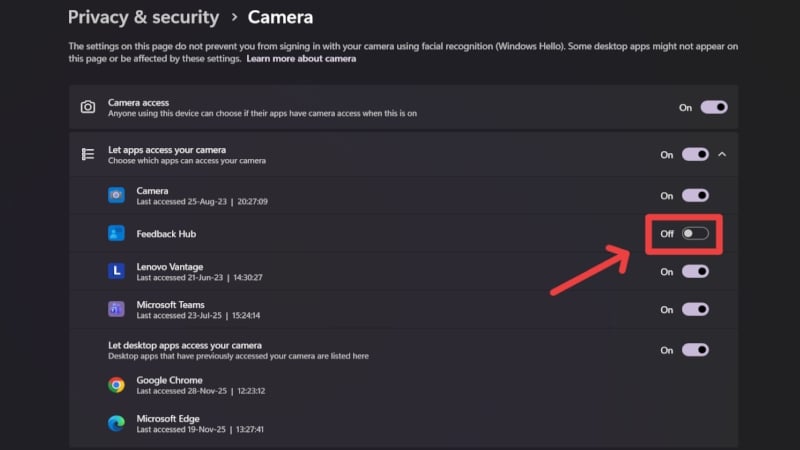
App permissions allow apps on your system to access your system’s vitals, such as the camera, microphone, location, documents, call history, and more. While some apps require permissions to function correctly, most don’t. In fact, many of Microsoft’s own apps, such as Feedback Hub, are pre-granted with crucial permissions, including camera, microphone, and location access. Follow the steps below to revoke such permissions:
- Open Settings, or use the keyboard shortcut Windows + I.
- Navigate to Privacy & security settings from the left toolbar.
- Under App permissions, review all categories and disable permissions of unwanted apps. You can also choose to disable permissions for all apps entirely if you don’t require the corresponding features.
Search Settings
Search is an excellent way to know about your interests and queries, which are indeed the best way for companies to lure you with targeted ads and recommendations. Often referred to as “Personalized search suggestions,” it’s just another thing that we highly recommend turning off for your good. To do so on your PC, follow the steps below:
- Open Settings, or use the keyboard shortcut Windows + I.
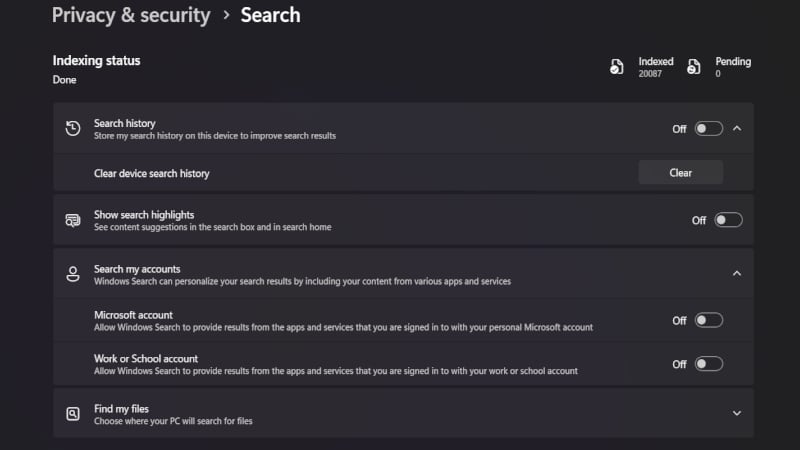
- Navigate to Privacy & security settings from the left toolbar and enter the Search section.
- Deselect the toggle beside Search history. You can also clear your stored search history by expanding the menu.
- We also recommend turning off the Show search highlights option.
- Lastly, you should also turn off the following options under Search my accounts:
Microsoft account
Work or School account
Start Menu
The Windows start menu is the primary interface you interact with, which is why it’s the perfect place for Microsoft to showcase tips, recommendations, and more. The Windows start menu is generally much more cluttered than you’d like, which is why a cleanup is appropriate for most users. Follow the steps below to fix your PC’s start menu:
- Open Settings, or use the keyboard shortcut Windows + I.
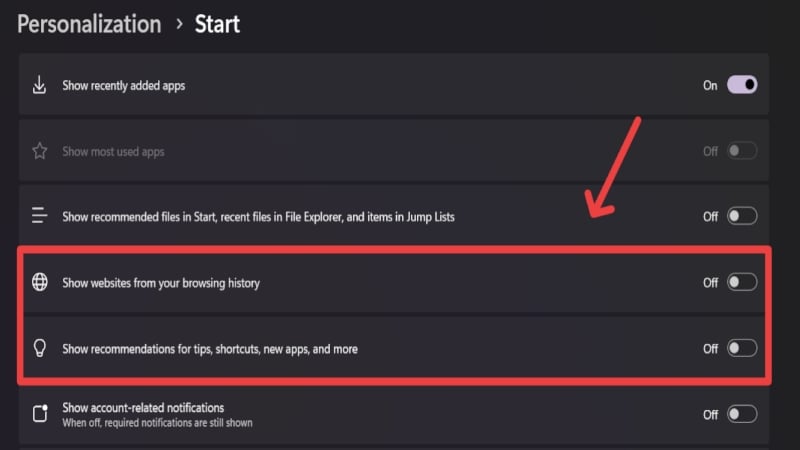
- Navigate to Personalization settings from the left toolbar and enter the Start section.
- Disable the toggle beside the following options:
Show recommended files in Start, recent files in File Explorer, and items in Jump Lists
Show websites from your browsing history
Show recommendations for tips, shortcuts, new apps, and more
Lock Screen
Like the start menu, Microsoft is not well-known for its lock-screen experience. By default, the lock screen is riddled with not-so-good-looking widgets, uninvited recommendations, tips, and whatnot. Disabling a few options can make your lock screen a lot cleaner and more appealing. Follow the steps below to fix your PC’s lock screen:
- Open Settings, or use the keyboard shortcut Windows + I.
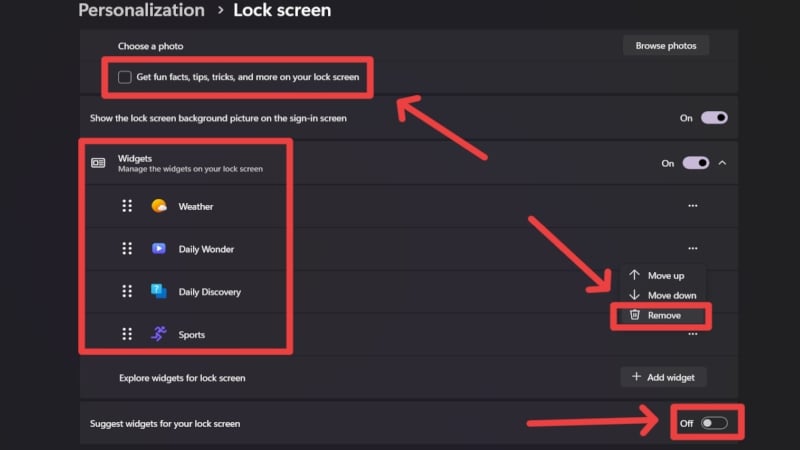
- Navigate to Personalization settings from the left toolbar and enter the Lock screen section.
- Expand the Personalize your lock screen menu and uncheck the box beside Get fun facts, tips, tricks, and more on your lock screen.
- We recommend removing all the widgets, or at least the shady ones, such as Daily Wonder and Daily Discovery, if not all of them. You can do so by clicking on the meatball menu icon (⋯) and selecting Remove.
- Disable the toggle beside Suggest widgets for your lock screen.
Uninstall Bloatware
Unwanted pre-installed apps are referred to as bloatware, and it’s the tale of every Windows PC. They include manufacturers bundling first-party apps and antivirus software, or Microsoft bundling suggested apps that users hardly use. Such apps and software take up valuable space and use system resources, so uninstalling them is the best option. Here’s how you can do so:
- Open Settings, or use the keyboard shortcut Windows + I.
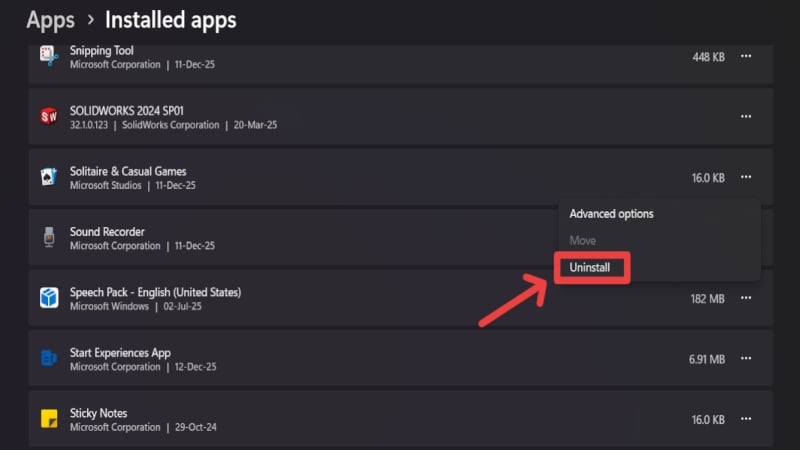
- Navigate to Apps settings from the left toolbar and enter the Installed apps section.
- Identify the unwanted apps and delete them by clicking on the meatball menu icon (⋯) and selecting Uninstall. If you are unsure about an app, search it up before uninstalling.
Disable Automatic Updates
Automatic updates allow your system to update installed apps on your PC automatically. The feature is enabled by default, and while it may sound appealing, we strongly recommend turning it off and manually updating the required apps regularly. App updates take up valuable storage space, so it’s best to do them manually. Here’s how you turn off automatic app updates:
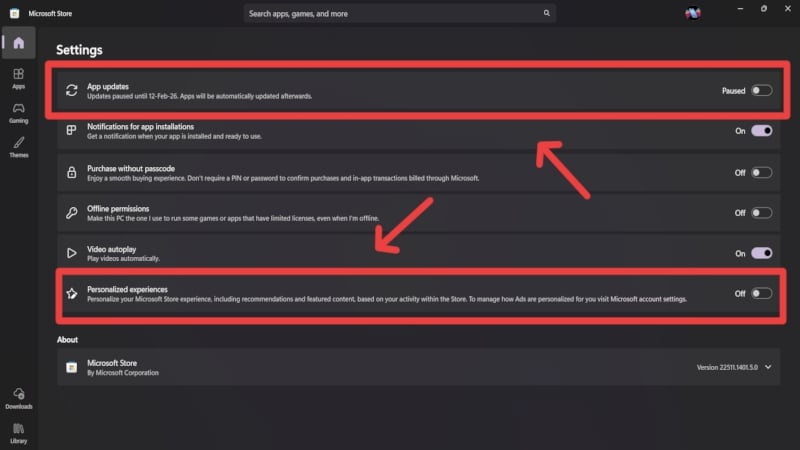
- Open Microsoft Store.
- Click on your profile icon in the top-right corner and select Store settings.
- Disable the toggle beside App updates. You’ll have to select a pause duration ranging from 1 week to up to 5 weeks, meaning the setting isn’t permanent.
- While you’re there, we also recommend turning off Personalized experiences.
Disable Startup Apps
Have you ever noticed apps starting on their own right after you turn on your system? That’s enabled by startup apps, which let you access apps quickly and get working as soon as the PC turns on. However, it negatively affects bootup speeds and often strains system resources during startup. Therefore, it’s better to start the apps manually after your system starts. Microsoft enables quite a few startup apps by default, and you can disable them in the following way:
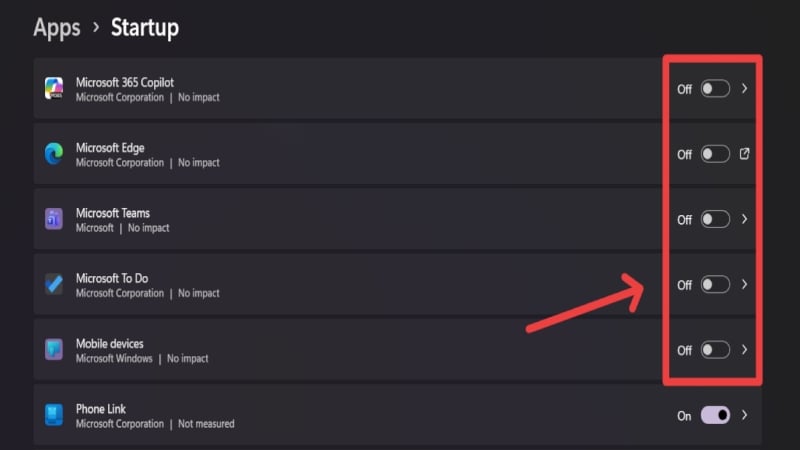
- Open Settings, or use the keyboard shortcut Windows + I.
- Navigate to Apps settings from the left toolbar and enter the Startup apps section.
- Scroll through the app list and disable the startup features accordingly.
Disable Core Services
Microsoft hides a few services related to diagnostic data capturing and error reporting from plain sight. There are a few other services that are hardly useful to the majority of users, which is why disabling them is beneficial. Here’s how you can do so:
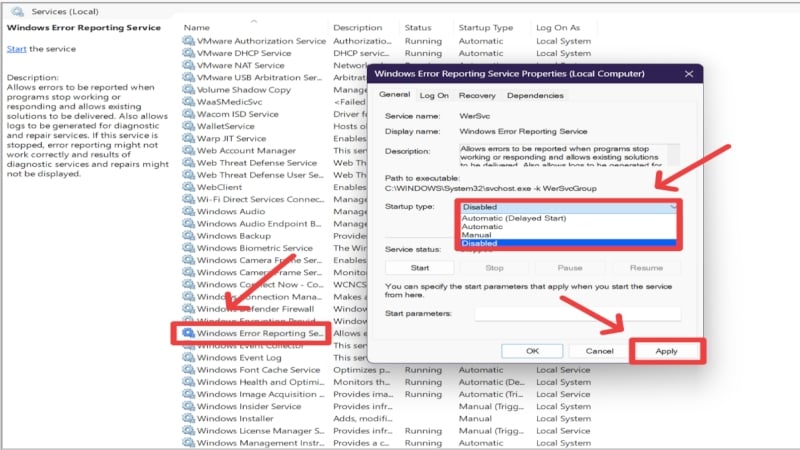
- Open the Run app using the keyboard shortcut Windows + R.
- Type services.msc and hit Enter.
- Scroll through the alphabetically arranged list and locate Windows Error Reporting Service. Right-click on the service and select Properties.
- Change the startup type to Disabled from the dropdown menu. Stop the service if its service status shows it’s running.
- Select Apply followed by OK.
- Restart your system by going through the Start menu.
If your PC doesn’t have biometric authentication means, such as a fingerprint scanner or facial recognition, you can also disable the Windows Biometric Service by following the steps above. You can also disable the SysMain service if your PC uses an SSD instead of an HDD.
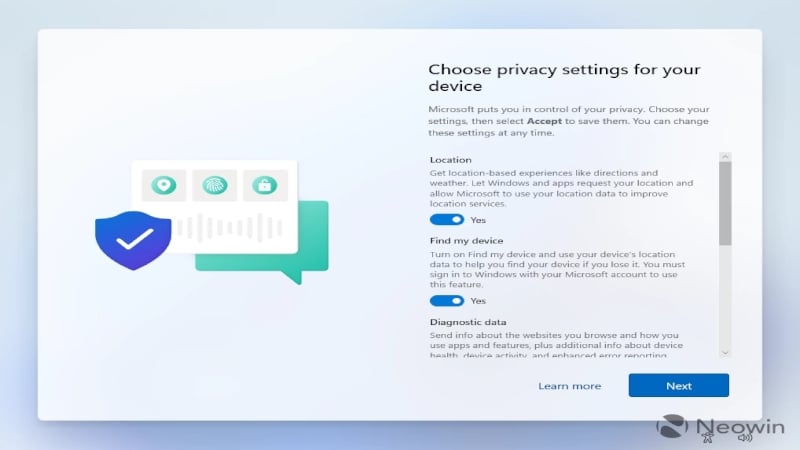
Set Up Your PC Carefully
Albeit not a setting you can change instantly, it’s essential to be aware of the dark patterns Windows PCs use when you set them up for the first time. The setup process of a Windows PC isn’t as straightforward as it used to be, as Microsoft sneaks in a lot of unwanted options that are easy to miss. Pay attention to the Privacy settings while setting up your PC, and ensure to disable all unwanted options related to sending diagnostic data, tailored experiences, browsing data, advertising ID, and more. Although it’s up to you, we suggest avoiding services promoted by Microsoft during setup, such as Microsoft 365 and Xbox Game Pass.
Use Your PC in Its Best Form
Given the sorry state of Windows PCs due to dark patterns built into the OS, it’s increasingly important to take control into your own hands. Fortunately, doing so is child’s play, as all it requires is changing a handful of settings and setting up your PC attentively. Windows’ Privacy & security settings house many crucial settings that need to be disabled, such as settings related to diagnostic data collection, advertising ID, search history, and more. Taking care of your PC’s apps by uninstalling the unwanted ones, disabling startup apps, and turning off automatic updates is highly beneficial for your PC. Windows’ Start menu and lock screen should also be customized to prevent unwanted recommendations, tips, and other content.
