

Quick Answer
To change the default screenshot location on Windows 11, open File Explorer, go to Pictures > Screenshots, right-click the Screenshots folder, select Properties, click the Location tab, and choose Move. Select your desired folder, click Apply, then OK. Verify by taking a screenshot and checking the new location.
It is quite common for us to take a quick screenshot of something when we find it a bit interesting, either for further reading at a later time or sharing it with others. On a Windows 11 PC, taking a screenshot is fairly easy. All you need to do is press the Windows+PrtScr keys together, and it will take a screenshot of the entire screen. The screenshot then gets saved to its default location, which is C:\Users\[User Name]\Pictures\Screenshots. If you get hold of your screenshots, that is the folder where you have to look into.

While this is perfectly normal and doesn’t pose any issue, there may be instances where you might want the screenshots to get directly saved into a dedicated folder. This could be because you are working on a project that requires a bunch of screenshots to be taken. So, instead of letting the screenshot be saved in the default folder, you can change it and save it in a selected drive or USB folder. Luckily, Microsoft lets you do that, which is what we are going to explain in this guide. Let’s jump right into it.
Why change the default screenshot location?
First question: why would anyone want to change the default screenshot location? Below are some of the reasons that could make you adjust the default screenshot location:
- Your primary drive might be running out of space. In such cases, saving screenshots to a different drive helps.
- You might want to keep the screenshots specific to a project in a dedicated folder and categorize them for a purpose.
- Changing the default screenshot folder to a folder that is synced with cloud storage helps sharing and accessing screenshots from other devices much easier.
- Saving screenshots on an external drive or USB ensures that they are saved and creates a backup. So, even if your OS gets corrupt, your screenshots are safe.
How to change the default screenshot location on Windows 11?
Pressing the Win+PrtScr buttons isn’t the only way to take a screenshot on Windows 11. We have a guide that explains several other ways that can help you take a quick screenshot. While you can choose any of the methods to take a screenshot, the location of the screenshots getting saved may not work well for most users.
Here’s what you need to do to change the default screenshot location on Windows 11:
- Open File Explorer. You can open it using the icon on the desktop home screen, use the Start menu and open it, or press Win+E keys together to open the File Explorer.
- Head over to Pictures from the navigation pane on the left.
- Right-click on the Screenshots folder and choose Properties.

- Select the Location tab.
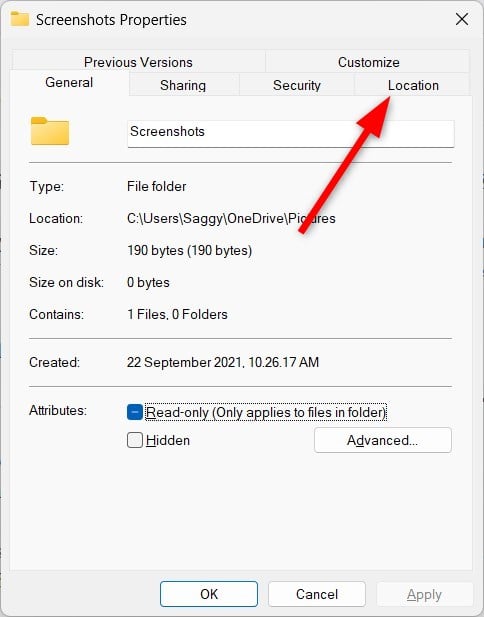
- Choose Move to browse for a new screenshot location and select the folder in which your screenshots will be saved. Note that you need to make sure that the new folder is created or present in the location that you have chosen, as the Screenshots folder will merge with whatever folder you select there.

- Click Apply and OK to save the changes.
Verify the new location
To ensure that the change is successful, follow the below steps:
- Press the Win+PrtScr button to take a screenshot.
- Open File Explorer and head over to the newly selected folder.
- Confirm that the screenshot that you just took is available there.
Restore the default screenshot location
If you want to revert to the original screenshot location, then it’s pretty easy to do:
- Open File Explorer and head over to the newly selected screenshot folder.
- Choose Properties, and select the Location tab.
- Click Restore default.
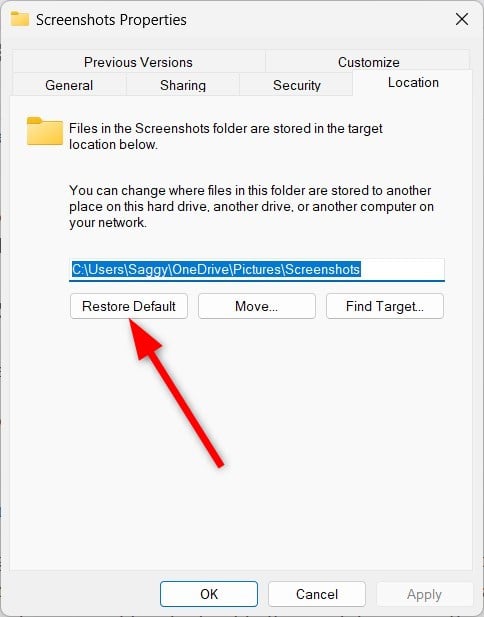
- Click Apply, and select if you wish to move the screenshots back to the default location or not.
That’s it! Now, whenever you take a screenshot, it will get saved to the selected location. Notably, this also impacts the screenshots taken with the Snipping Tool. However, Snipping Tool lets you choose the location to save the screenshot on a case-by-case basis. If you want more options and customizations while taking a screenshot, for instance, an editing tool right after you take a snap, then you may want to check out some of the best third-party screenshot apps for Windows.
They are not only more advanced but offer many more options than the default screenshot app on Windows 11, such as the ability to screen record, post edit, screenshots in shapes, etc.

