Quick Answer
If you want to use an iPad as a computer replacement or buy an iPad as a laptop replacement, here is the full setup guide you can follow to get a macOS-like experience on your iPad. You can use Apple Magic Keyboard to get keyboard and trackpad support on your iPad, an external SSD to store all your files, and enable Stage Manager for better multitasking. Additionally, change iPadOS settings and install third-party apps. Here is everything that you need to know to use your iPad as your Mac replacement.
The Apple iPad lineup is always confusing. While Apple claims these iPads are the best replacement for laptops, they still don’t provide the full app compatibility to replace your laptops. So, a popular question remains unanswered: Is the iPad a replacement for a laptop?
So I recently went to my friend’s marriage; since my job involves staying updated with the latest news and constantly searching on the internet for tech news, gadget apps, and more, in the past, whenever I went to his home, I spent the majority of my time in front of my laptop, writing articles, blogs, and posting social media posts and news updates.
So this time, at his marriage, he didn’t want me to bring a laptop, so we agreed upon it because it’s a once-in-a-lifetime thing that my friend has got. So I agreed, and instead, I decided to take my iPad Pro as a replacement for my laptop. I use my Macbook mainly for writing articles, editing videos, watching movies, and browsing the internet. I also do most basic and medium tasks involving video editing using CapCut.
So, I had to set up my iPad to replace my Macbook as a laptop alternative. Suppose you plan to use your iPad as a replacement or purchase an iPad as a laptop replacement; in this guide, you will learn how to set up your iPad as a laptop replacement if you have one.
Table of Contents
How To Set Up Your iPad as a Laptop Replacement
Buy an Apple Magic Keyboard
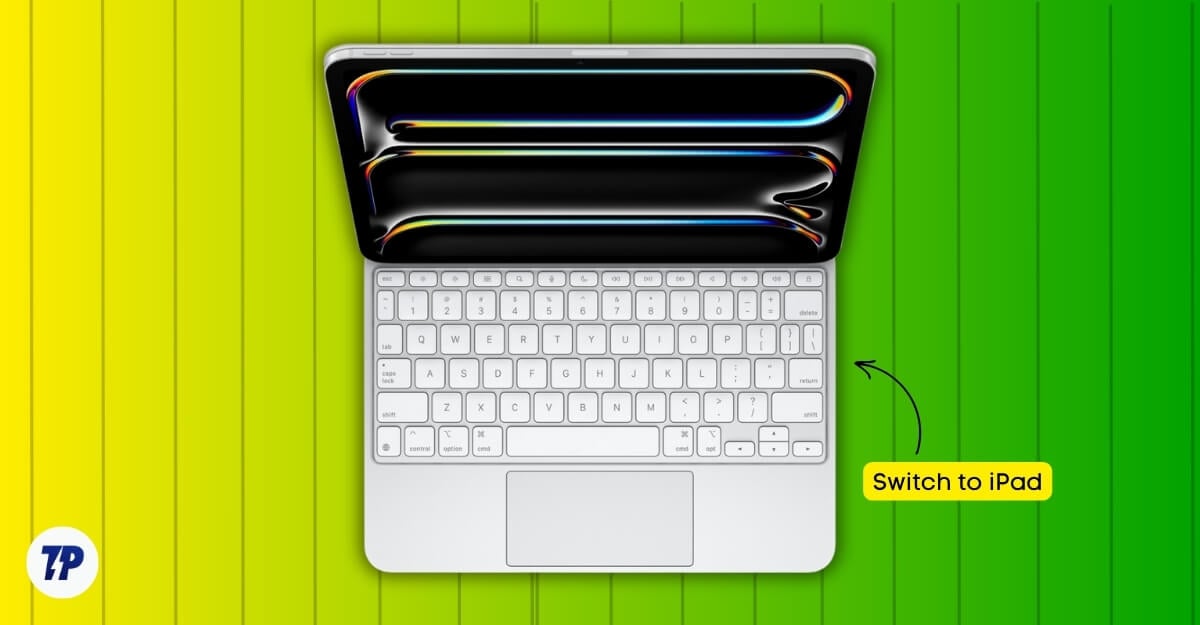
Macbooks and iPads are in different product categories. If you want a complete replacement and a similar experience to your laptop, you can buy an Apple Magic Keyboard for your iPad Pro.
It adds a keyboard and built-in trackpad support for your iPad, bringing almost 80% of the laptop experience through the hardware level.
Apple Magic Keyboard is available for iPad Pro and Air starting in 2020 and the recently announced iPad Air 13-inch model.
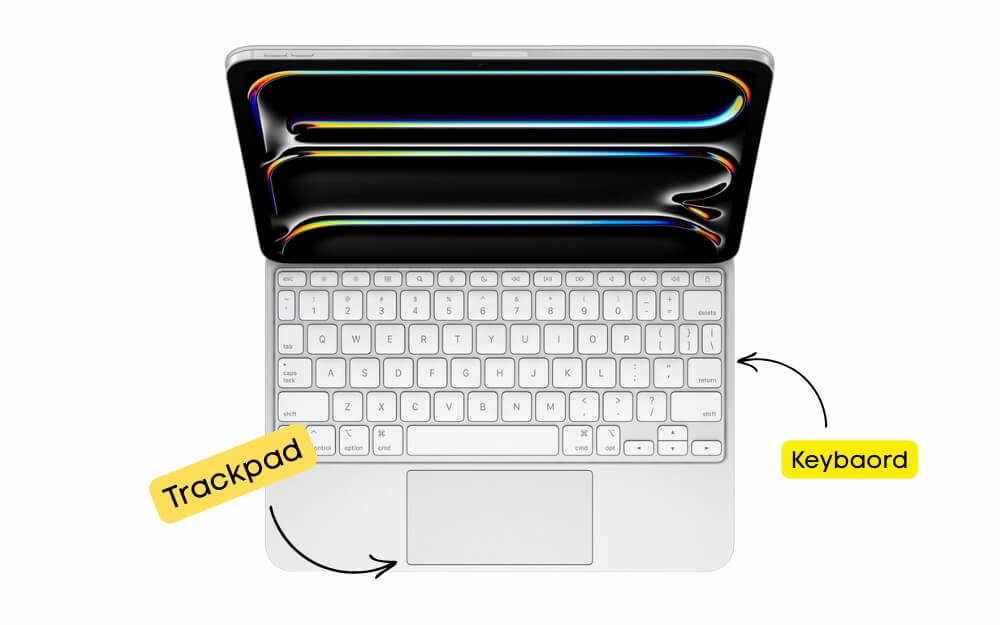
The Magic Keyboard is a detachable keyboard with support for full-size keys with up to 1mm of key travel. However, the typing experience is not as good as a laptop; the keyboard feels small and uncomfortable to type on unless you are used to it.
The iPad magnetically attaches to the Magic keyboard and holds tightly and firmly. The keyboard also supports backlighting, so you don’t need to worry if you are using the keyboard in the dark. It also comes with a built-in trackpad and supports all iPadOS gestures.
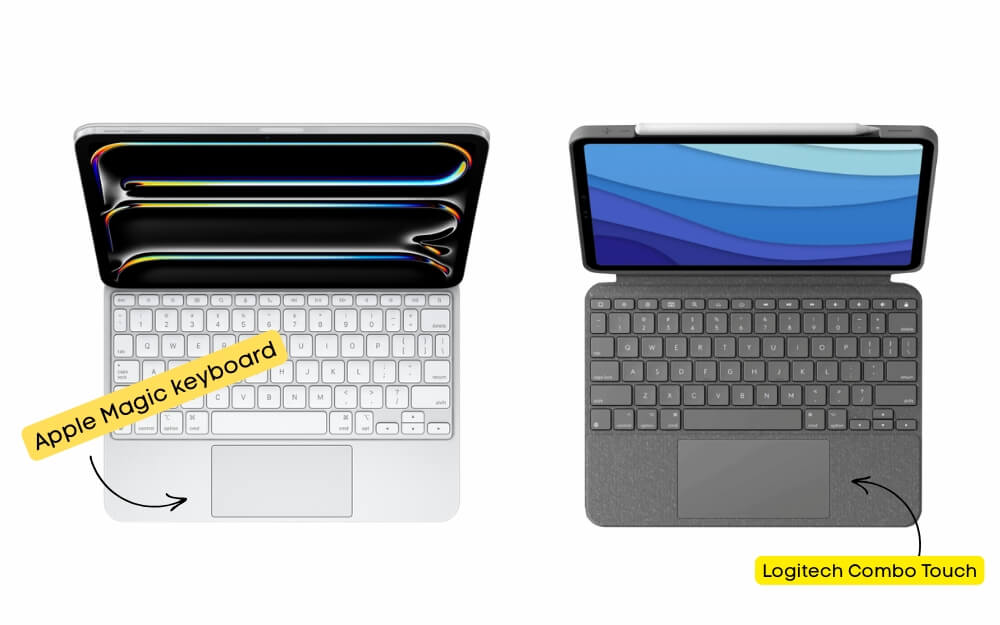
If you can afford it, Apple officially sells the Apple Magic Keyboard, but they are slightly expensive. These keyboards often range from $299-$349; fortunately, several third-party manufacturers also offer compatible Magic Keyboard alternatives for the iPad.
The best alternate option is the Logitech Combo Touch, which works well but doesn’t support magnetic attachment like the iPad Magic Keyboard, which requires a base to make your iPad stand. It is compatible with all iPad models, including the Pro and the Air variants, and costs less than the Magic keyboard. It connects to your iPad using the Smart Connector and has a keyboard backlight and a built-in trackpad.
Plus, unlike the Magic Keyboard, the Logitech Combo Touch supports function keys, which you can use for various useful functions, especially if you do video editing or want to quickly adjust your brightness and more without depending on the touch screen.
We also love the Zagg Pro Keys, which offers a similar experience but doesn’t come with a built-in trackpad, and the iClever Folding Keyboard if you are looking for an even more affordable option. If you want to replace your laptop or want to use an iPad as a laptop, I recommend investing in a keyboard. You can choose any keyboard you want from these best options. Afterward, you need to change some iPadOS settings and install third-party apps to get a Mac experience on your iPad.
Expand Your Storage Using Portable SSD
iPad has limited storage, and Apple charges a hefty price if you want to upgrade the storage on your iPad. In that case, you can use any external storage device, like a portable SSD, to expand your iPad storage without breaking the bank.

There are plenty of SSD external options you can get. We recommend the Samsung SSD, which is faster and also more reliable.
If you think SSDs are hard to carry, you can use a flash drive to connect to your iPad using Type-C and store all your important files.
Change these iPad Settings
If you bought the Apple Magic Keyboard, you almost replicated the macOS experience on your iPad at the hardware level. Next, you have to change the software experience to replicate macOS.
This is where the biggest drawback of the iPad as a laptop alternative comes into play. Despite being powered by a similar processor, including the M4 chip in recent iPads, the iPad is still a replica of iOS instead of macOS. The biggest problem is that the iPad still doesn’t support full desktop-class applications like Final Cut, Logic Pro, Photoshop, and more. Apple has recently brought some desktop applications to iPadOS, but it is still not at the level that can completely replace your laptop if you depend on these applications. However, to get the best experience, you must change a few iPadOS settings.
1. Customize External Mouse & Keyboard Support
Your iPad automatically detects your mouse and keyboard when using Bluetooth; however, if it is disabled by default, you can re-enable it by going to Bluetooth and connecting your keyboard and mouse.
Next, you can customize these settings to add shortcut support and additional functionality to the mouse and trackpad.
How to Customize Mouse & Trackpad Settings
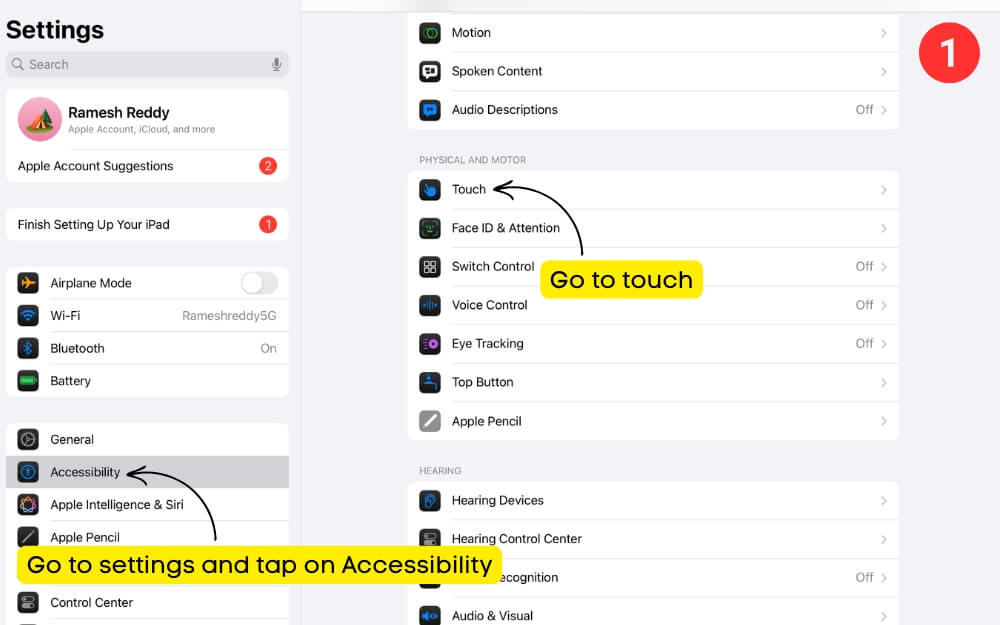
- Go to Settings > Accessibility > Touch
- Now tap on the Assistive Touch.
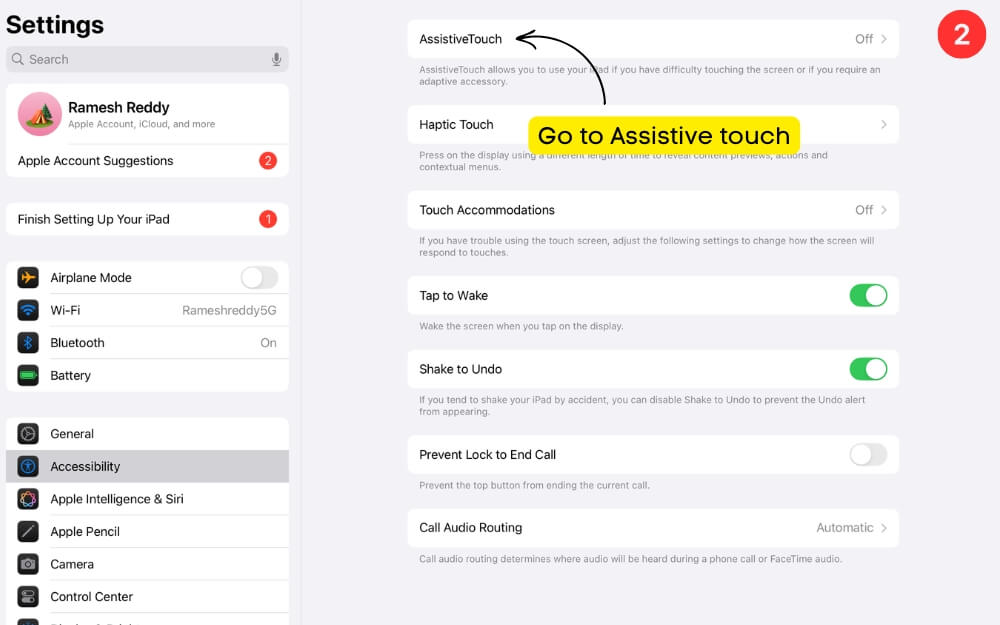
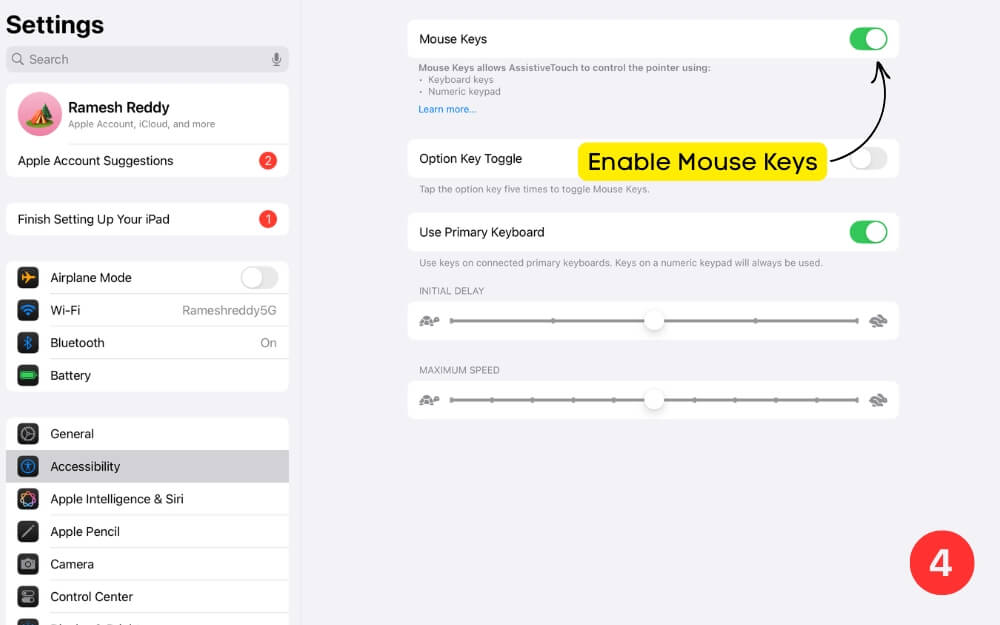
- Scroll down and then under Pointer Devices, select Mouse Keys and turn it on.
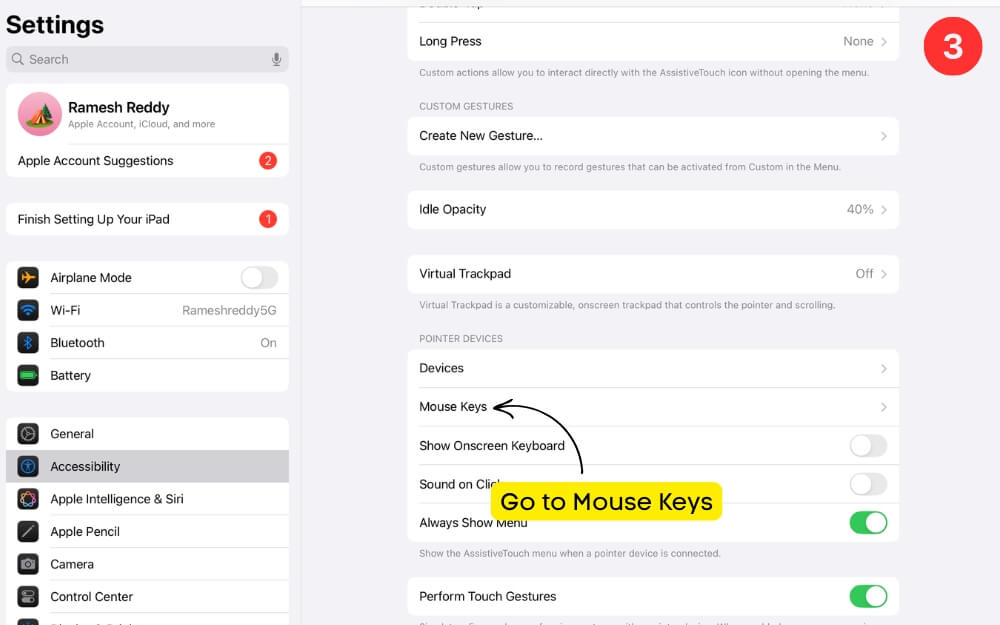
- By enabling this option, you can use right-click, scroll, and drag-and-drop functionality similar to a Mac.
- Now, go back to Accessibility settings and scroll down under Pointer Control to adjust the pointer settings when using a mouse.
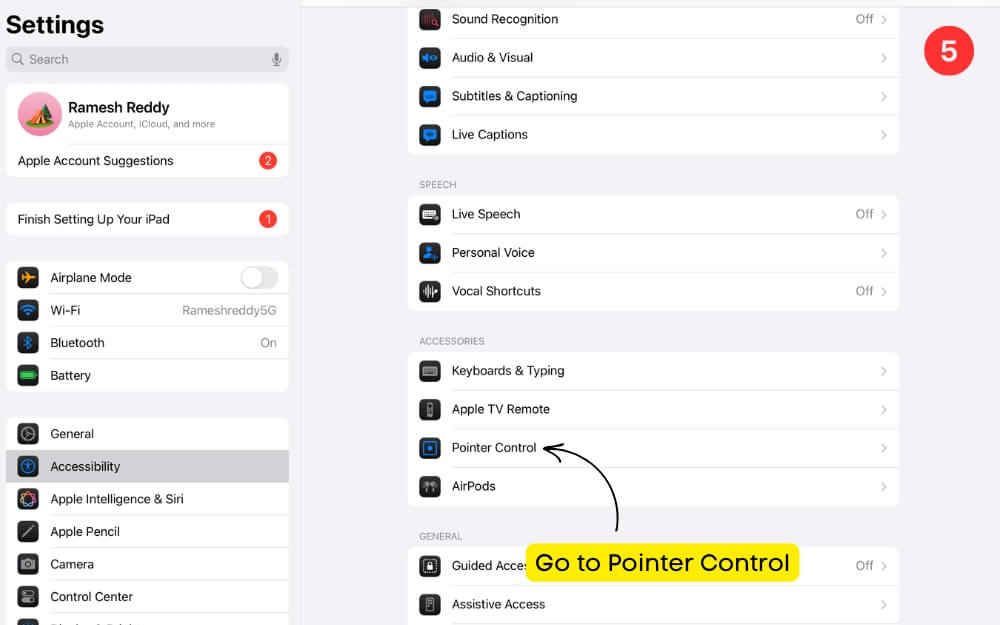
- Here, you can increase the contrast, hide the pointer automatically after a certain time, and adjust the pointer size for better functionality and click rate.
Next, enable Keyboard Shortcuts
Keyboard shortcuts can make life easier. Unlike using touch interactions, shortcuts can help you navigate iPadOS faster and feel more like a laptop. Thanks to the recent iPadOS updates, it now supports all useful shortcuts you can find on your Mac. These shortcuts work on all popular apps, including Browser, Mail, Notes, and Safari. Connect your keyboard to your iPad and enable Full Keyboard Access to access the full shortcuts on your iPad.
How to enable keyboard shortcuts on iOS
- Under the same Accessibility settings, go to Keyboards & Typing.
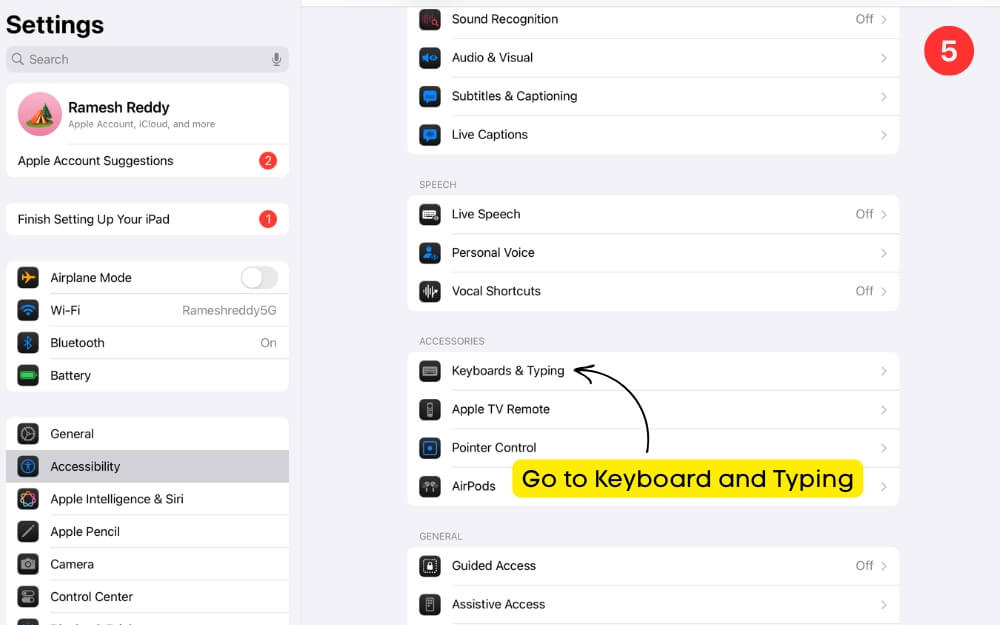
- First, turn on Full Keyboard Access.
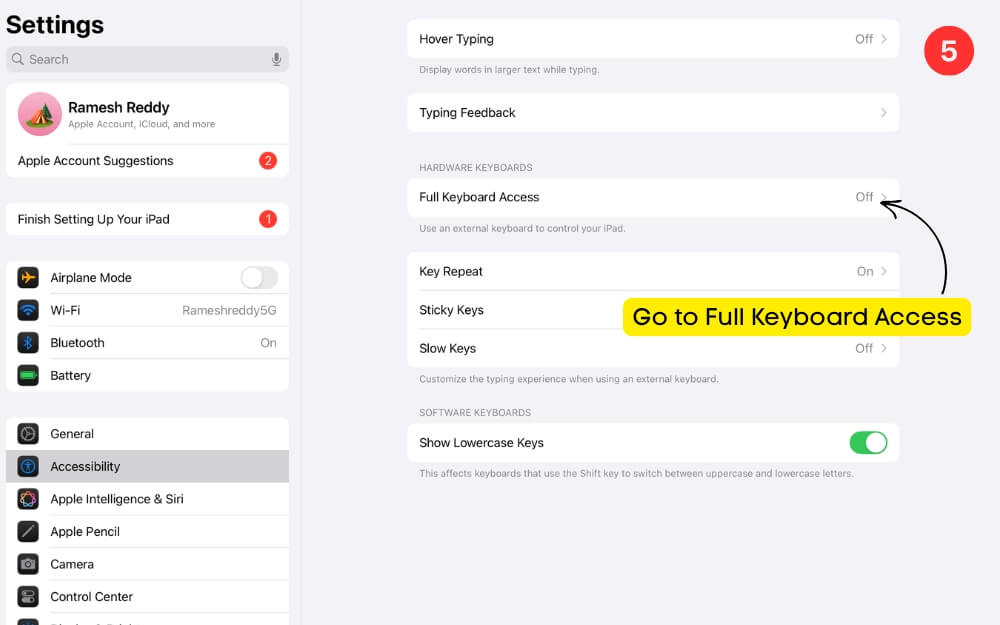
- After this, click on the Command option and customize the existing commands you use on Mac to replicate the same commands on iPad.

- Now, go back to the Settings page, then go to General Settings > Keyboard.
- Now, tap on Keyboard Shortcuts and enable keyboard functions to enhance your typing experience.
Enable iCloud Desktop & Documents Sync on iPad
If you own a Mac, you can sync your important files with your iPad using iCloud Drive. You can enable iCloud sync on your Mac, which automatically syncs all your files from your Desktop and Documents to the iCloud Drive.
Later, you can access those files on your iPad Files app, like the Finder on your macOS. You can even edit your file on your iPad; all changes appear on your Mac in real time.
However, the free iCloud only offers 5GB of free storage space, which can quickly fill your free space if you have multiple Apple devices. If you need to access important files, you can enable iCloud sync and access these files automatically on your Mac via iCloud. You can also access your Photos, Documents, and other important files synced into your iCloud Drive on your iPad iOS.
How to Enable iCloud Drive on Your Mac and Sync Files to iPad
- Go to System Settings > Apple ID > iCloud Account
- Tap on the iCloud and click on the See All
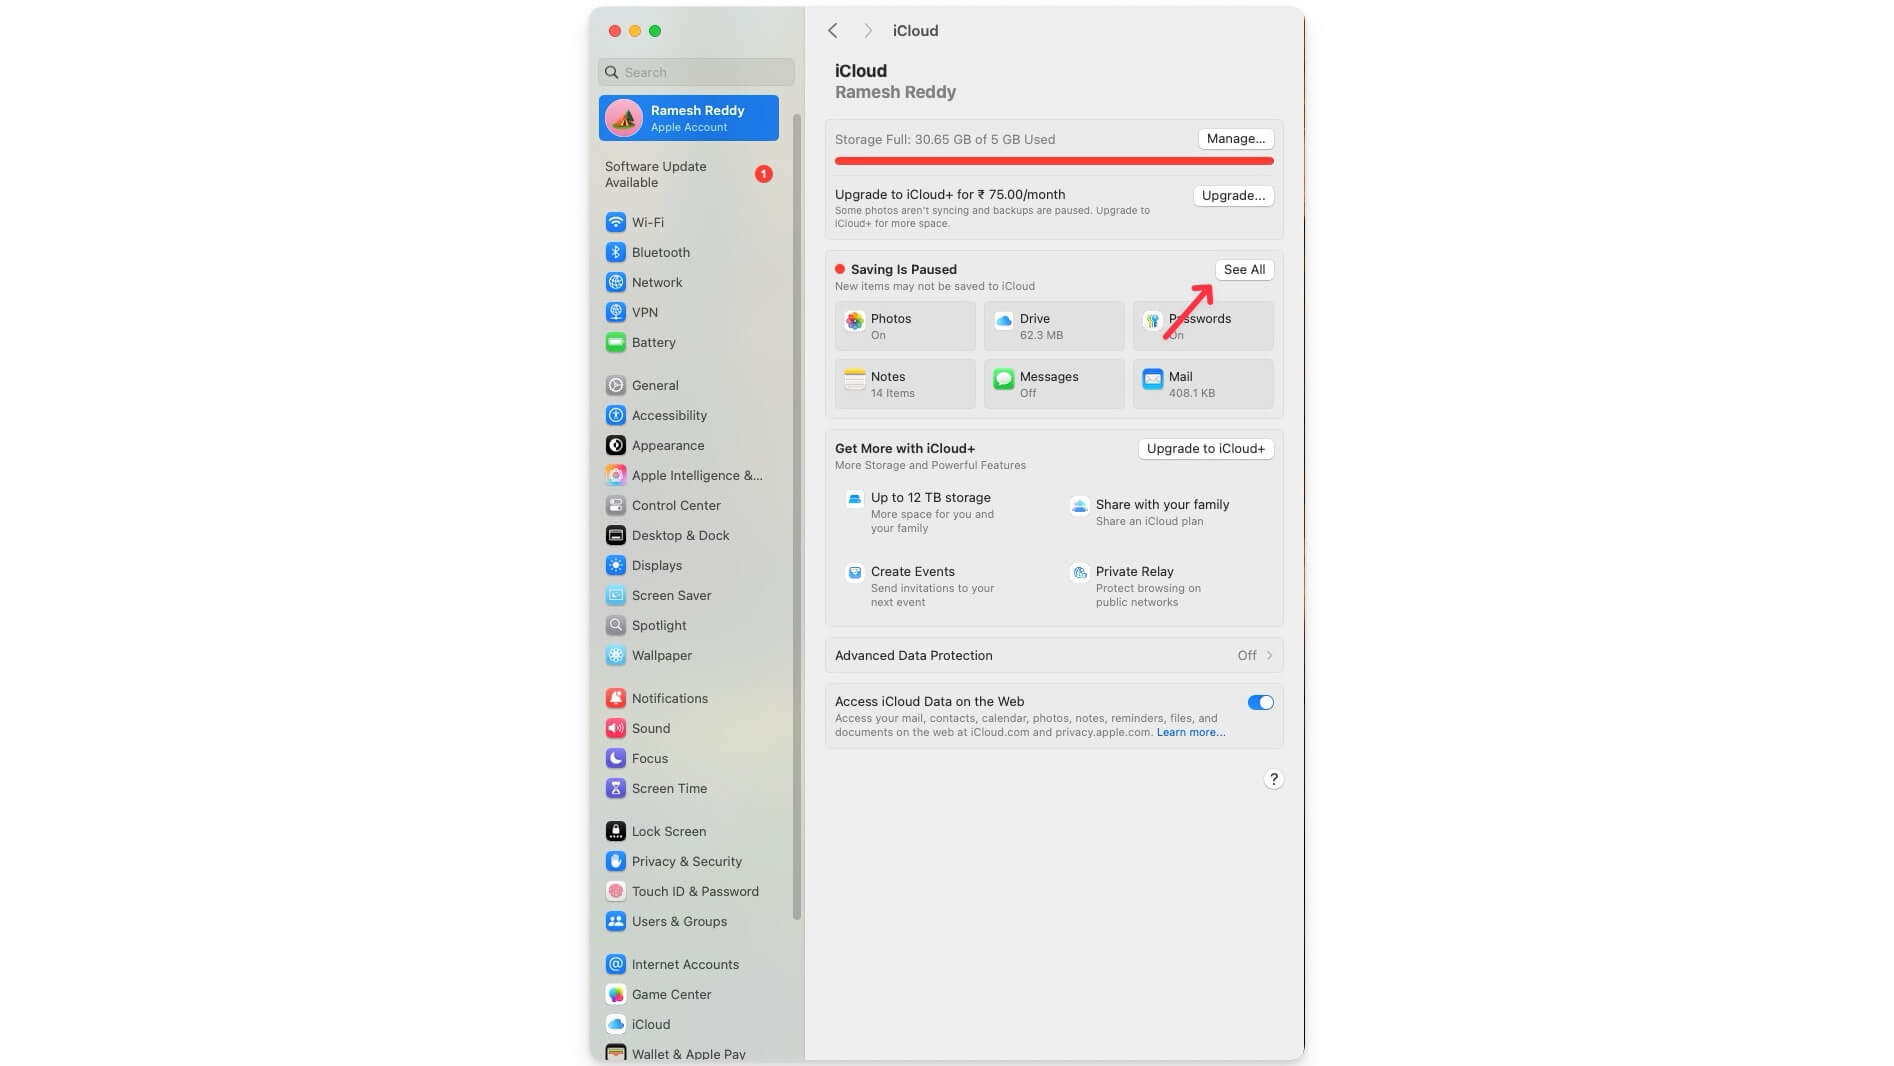
- Click on the iCloud drive again, tap on Options, and enable Desktop & Documents Folders.
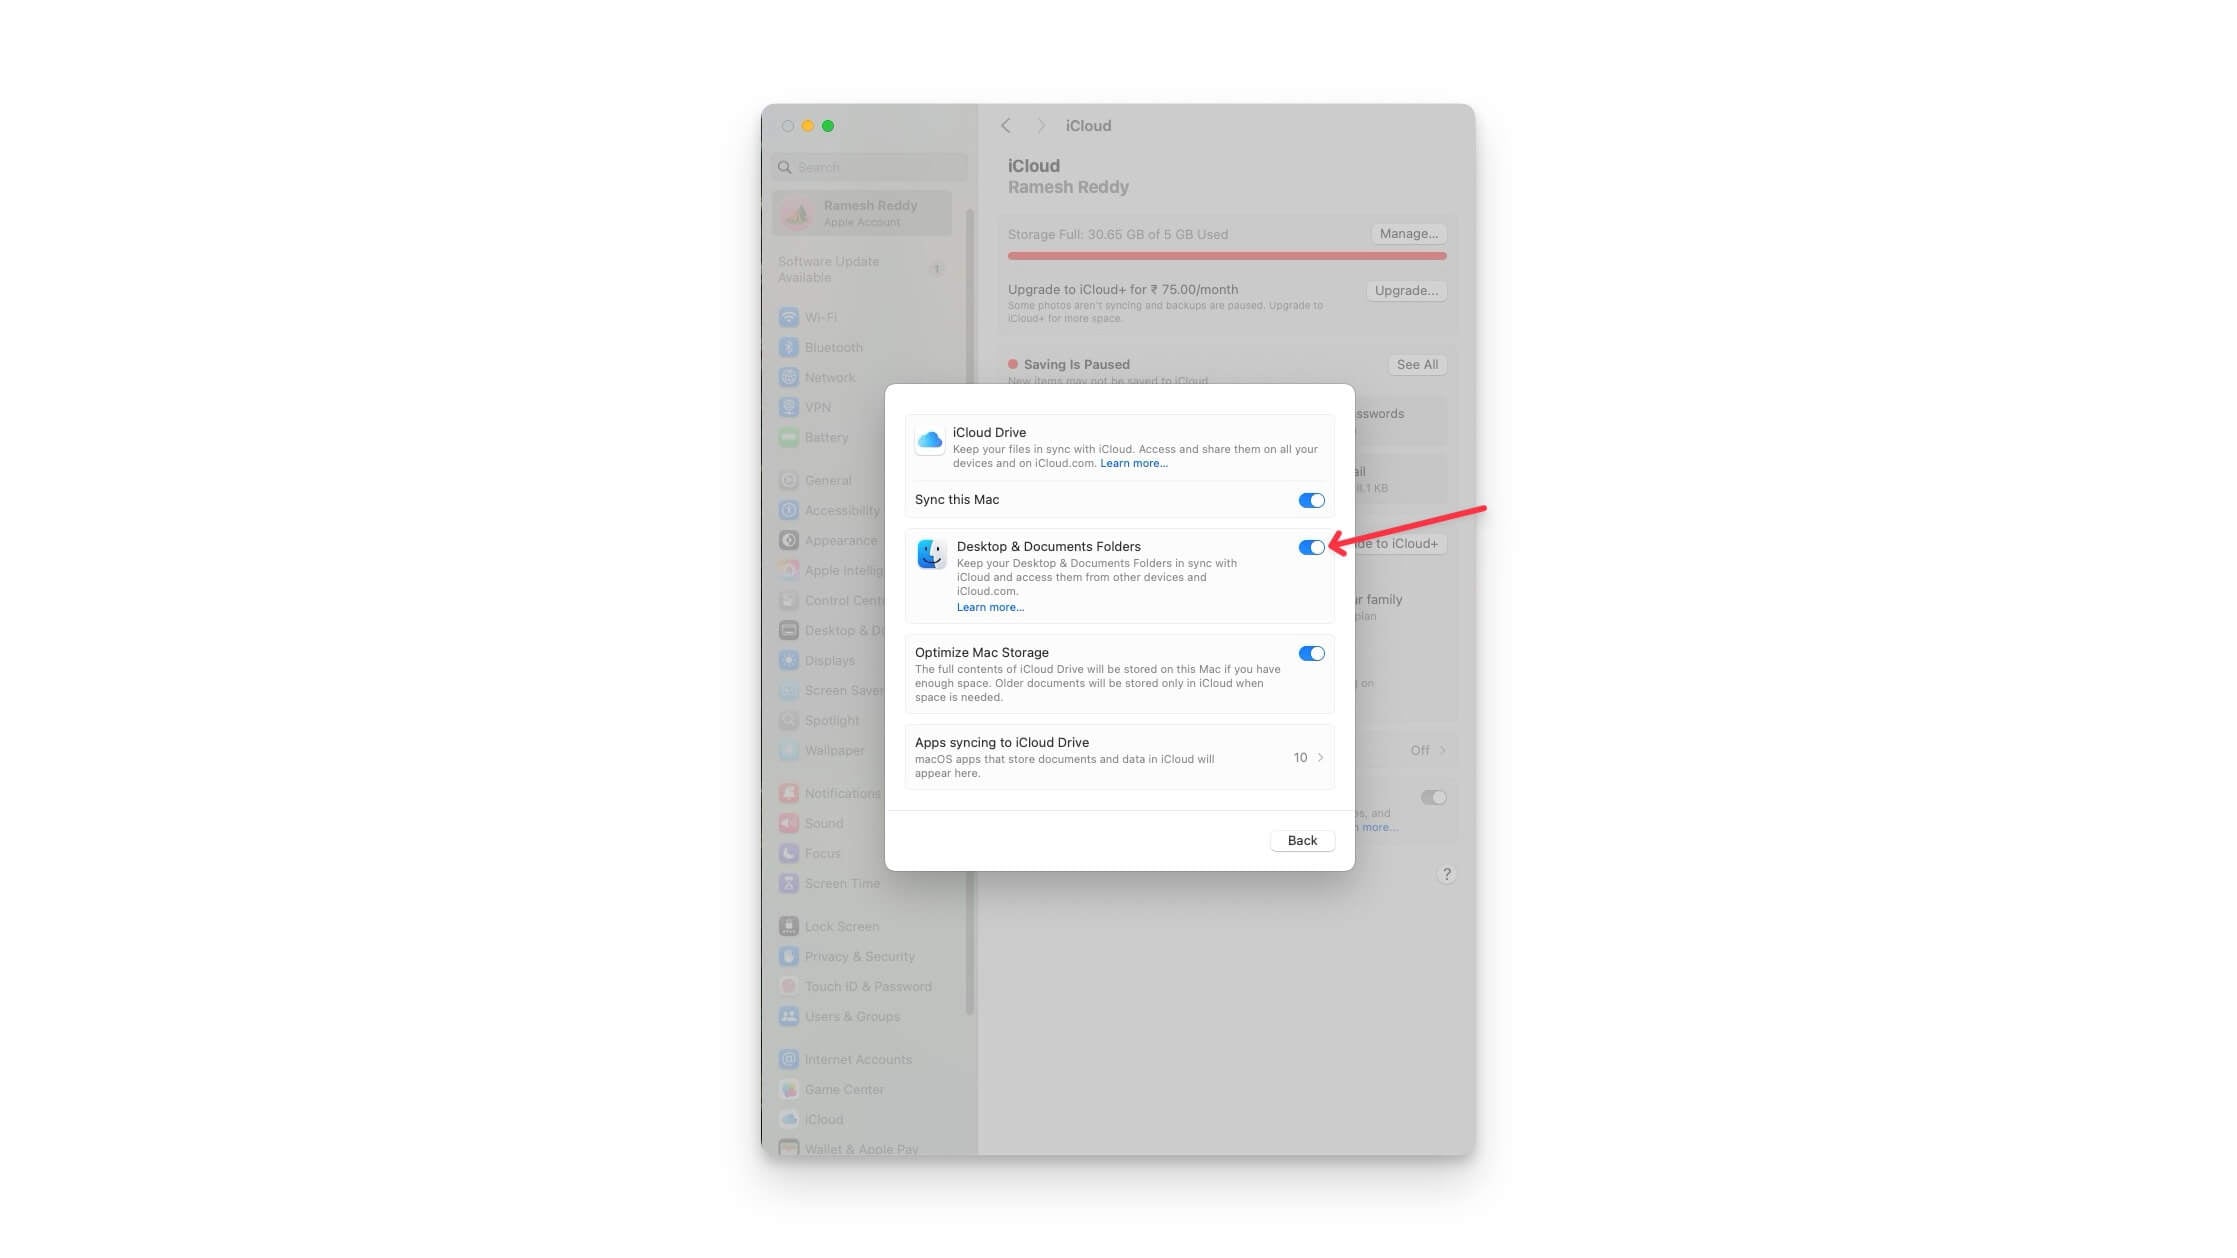
- Now, all files in these folders will be uploaded to iCloud automatically.
However, if you don’t want all files to fill up your space, you can manually store important files in the Finder iCloud folder, which you can access on the iPad as well.
How to Access Mac Files on iPad
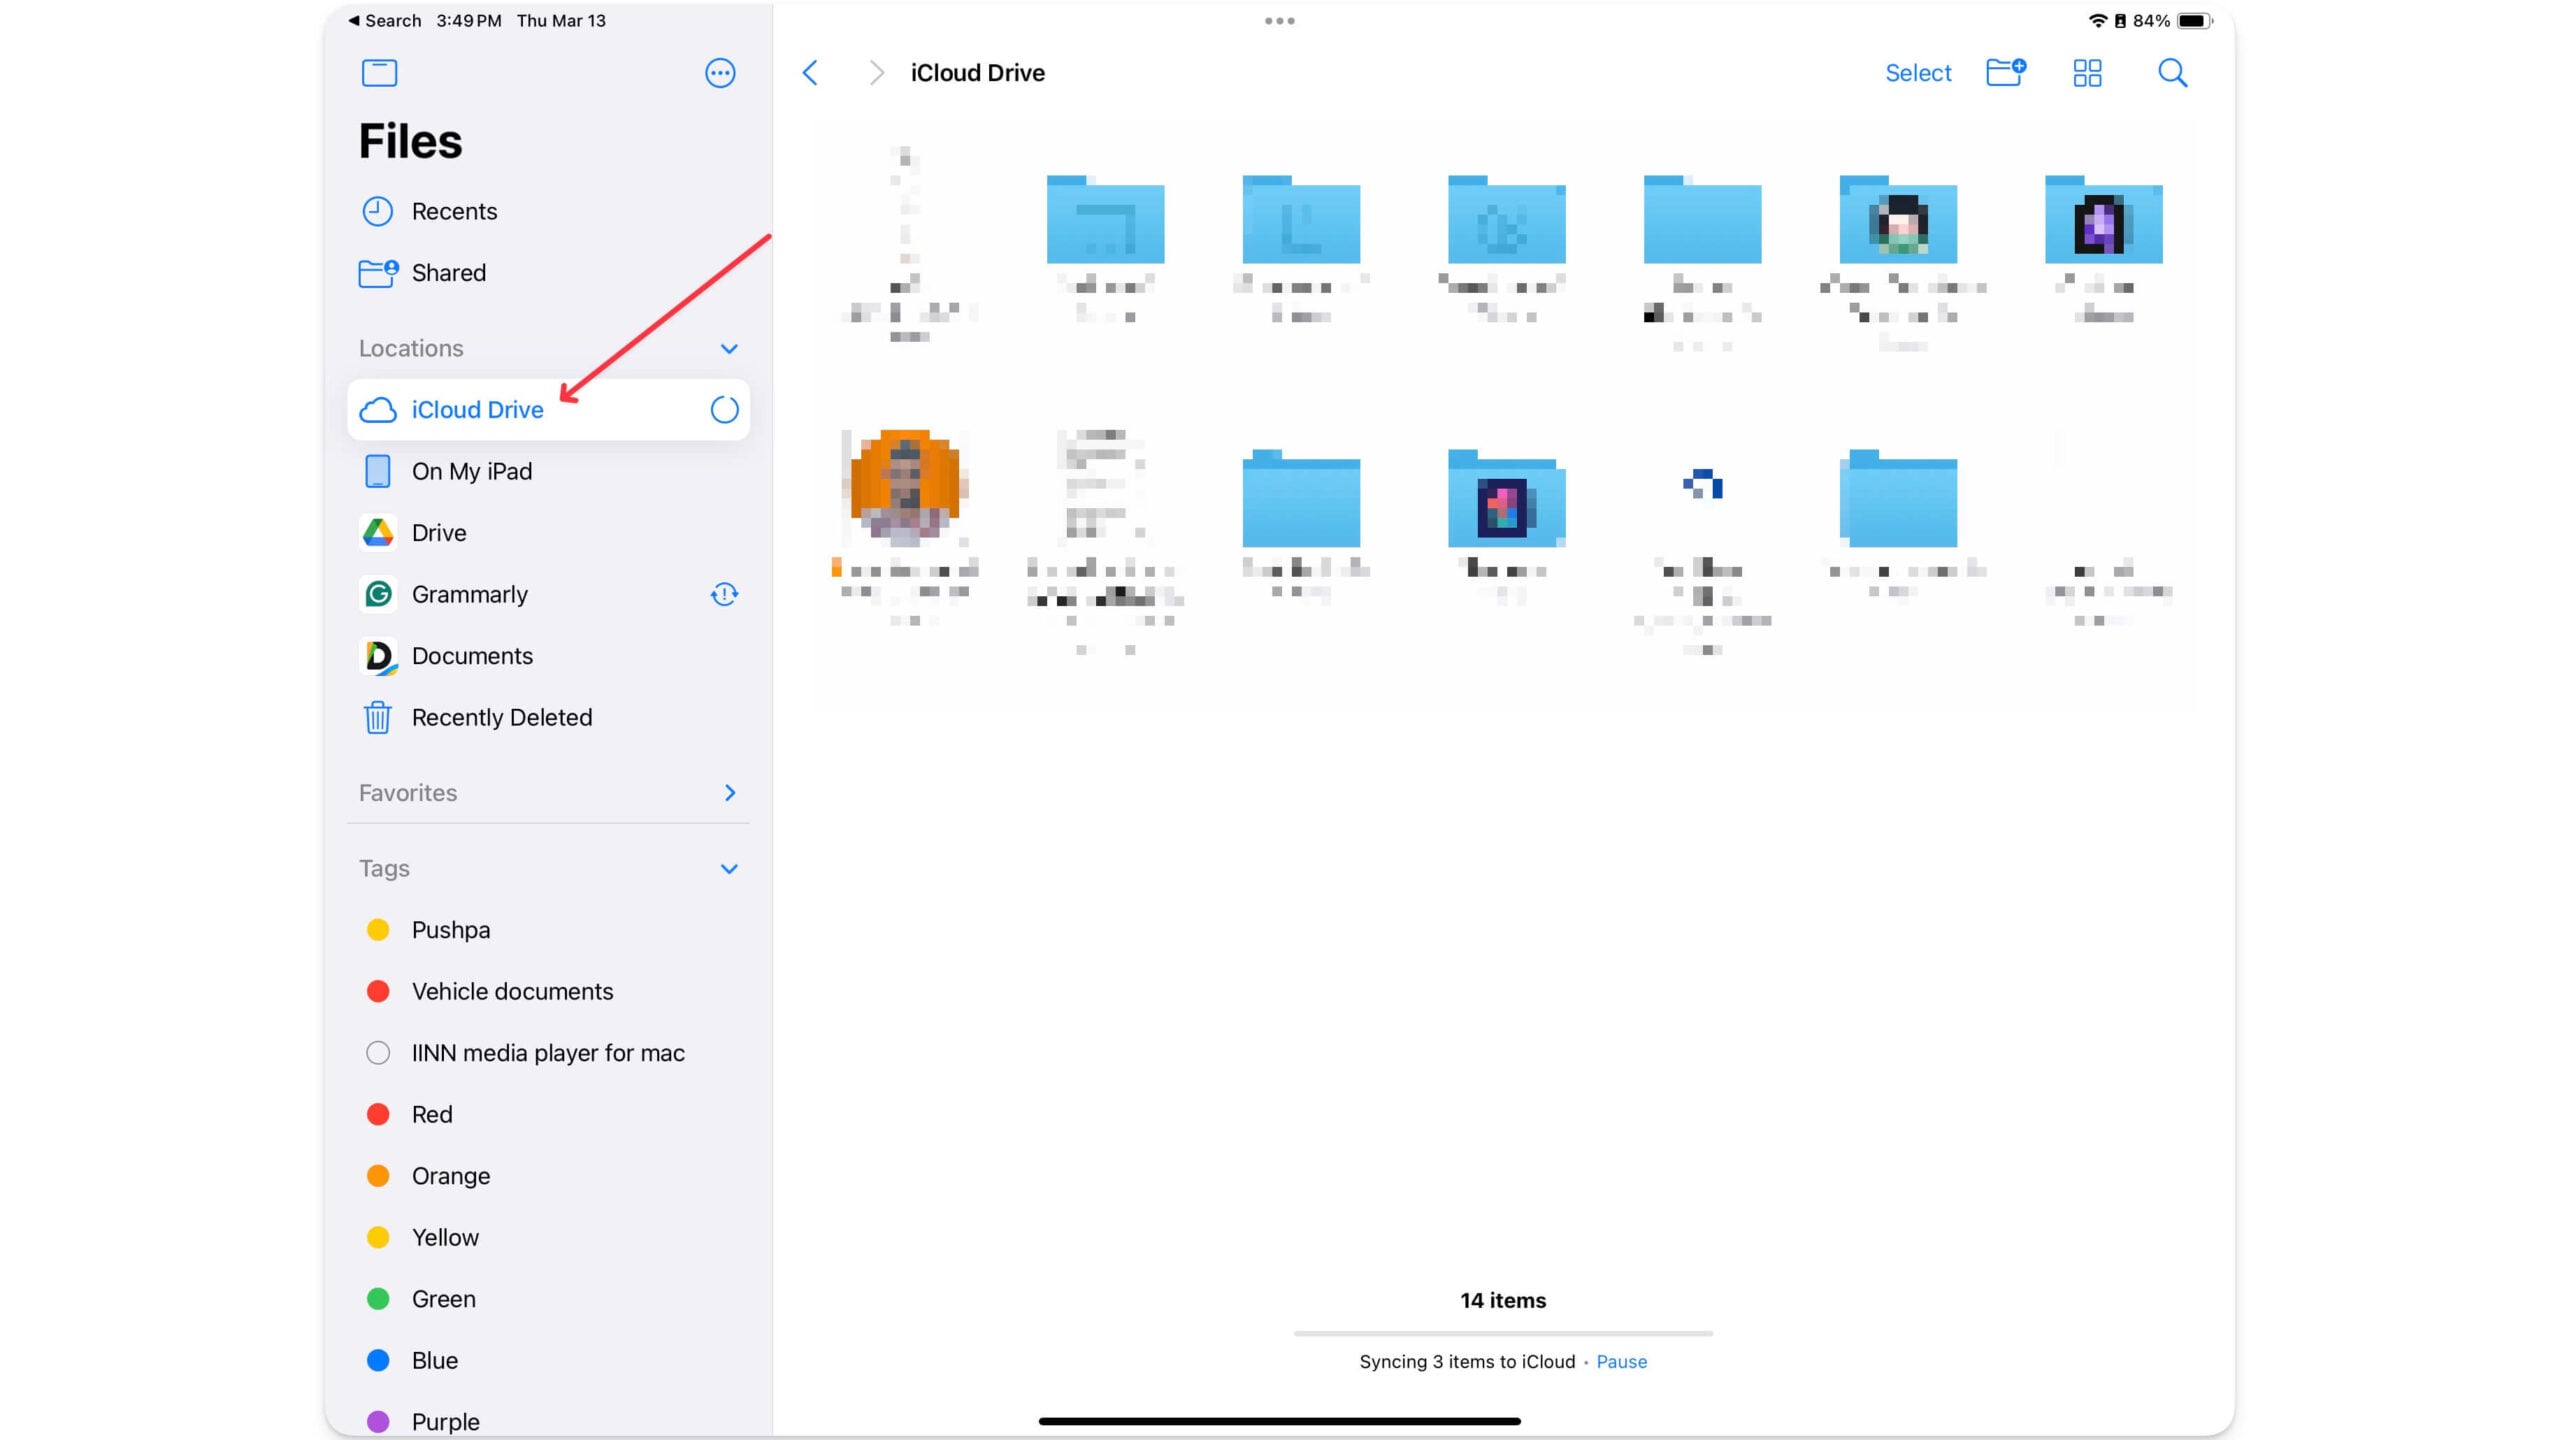
- Open the Files app on your iPad
- Tap on iCloud Drive in the left sidebar
- You will see the Desktop and Documents folders from your Mac
- You can also access these folders in the Documents using the Readdle app, a third-party file manager offering additional features.
Syncing your files with the iCloud Drive eliminates the need to manually transfer files from Mac to iPad. Whenever you travel, you can also enable Handoff, which allows you to start a document on Mac and finish it on iPad without manually transferring files for a seamless experience.
3. Turn on Stage Manager for better Multitasking
Despite boasting 12.5 inches on the iPad Pro, multitasking on the iPad was a mess and very limited up until iPadOS 16.
Apple introduced Stage Manager on iPadOS 16. It lets you use and manage multiple app windows; you can open multiple apps, resize them, switch between them easily, and even drag and drop content between them.
Before you get excited, Stage Manager requires the iPad to run on the iPadOS 16 or later versions and the Apple M1 or later processors. Apple claims that Stage Manager required multiple power sources, so it was limited to the power of M1 or later processors. Later, in iPadOS 17, Apple also added support for Stage Manager for external displays. Apple’s Stage Manager is turned off by default, but you can enable it from the settings.
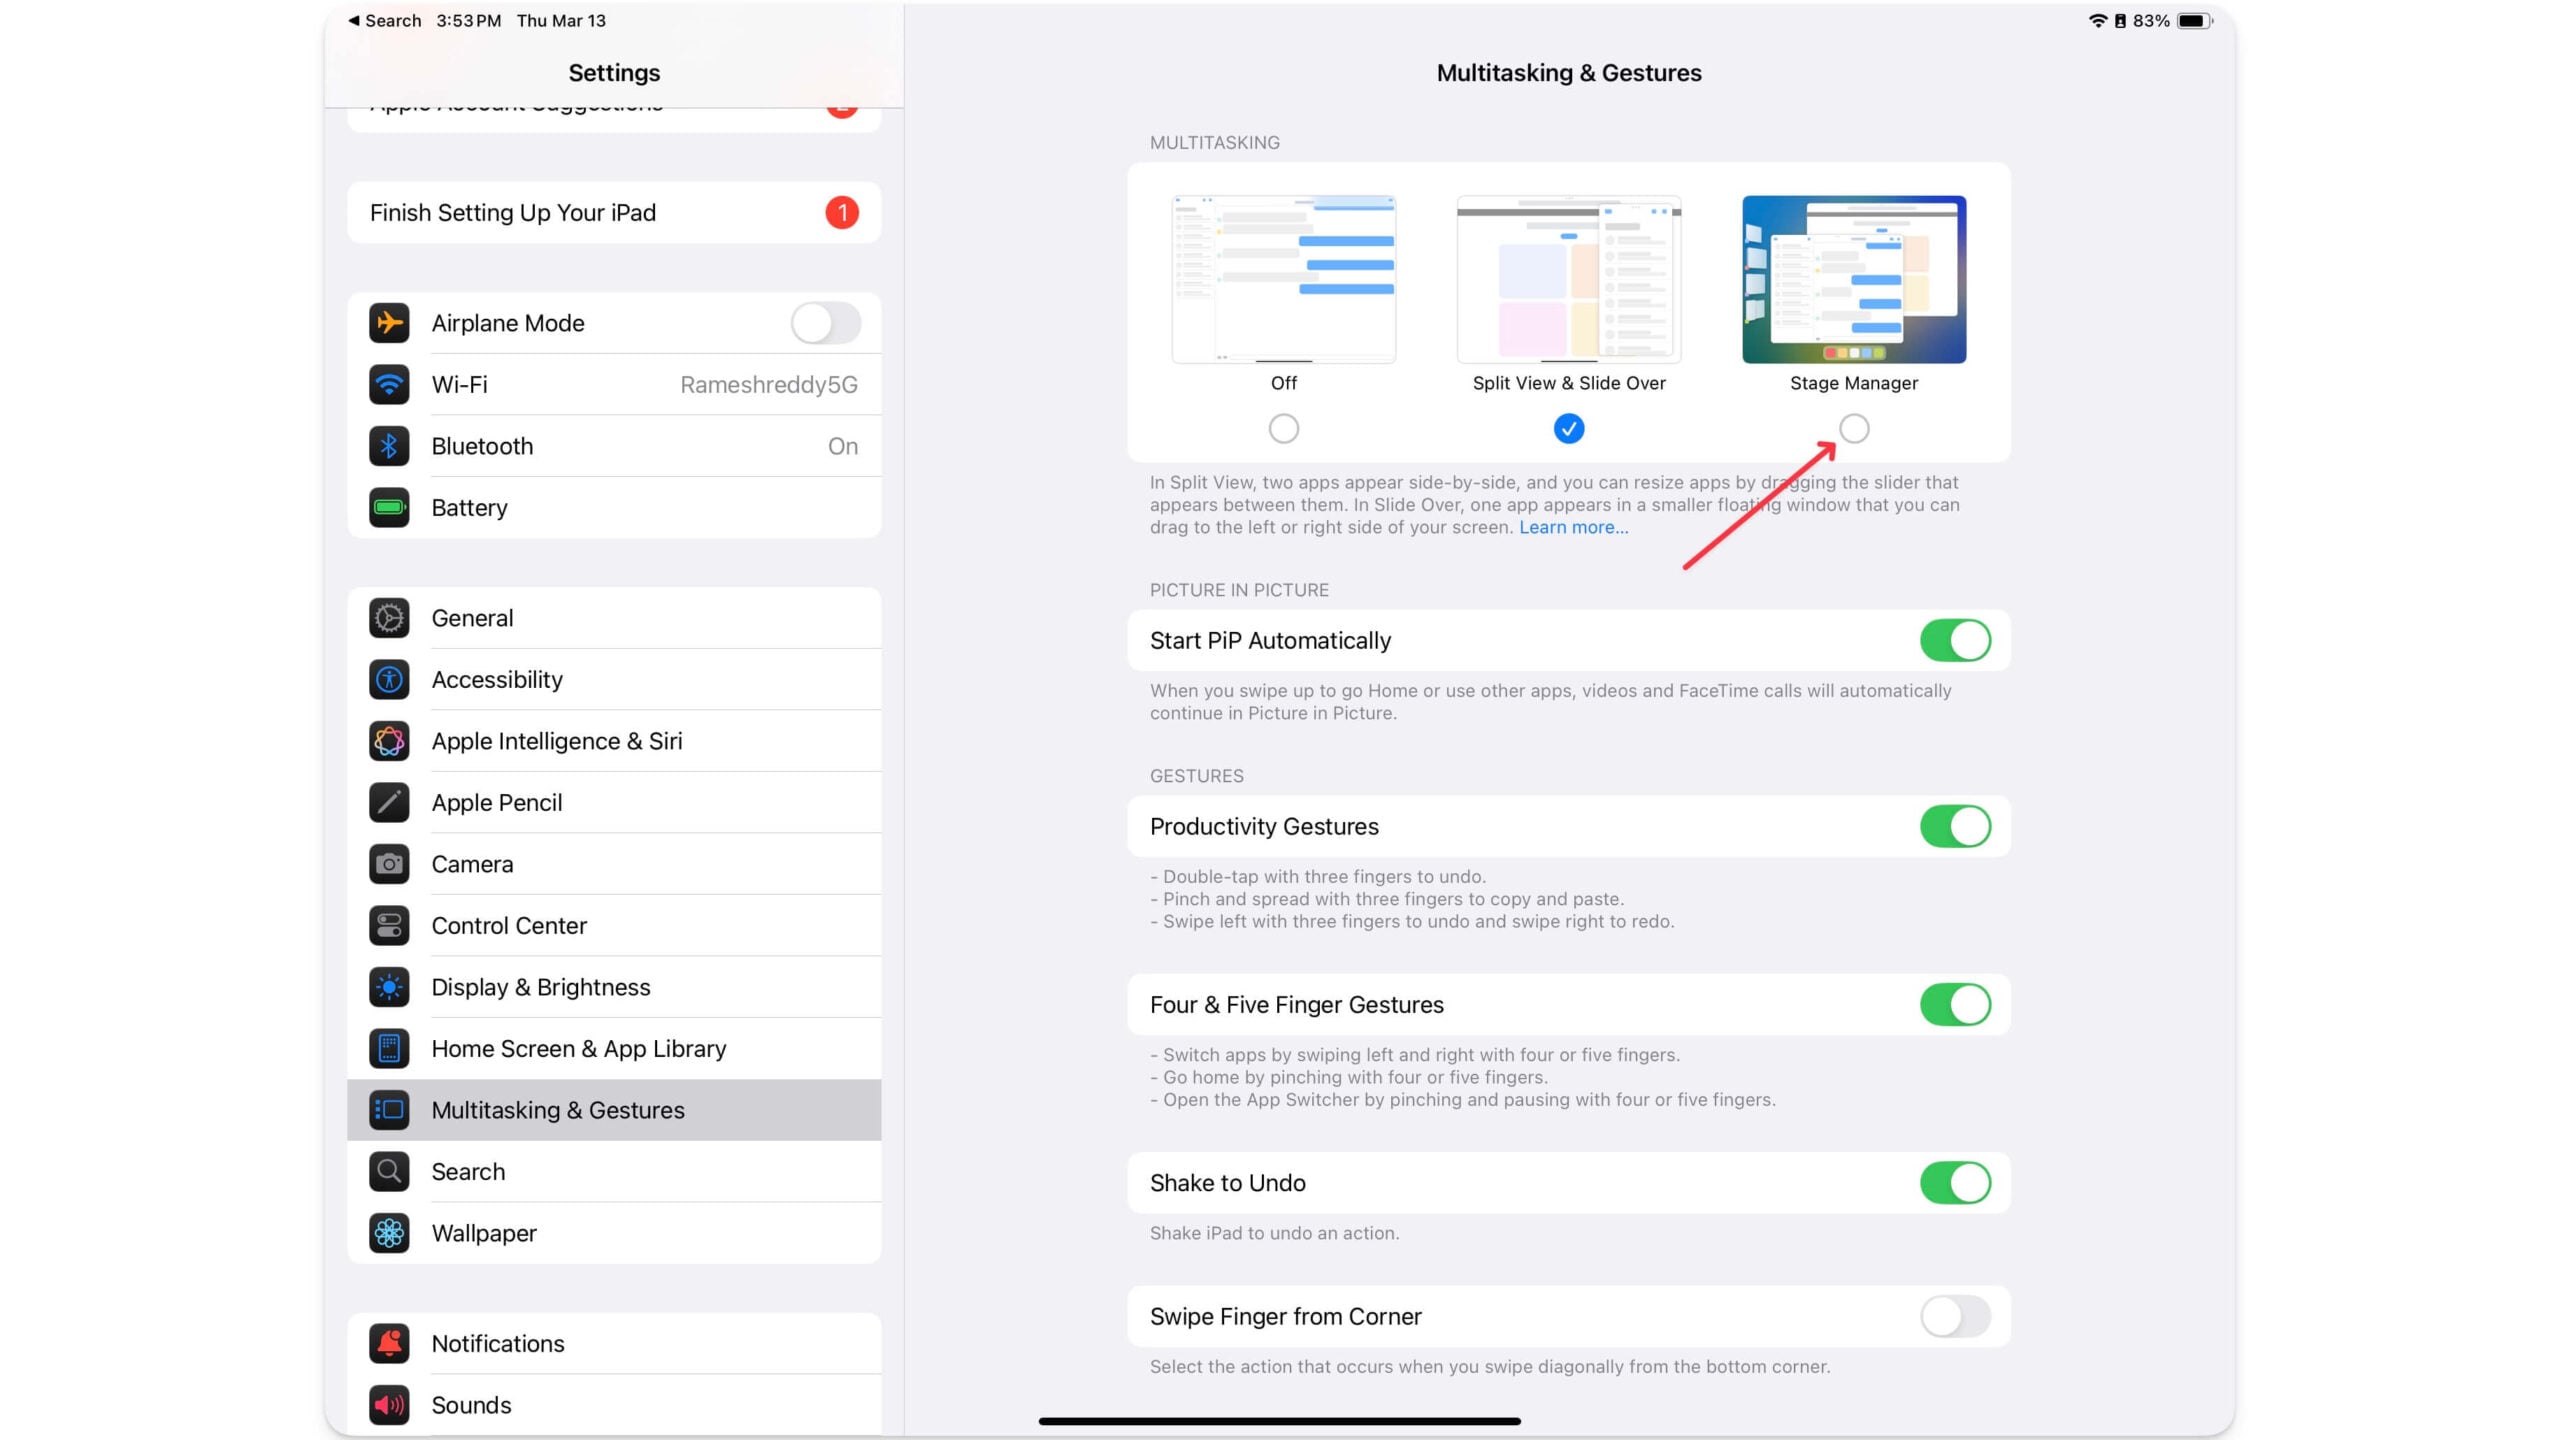
Go to Settings > Home Screen & Multitasking > Stage Manager to enable. You can swipe from the right corner and tap the Stage Manager icon. This will bring Stage Manager multitasking functionality to your home screen iPad.

4. Enable Dock and app drawer on your iPad
Apple Stage Manager enhances your multitasking experience on your iPad. Still, it cannot search and add apps that are not recent tabs. You can use the dock or app library in the doc to find and search apps. However, if you disable the dock in the settings, you must enable the best multi-tasking experience on your iPad.
Go to Settings > Home Screen & Dock and enable Dock and App Library on your macOS-like setup.
Similar to the Mac dock, the dock displays your regularly used apps so that you easily find and switch between them, and the app library gives you a list of all apps on your iPad. You can long-press on an app and tap on it to add it to Stage Manager.
Install These Apps for a Desktop-Like Experience
After changing the necessary settings, install these third-party apps to get an advanced file manager and remotely access your files on your Mac.
1. File Manager: Manage Your Files With Useful Tools
The built-in file manager on the iPad is more than enough to manage all your files. However, suppose you want a desktop-like experience with useful additional features. In that case, you can install Documents by Readdle, which offers additional features to manage, download, edit, organize, connect your iPad to your Mac, and more.
Along with Google Drive, you can connect multiple cloud services, import files, and manage files from them easily. Plus, it comes with a handy local computer connection feature, which allows you to automatically connect it to your Mac or any PC and transfer files that you have modified on your computer when your PC is not with you.
It also supports many useful tools, from easy video transfer to quickly transferring files into different formats. VPN and browser support are also built for handy use if you want to download files directly from the Files app.
The Files app also comes with a built-in media player that allows users to watch and listen to music directly within the Files app.
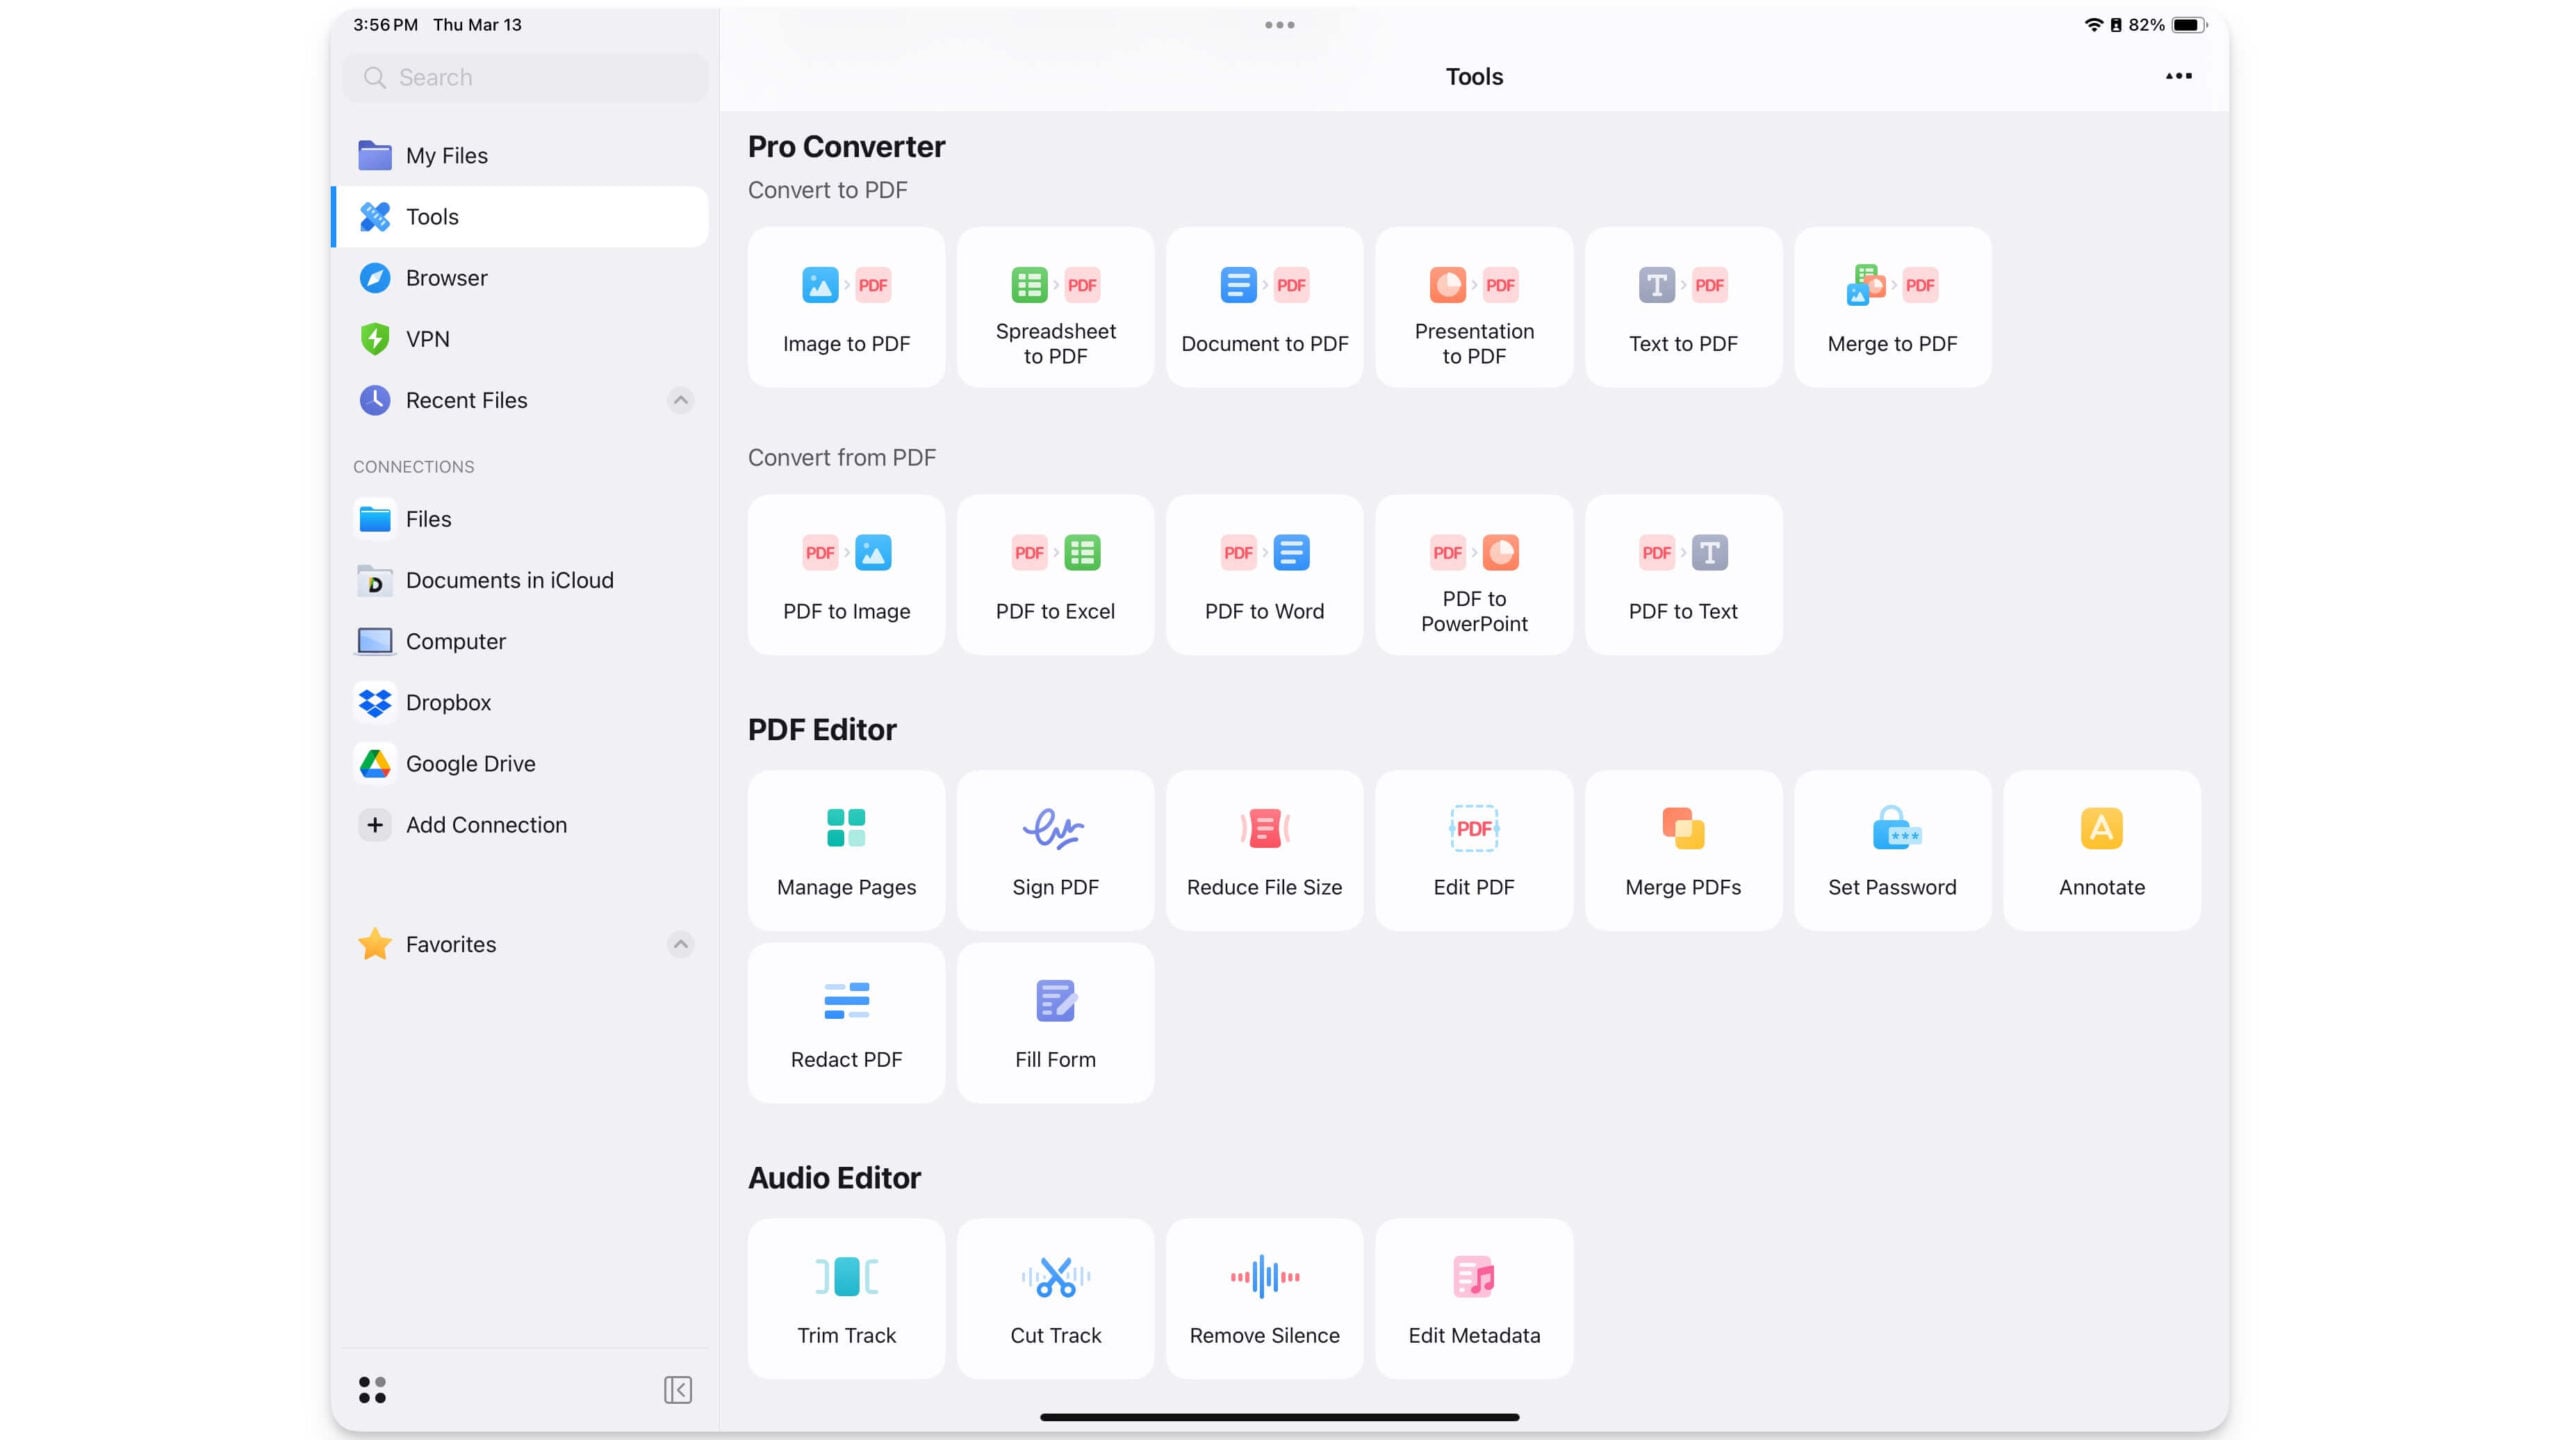
Files app comes with both free and premium versions; the premium version gives access to a wide variety of tools like PDF converter, scan, and useful PDF editor tools such as sign input, set password, edit PDF, and fill form features, which come in handy if you often deal with PDFs more on your iPad.
Download Documents file manager for iPad
2. Jump Desktop: Access Your Mac Remotely
You can back up all your files to the cloud and use them on your iPad remotely; however, if you forget an important file on your Mac or need to access only a desktop application that only works on Mac, Jump Desktop can come in handy for you.
Jump Desktop is a remote desktop application that lets you control your Mac and Windows PC from your iPad, similar to the Windows Remote Desktop app, which lets you access Windows PC on any device.
Using it, you can remotely use your iPad to connect to your computer, access files on your Mac, and interact with your desktop. Since the connection is remote, there might be some delays between them, also based on your network, but it can come in handy if you quickly want to open a certain desktop application or access a specific file on your Mac.
Remember, to use Jump Desktop, your MacBook should be turned on and connected to the internet. However, you can prevent your Mac from going to sleep mode using this tutorial, but if your Mac is off, there is no way to turn it on remotely unless you have someone in your house to wake up your Mac and help you get the remote control to your iPad.
Download Jump Desktop app for iPad
Connect Your iPad to an External Monitor
If you are coming from a 15 or 16-inch or any Windows laptop, using an iPad might feel smaller and limited in size. However, if you can access an external display, you can connect your iPad to the external display using a cable and use your second screen as an extended display.
Apple has introduced support for external monitors in iPadOS 16, which lets you connect your iPad directly to an external display, just like the dual monitor setup on macOS. Like macOS, you can run multiple apps side by side, drag and drop between them, and more.
In addition, if you have a keyboard and mouse, you can use your iPad as a complete desktop replacement for your computer. The video tutorial below explains how you can use your iPad as an external display for your Mac.
Those are the settings, surfaces, and external accessories you can get and change on your iPadOS to replicate the macOS experience on your iPad. With Stage Manager, External Display, Mouse & Keyboard Support, and Cloud Sync, you can almost replicate 90% of your Mac on your iPad.
If you are someone who is getting an iPad instead of a Mac, here are the pros and cons of the device that can help you decide:
If you bought an iPad
- You will miss the full video editing capabilities
- You need to buy an external Magic Keyboard. However, it is not ideal for lap use.
- The iPad screen will be small, and the typing experience will not be as great as that of a Mac
- iPadOS is still limited and doesn’t support a lot of desktop apps
- iPad is not a choice for developers and advanced video editors for a complete video editing setup
But: - It is portable, and you can detach the keyboard and mouse and use it as a standalone iPad, which can be better for media viewing.
- It brings a touchscreen experience and is easy to carry.
If you bought a Mac
- You will miss the portability and touchscreen support on the iPad
- All iPadOS-specific apps for drawing, note and more
- Best media viewing experience
- Apple Pencil support
If you use your iPad mainly for browsing, writing, editing photos, or managing tasks, an iPad can fully replace a Mac. However, if you are a power user like a developer or need an advanced video editing setup, you still need a Mac for full capabilities.
