Quick Answer
The iPhone Camera app features key icons like the flash for lighting control, Live Photo for motion capture, and the caret for advanced settings. Icons vary by mode, with options for exposure, timer, filters, and zoom. Video mode adds symbols for resolution, frame rate, and action mode, while Portrait and Cinematic modes offer lighting and depth control for creative shots.
Even though Apple’s Camera app looks minimal and less cluttered than other camera interfaces, it can still confuse new users. Some existing users also still find camera app icons confusing, thanks to Apple’s exclusive features like Live Photos and Photographic Styles.

To help you out, in this guide, I have explained each camera feature on the Apple Camera interface, from different screens to different camera modes, so that you won’t feel lost when trying to use the camera features. Here is a simple and easy guide if you want a simple way to understand camera icons.
Table of Contents
What do the symbols mean on the camera app on iPhone in iOS 26
Apple recently announced iOS 26, its latest update for iPhone. Along with the new liquid glass interface, Apple has completely changed the camera interface, marking the biggest revamp in history. The new interface strips all the camera features, making the whole interface a lot cleaner and easier to use.
However, this sudden change can out many peoplecomfideed fortnely we have this guide to explain to you how to use the Apple new camera interface and what each icon means. However, if still using iOS 18 or lower, you can follow the guide below (iOS 18 Camera icons explained).
Main Camera Interface

- Exposure: The Exposure option is now moved to the top right corner which lets you adjust the brightness value of the image. It is displayed as a slider from 0.0 to 2.0 which can be increased or decreased.
- Focal Length: The focal length allows you to switch between different zoom levels, it changes depends on your camera lens, for instance in my case it is 0.5x for ultra wide and 1x for a standard, it also also can be 2x, 3x if you have telephoto lens.
- Shutter button: It takes a photo when pressed. Like before, long pressing the shutter button lets you record video.
- Camera Switch button: It lets you switch between front and rear camera.
- Switch: It lets you to switch between different camera modes such as Photo, Video and etc, You can swipe right or left for more modes.
- Night mode: It lets you to toggle night mode on or off in low light.
- Flash on/off: It lets you enable or disable flash lights.
- More options: Tapping on this icon reveals more camera controls such as timer, exposure and more.
- Filters: Allows you to add color filters in the real time.
- Modes: Switches between camera modes such as rich vibrant, contrast and more. Keep in mind this doesnt switch into different camera modes such as portrait and panorama and all for that you need use the switch.
Advanced camera options
After tapping on the more details, You get access to more camera options, here is what they mean.

- Exposure: Same as before it lets you to adjust the brightness.
- Flash: Lets you to turn on/off flash and also lets you to switcjh to Auto mode.
- Exposure (in the menu): Apple also offers eposure option in the main camera settings lets you to adjust the brightness.
- Aspect ratio: It lets you to ajust the photo framing. For instance, you can switch between: 4:3, 16:9, 1:1, Full Screen and more.
- Filters: It lets you to apply filters to the photo even before taking the picture.
- Live Photo: Apple standout feature that capture a few seconds of motion witheach photo.
- Timer: It lets you to set timer for the capturing the shots, works for both front and back cams ans its lets you to set max up to 10s
- Styles: It lets you to enable photo graphisc styles such as Rich contrast, Vibrant and more.
- Filter: It lets you to apply filters such as Vivid, warm and more.
Video recording interface explained

Similar to Photos, Video recording interface also gets design overheaul, here is what each icon mean:
- Resolution: It lets you to adjust the video recording quality, for example: HD, 4K and more.
- FPS (Frames Per seocond): It lets you to adjust the video frames per second. In other words how smooth the video looks, for 30FPS means that your iPhone camera records 30 Frames per second, 60 FPS records even more smoother videos. and 120FPS is generally used for slow motion.
- Record button: It lets you to record the video.
- Camera Switch: It lets you to switch between front and rear camera.
- Flash: You can turn on/off flash while recording the video.
- More options: Similar to camera, tapping on it reveals more video controls.
Video Controls icons Explained

- Flash: It lets you to toggle on/off the flash light while recording the video.
- Exposure: Similar to Photos you can adjust the brightness for better video recording in low light.
- Action mode: Another Apple specific feature which lets you to record videoes with enhanced stabilization especially when you are running, biking taking action videos.
Those are the camera icons and meaning on the Apple camera app in iOS 26, if you are using older iOS version you can view the guide below.
What do the symbols mean on the Camera app in iOS 18
Before going to the guide, this guide focuses on the camera app interface of iOS 18. You can also see this guide to learn camera symbols on previous iOS versions, since the Apple camera interface has remained the same since iOS 17. A few camera features might vary depending on your iPhone model.
If you are using an iPhone 15 or later model, a new camera control button gives you additional features in the camera settings, but still, most of the icons remain the same.
Main Camera Interface
When you open the camera app, by default, the app shows you the photo mode with plenty of options and icons to choose from. You can also access advanced features using the caret arrow icon. Here is what each icon means.

- Flash Icon: It controls the camera flash. You can tap on it to set it to Auto, Off, and On.
- Live Photo: You can enable or disable Live Photos capture. Live photos capture a few seconds of motion before and after taking a picture. You can learn more about Apple Live Photos from here.
- Additional Settings (Caret Icon): Using this icon, you can access more camera settings like aspect ratio, timer, and filters.
- Zoom Level: You can adjust the zoom level using these settings(e.g., 0.5x, 1x, 2x). It varies from iPhone to iPhone, depending on your camera’s telephoto capabilities.
- Camera Modes: You can swipe left or right to switch between different camera modes (Cinematic, Video, Photo, Portrait, Pano). Currently, the above interface is in photo mode.
- Switch Camera Icon: Tapping the icon can toggle between the front and rear cameras.
- Shutter Button: Captures a photo when pressed. You can also record videos by pressing it for a long time.
- Gallery/Recent Photos: It opens the Photos app to view recently taken pictures and videos.
iPhone Camera App Advanced Photo Mode Controls Explained
For pro users, the iPhone camera app offers advanced camera controls to take better images; you can also adjust the existing settings and turn off settings by default, which is what each symbol means in the advanced photo settings in the camera app.
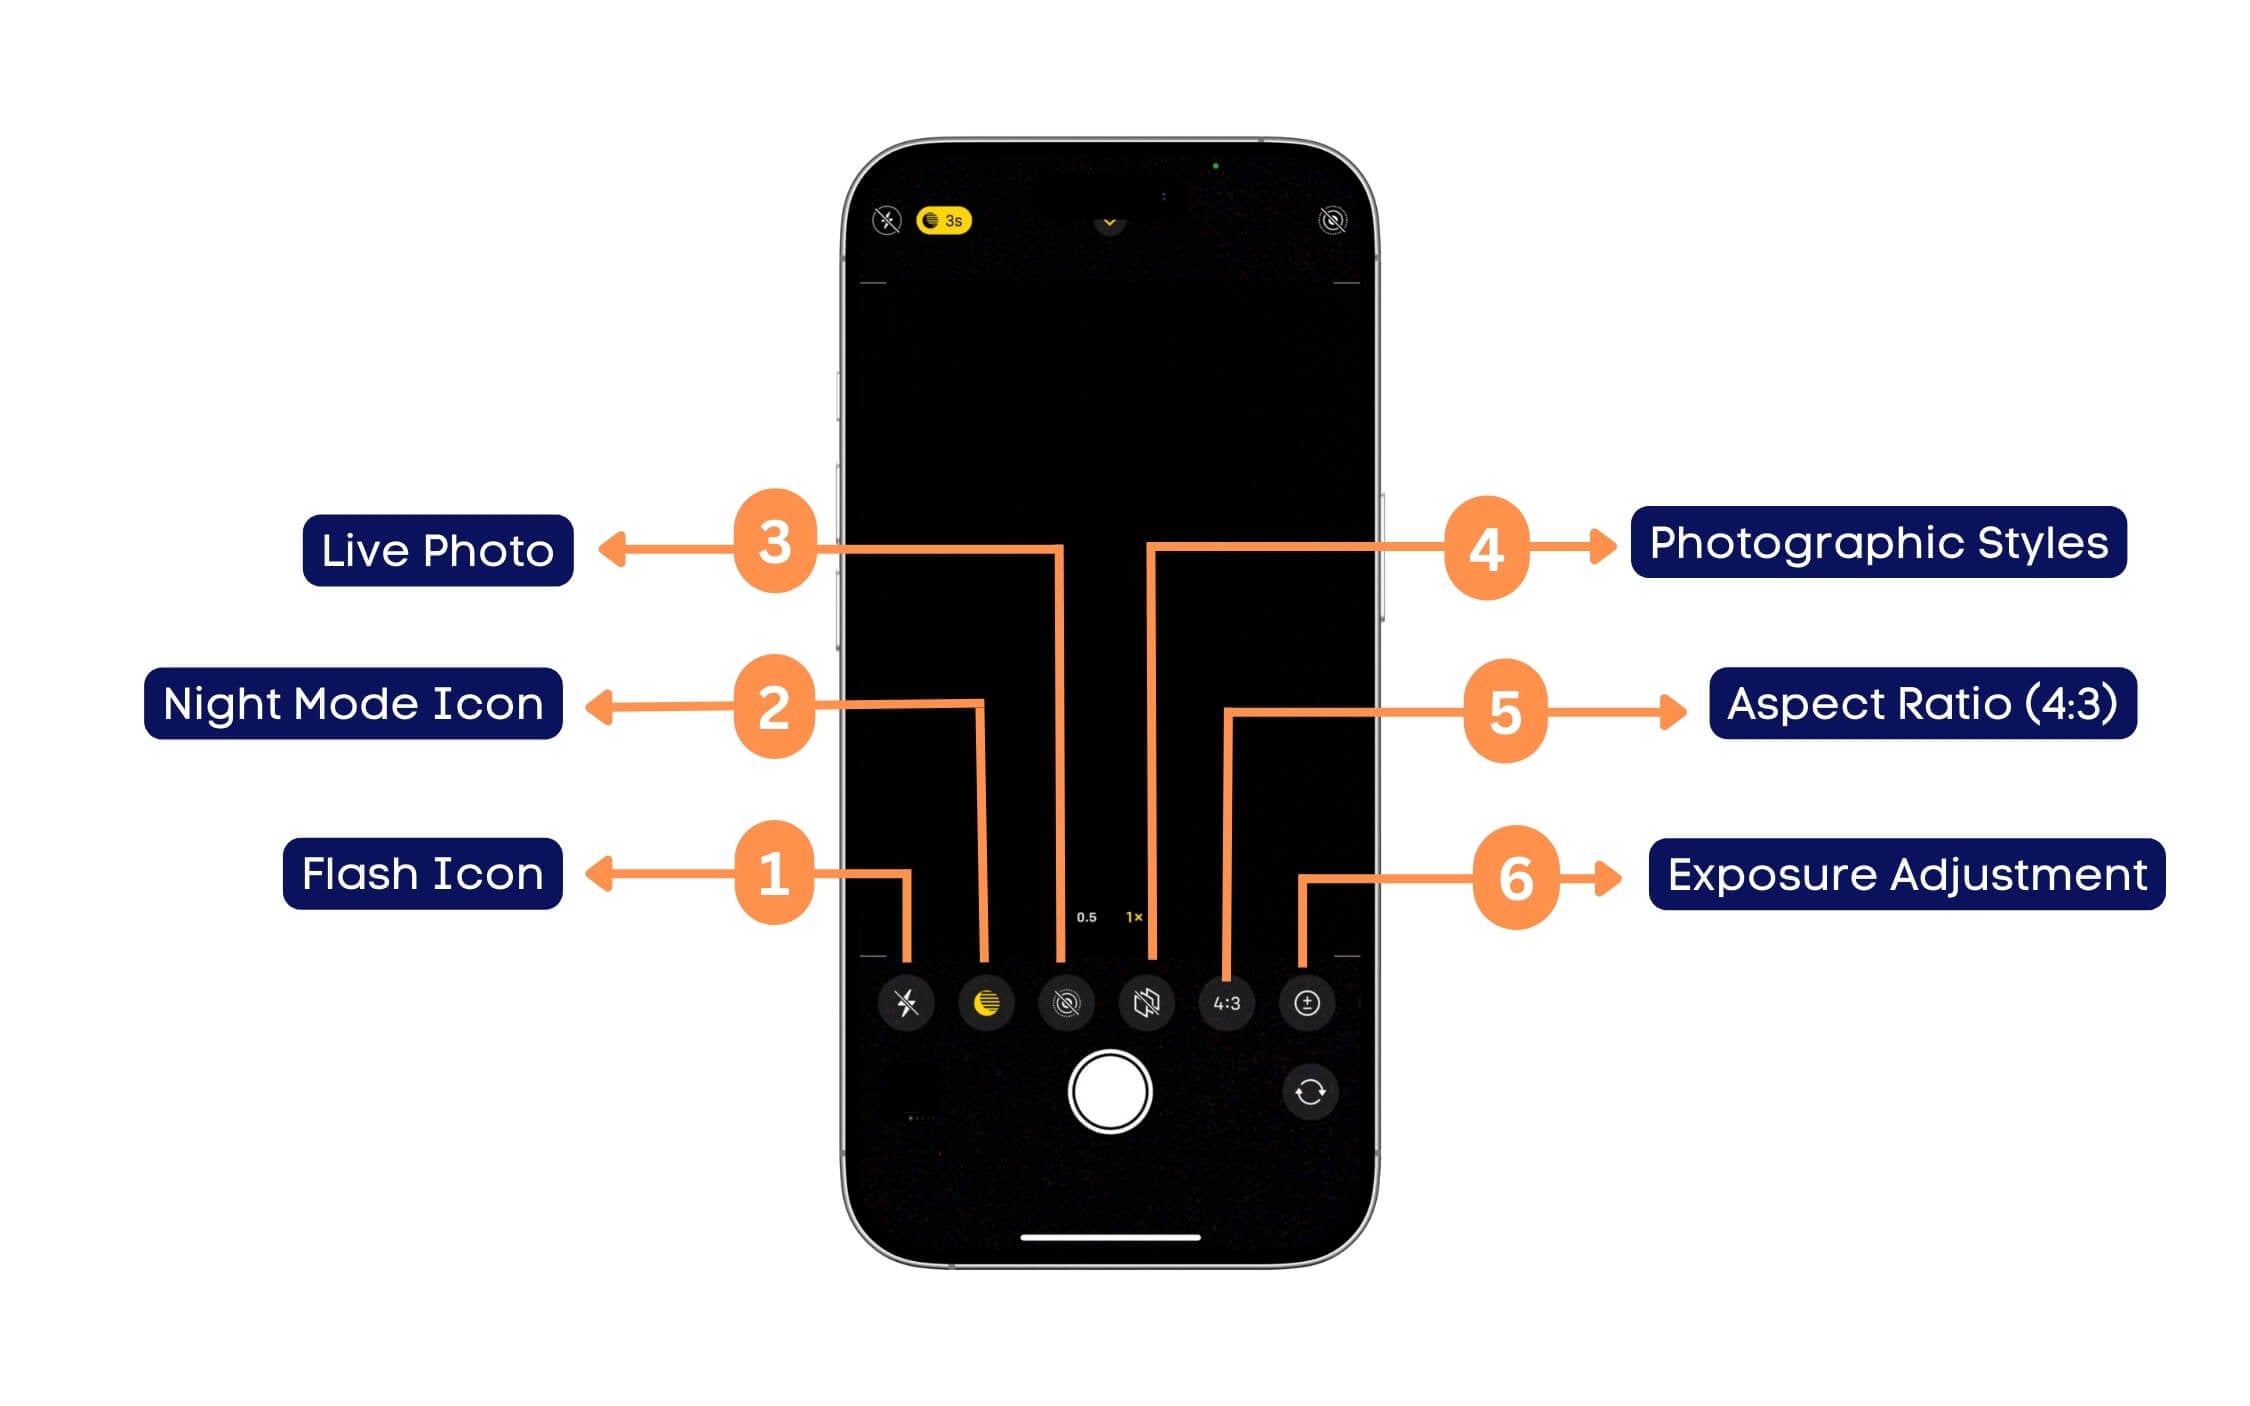
- Flash Icon: You can also control flash settings from here if the top flash icon is hard to reach. You can turn it on/off or leave it auto, where the camera app decides based on lighting conditions.
- Night Mode icon: Similar to the flash icon, you can also control night mode from here; tapping it allows you to adjust the time and level of the exposure you can set in the night mode further.
- Live Photo: You can enable or disable Live Photos capture. Live photos capture a few seconds of motion before and after taking a picture. You can learn more about Apple Live Photos from here. From here, you get extra options to turn it off and on.
- Photographic Styles: Choose from different Photographic Styles. The iPhone Camera app offers the following: standard (default look), rich contrast (darker shadows, richer contrast), vibrant (brighter colours), warm (yellowish tone), cool (bluish tone)
- Aspect Ratio (4:3): You can adjust the image aspect ratio in simple terms, the frame to 4:3, 16:9, or Square (1:1).
- Exposure Adjustment (+/- icon): You can manually increase or decrease exposure for darker or brighter shots.

- Timer Icon: The timer icon allows you to set a delay before capturing a photo. By default, it is turned off. You can set the time from 3 seconds to a maximum of 10 seconds.
- Filters Icon: The filter icon allows you to apply different filters before taking a photo. Currently, the available filters are Original, Vivid, Vivid Warm, Vivid Cool, Dramatic, Dramatic Warm, Dramatic Cool, Mono, Silver Tone, and Noir (which is black and white).
Night Mode
The Apple camera app automatically uses night mode when there is less light to capture. Many users find these settings confusing; here is what the night mode symbol means in detail.

- Night Mode Icon: Apple automatically enables night mode if there is no light to capture the photo; depending on the light, it shows the timer (e.g., 3s), which indicates the exposure time and how long the camera sensor will be exposed to the light. The more time it takes, the more light it will be; you can also turn it off from the settings.
iPhone Camera App – Video Mode Screen Explained

- Flash Icon: Indicates whether the camera flash is on or off during video recording. A slash (/) means the flash is disabled.
- Action Mode Icon: Action mode stabilizes the video footage. If this option is enabled, it reduces the shakiness and captures video with smooth motion.
- Resolution & Frame Rate: Displays the current video quality settings. For example, HD 30 = 1080p resolution at 30 frames per second, 4K 60 = 4K resolution at 60 frames per second; you can adjust the settings by tapping on it or setting default values from the Settings> camera options.
- Timer: The timer displays how much time the video is being recorded.
- Finally, the o.5x and 1x: Display the zoom of the video, similar to the photo. You can adjust the video zoom using these settings.
iPhone Camera App Video Recording Screen Symbols Explained
The camera app has a different function and symbols when you are recording the video; here is what they mean

- Pause Button: This allows you to pause the video recording instead of stopping it. You can pause and resume the video from where you have stopped.
- Record Button: If it has a centre red mark, it indicates the recording is in progress. Tapping it will stop the recording.
- Capture Photo Button: This allows you to take photos simultaneously while recording the video. You can take pictures of specific parts of the video without interrupting the while recording.
- Recording Timer: The video timer in hours, minutes, and seconds.
iPhone Camera App – Cinematic Mode Screen Symbols Explained
Apple comes with exclusive cinematic mode, which lets you to capture images rising depth effect; here is what the symbols mean in the camera mode.
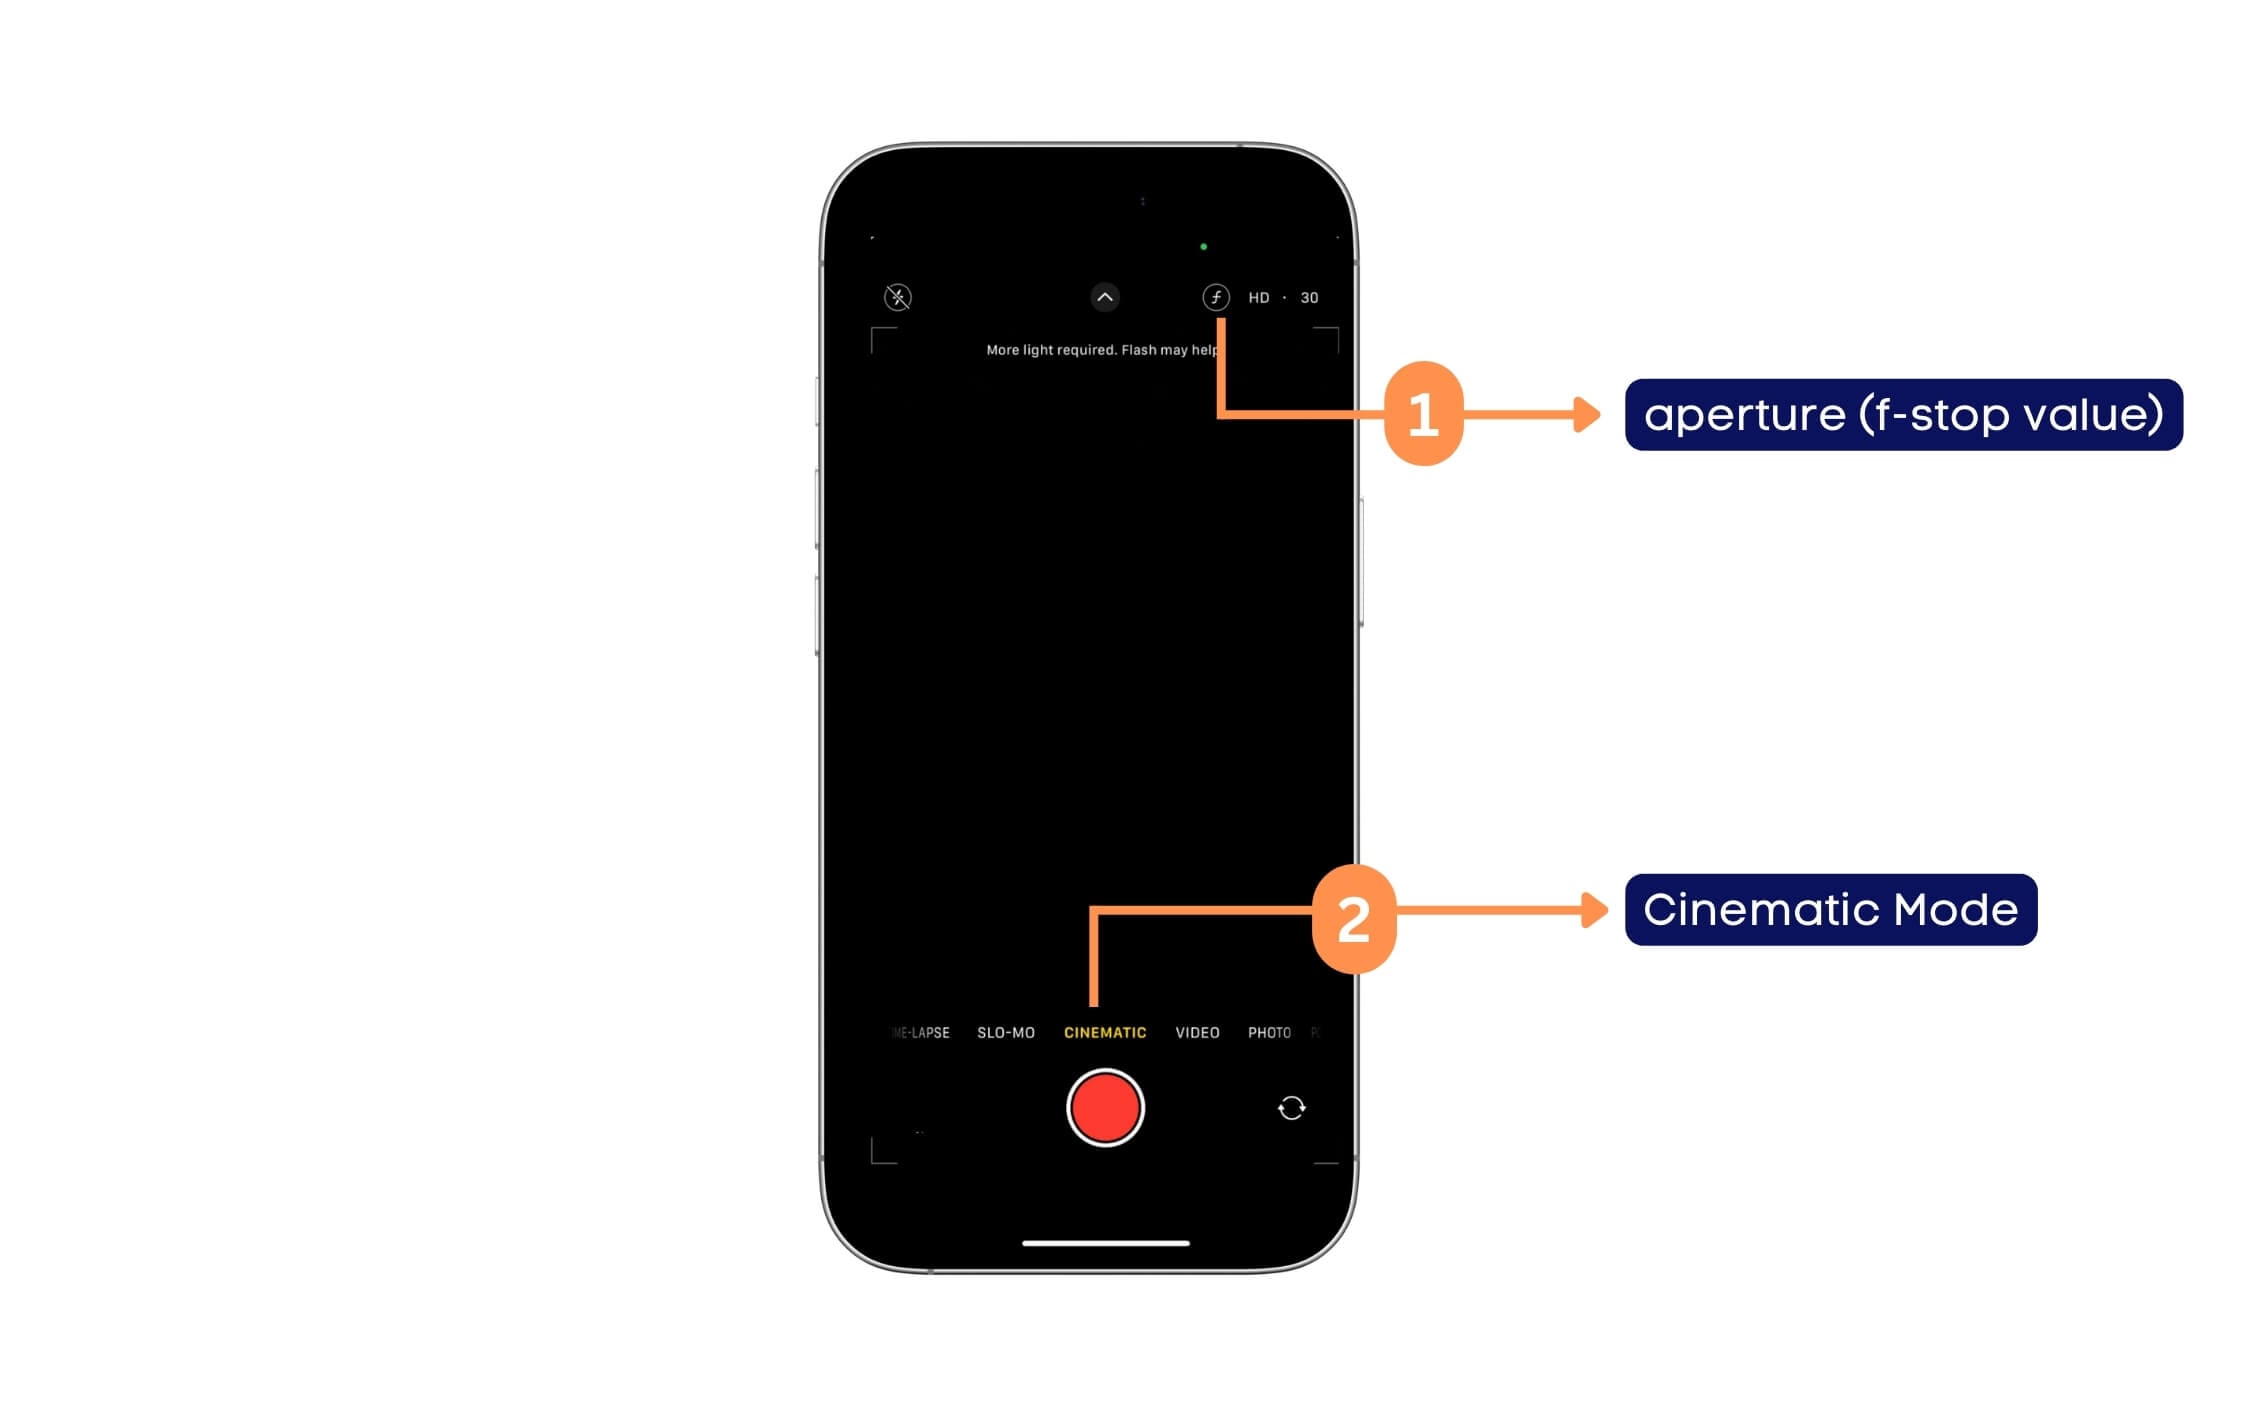
- F icon: The F icon in the cinematic mode lets you adjust the aperture, also known as the f-stop value. This is also known as the depth of field adjustment. It allows you to adjust the background blur in the cinematic video. The f-stop value on iPhone ranges from f/1.8 to f/8, which can vary depending on the camera aperture. The lower f-number (e.g., f/1.8) has stronger background blur (shallow depth of field), and the higher f-number (e.g., f/8) has lower background blur.
- Cinematic Mode Selection: iPhones come with a cinematic video mode where you can shoot videos in the cinematic style with shallow depth of field and blur the background, keeping the subject in focus.
iPhone Camera App Portrait Mode Screen Symbols Explained
Next, the iPhone offers different portrait modes lighting effects, allowing you to aperture portrait modes in different styles; here is how to access them and what each symbol means.

- Portrait Lighting Effects: iPhones come with different portrait lighting effects. This allows you to choose different lighting effects for Portrait Mode photos. Each icon means different effects, such as Natural Light, which is a standard portrait with no additional lighting effects; Studio Light, which brightness the subject face; Contour Light, which enhances shadows and highlights for a more dramatic effect; Stage light, with the subject with a black background, Stage Light Mono which is same as Stage Light but in black & white colours and finally high-key light mono which creates bright subject with the same mono colour combination.
iPhone Camera App Panorama Mode Screen Symbol Explained
Here is what the panoramic screen symbols mean in the iPhone Camera app

- Panorama Direction Indicator: This symbol indicates how to move the iPhone when capturing a panoramic photo. By default, the iPhone camera app suggests moving from left to right. You can tap on the arrow symbol to reverse the direction to move the camera from right to left.
Take Better Photos
So those are the settings and symbols of the Apple Camera app on iPhone. The app is minimal and has fewer features compared to other camera apps. Yet, some symbols might feel new and confuse some users, considering the Apple Camera app has exclusive features like Portrait mode, Cinematic mode, etc.
Not only that, Apple also allows you to customize camera settings further from the Settings app. You can enable the grid and adjust the frame rate, video quality, and everything else. I hope you found this guide helpful.

Apple is also rumoured to introduce a new camera interface for iOS 19, which should make the camera interface more straightforward to use.
