Quick Answer
To factory reset a Mac without getting stuck on the Apple ID sign-out screen, first complete key steps manually: back up your data, quit running apps, disconnect devices, turn off Find My Mac, and disable iCloud Drive. Then sign out of your Apple ID and use Erase All Content and Settings (or Recovery Mode for older Macs) to reset smoothly.
If your Mac has slowed down considerably, or if you’re trading it in for a new one, there’s a universal step you have to take: System Reset. Resetting your Mac is a solution to many problems, including those mentioned earlier. It is generally considered good practice to do so after a few years of use to give your Mac a brand-new feeling on the inside. However, as you might know, resetting a Mac device isn’t a piece of cake, as it requires time and following a step-by-step process. Even after that, you may get stuck at a common macOS pothole: the sign-out page.
It’s not a quick drive-through break, but almost a permanent breakdown if you can’t pass the step. Thankfully, it occurs in the beginning after you access the Erase Assistant through the System Settings, so starting over is always an option. Once you enter your Apple ID password, the system takes forever to sign you out and proceed, which is incredibly frustrating. But fret not; this article outlines effective ways to tackle the problem and factory reset your Mac without getting stuck on sign-out in no time. Buckle up, and let’s get going!
Table of Contents
What, When, and Why Does the Problem Occur?
The problem isn’t rare and is quite an irritating one, to say the least. While there are other ways to arrive at it, the problem, in the case of resetting a Mac device, occurs at the time of signing out of your Apple ID by entering your account password when you go through the Erase All Content and Settings within the Transfer or Reset settings page. What follows is an endless waiting game: the device will be at a standstill for what feels like forever, and you can’t do anything about it. Your Mac essentially tries to finish any pending tasks, such as file backups, iCloud backups, and file syncing, so you don’t lose your data.
When you click sign-out, your device tries to finish the aforementioned tasks simultaneously, which is highly prone to choking. Afterall, the process is designed such that a single unfinished task will bring it to a halt. It could be a result of a problem on Apple’s backend servers, or a mere connectivity failure. Furthermore, if there’s a corrupted file in your system, the system will fall into a loop of trying to access it and failing to do so. Large files cause long wait times, which stall the process and keep the Mac waiting forever to finish its tasks before signing you out.
In addition to file uploads and related tasks, Find My Mac must also be disabled to reset the system. Since it’s associated with your device’s anti-theft feature, which is linked to your Apple ID, your system has to communicate with Apple’s servers to release the lock with your permission. The handshake process between your Mac’s security chipset and Apple’s servers that begins after you enter your password is quite fragile, implying your Mac has to wait an annoying amount of time for the go-ahead.
The causes so far are interesting, and mostly fall in Apple’s ballpark. To let you know about the problems that may occur on your Mac’s end, the most common of them are certainly network-related. That includes slow internet speeds, fluctuating connections, and the like. Furthermore, the problem could be caused by an interfering background app. Possible ones include an active antivirus program, apps accessing iCloud files, cloud backup tools, and more, which prevent further processing. Now that you know the problem’s whereabouts and causes, let us check out some effective fixes.
Essential Pre-requisite Steps
Before you proceed with the main process, it’s essential to check off these pre-requisite steps to factory reset your Mac without getting stuck on sign-out.
Create a Backup
Since you know the value of your data best, we don’t need to emphasize the importance of backing up your Mac’s contents. Regardless, you would want a backup of your system before resetting it to transfer it to a new system, making it a win-win pre-requisite. As a cherry on top, macOS makes it very easy to create a backup. Here’s how to do so:
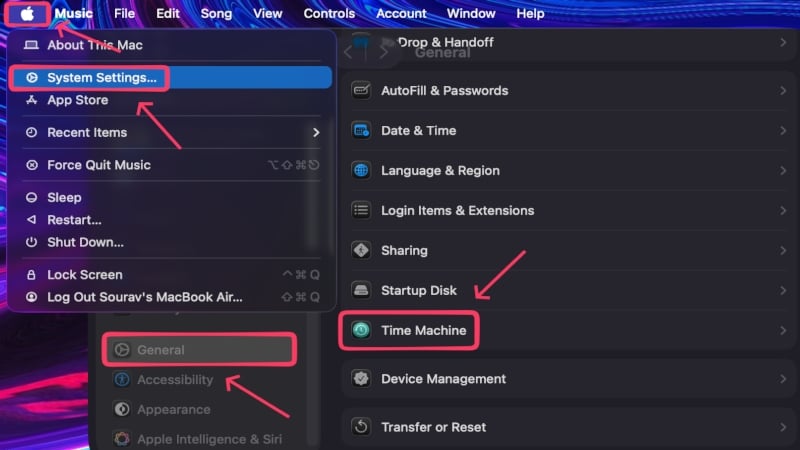
- Click on the Apple logo () in the top-left corner of your screen.
- Select System Settings.
- Under General Settings, click on Time Machine.
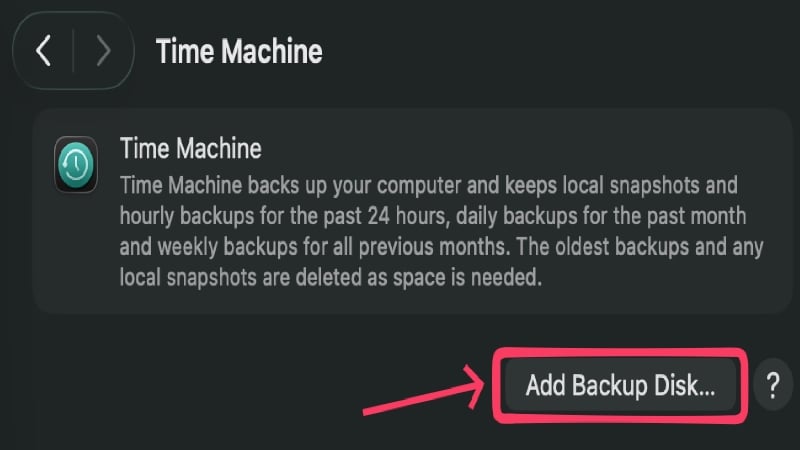
- Connect an appropriate external storage device, preferably an SSD having more storage space than your Mac’s internal storage. It will ensure that the backup process is fast and viable.
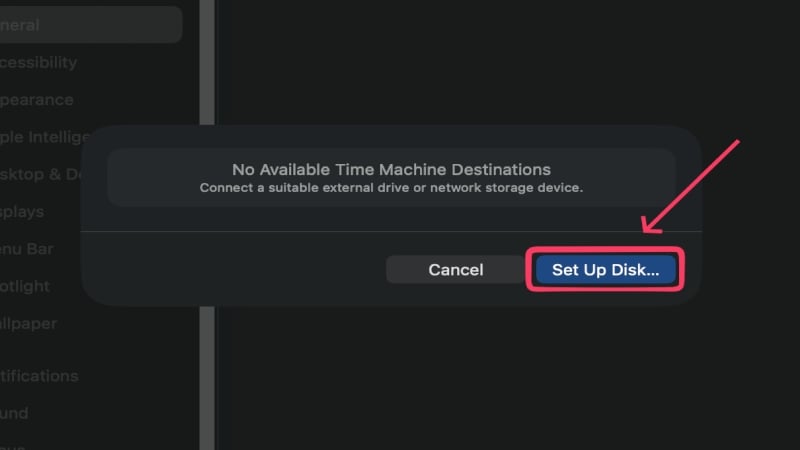
- Click on Add Backup Disk and select your storage device from the list.
- Select Set Up Disk and follow the on-screen instructions.
By default, Time Machine backs up everything on your system, but you can opt out of backing up items you don’t want to back up in backup preferences. If it’s the first time you’re creating a backup, it ought to take a long time. However, subsequent backups won’t take much time, as they only save the changes made since the preceding backup. Furthermore, you may also be prompted to erase your storage drive and format it before proceeding. You can also encrypt your backup by setting a password. Lastly, if you only have a limited set of folders or files to carry over, we recommend creating a manual backup by copying the required files to your storage device.
Check Your Internet Connection
Although it’s not usually the cause of the problem, it’s a good measure to check whether your internet is working properly. This includes checking the router, your Mac’s Wi-Fi settings to ensure you’re connected to the right network, whether you can access the internet, the validity of your pack, and other such attributes to ensure the problem isn’t caused on your end. Your Mac’s Wi-Fi settings can be accessed by clicking the Apple logo () in the top-left corner of your screen, then selecting System Settings.
Deauthorize Apple Apps
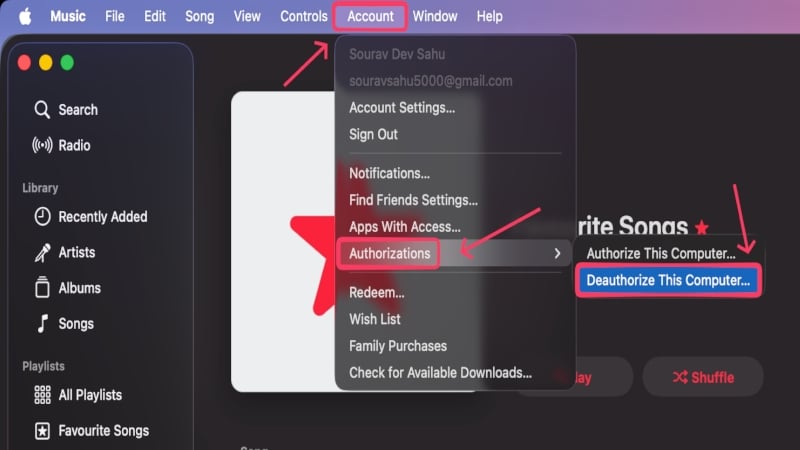
Apple’s first-party apps, in which you have signed in, may sometimes interfere with iCloud’s syncing and delay sign-out. To make it easier, you can take charge yourself by manually deauthorizing apps and signing out wherever possible. For instance, in Apple Music, you can select the Account section in the menu bar and deauthorize your Mac within Authorizations.
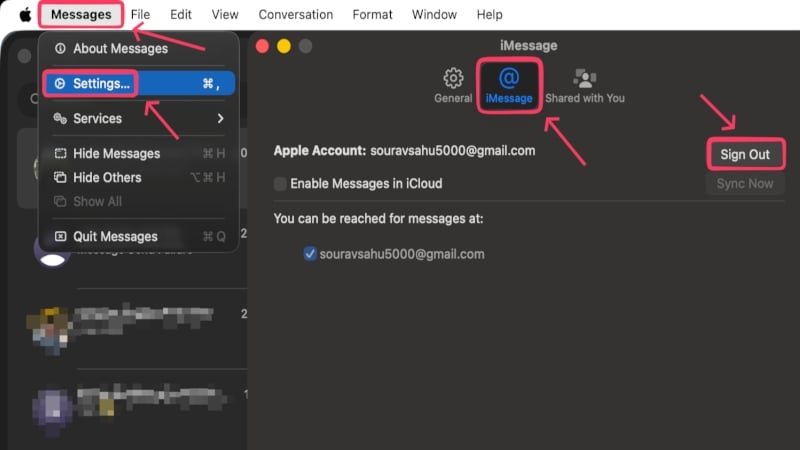
Furthermore, you can sign out of iMessage through its settings page, which can be accessed by selecting Messages from the menu bar, followed by Settings and iMessage. You can do so for other such apps.
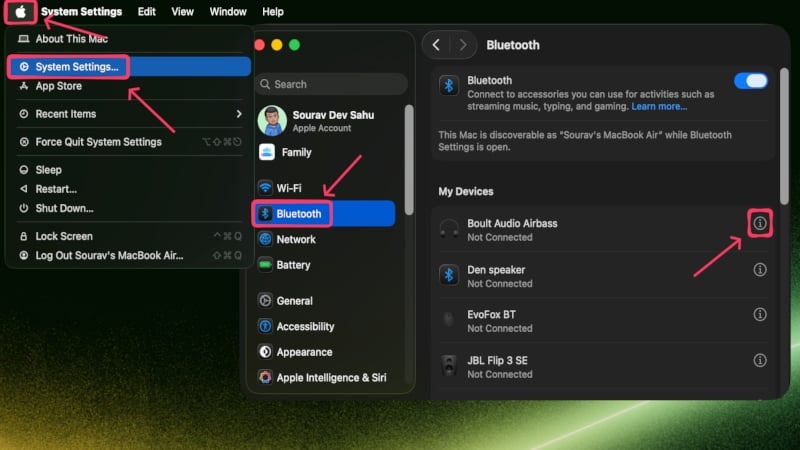
Disconnect Peripherals and Bluetooth Devices
Connected devices, whether wired or wireless, can sometimes interfere with a Mac’s reset process; it’s recommended to disconnect all of them to prevent unnecessary hassle. Start by disconnecting any connected peripherals, such as the mouse, keyboard, monitors, and external storage devices. Since you are going to reset your Mac, we also recommend not just disconnecting connected Bluetooth devices, but also forgetting them to avoid any hindrance. To do so:
- Click on the Apple logo () in the top-left corner of your screen.
- Select System Settings.
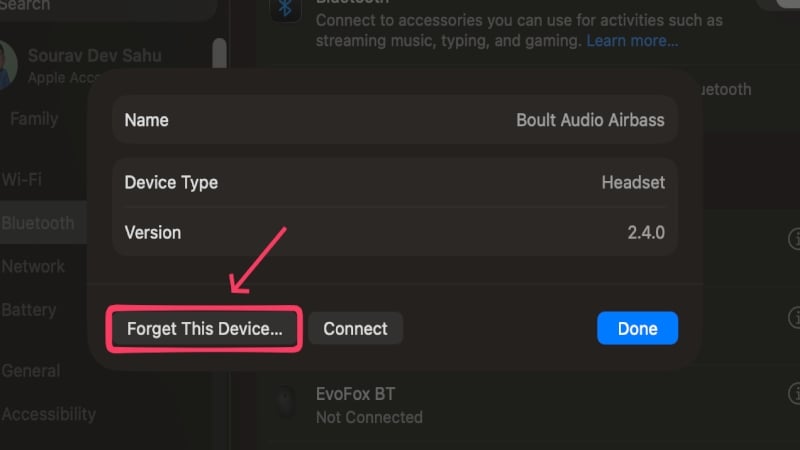
- In Bluetooth Settings, click the i icon next to a device.
- Select Forget This Device and confirm your action.
Quit Running Apps
It’s often the case that the process is interfered with by a background process, which is usually a running app. If an app is accessing a file or folder on your system, iCloud won’t be able to delete the local copies of your data, thereby preventing it from proceeding. It can also be caused by an antivirus program running background processes that prevent the sign-out process from completing. It is thus strongly recommended to quit all apps running in the background.
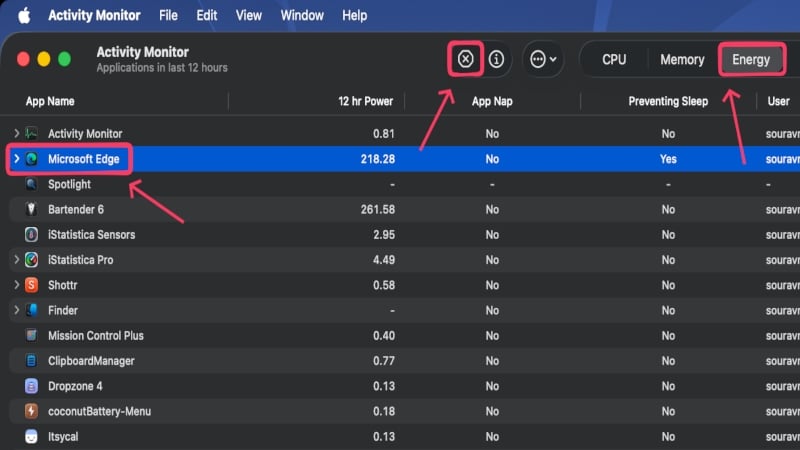
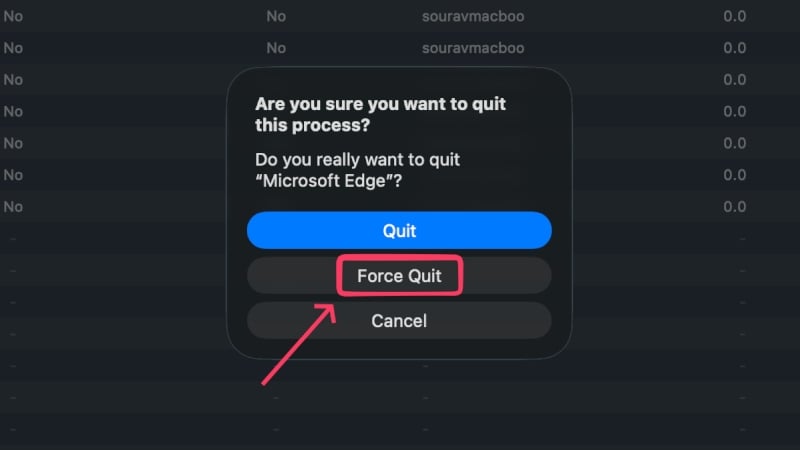
Furthermore, we suggest checking for other irrelevant background processes in the Activity Monitor and terminating them. You can do so by opening Activity Monitor, selecting the request process under the Energy or Memory tab, and force-quitting it by selecting the cross icon in the toolbar.
Factory Reset Mac Without Getting Stuck on Sign-Out
Now that you have ensured the pre-requisite steps have been followed, you can proceed with the next set of steps. We will essentially manually perform the tasks that your Mac would have performed when trying to sign out, thereby preventing bottlenecks. By doing so, your Mac won’t have to perform the tasks again or get stuck while performing them.
Turn Off Find My Mac
As explained earlier, your device must communicate with Apple’s servers to disable the lock on Find My Mac, but this process fails at times. To prevent the system from coming to a standstill, it’s recommended to perform this task manually, as it’s effortless to do so. Here’s what you need to do:
- Click on the Apple logo () in the top-left corner of your screen.
- Select your profile icon from the left menu and enter iCloud settings.
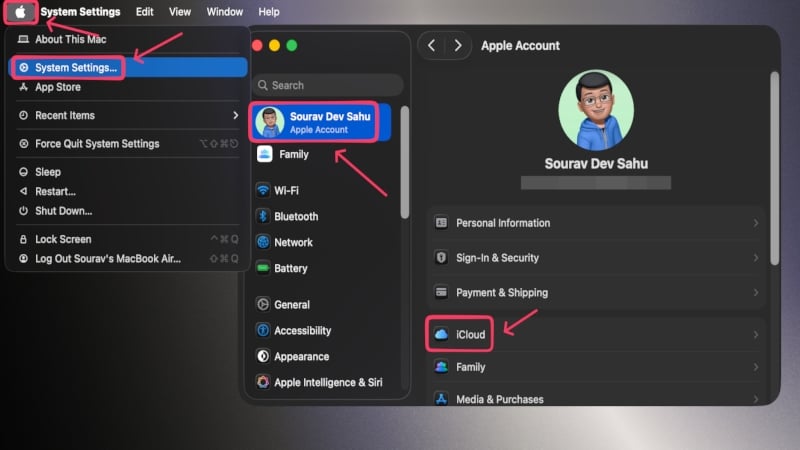
- Open the See All menu in the Saved to iCloud section.

- Open Find My Mac and select Turn Off.
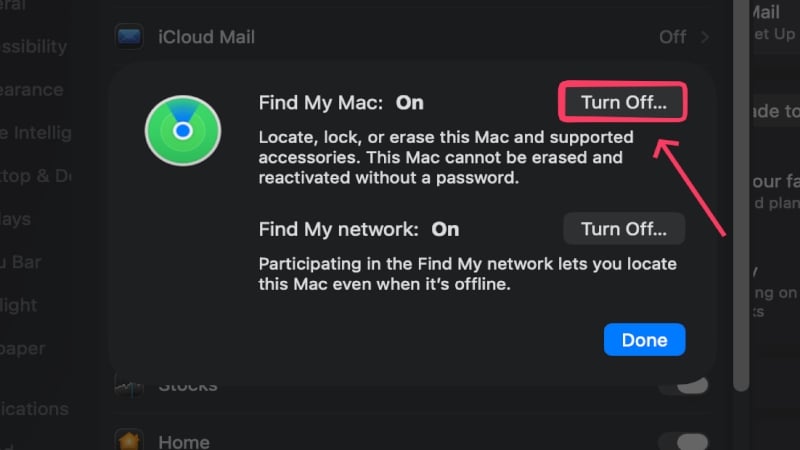
- You will need to enter your Apple ID password and follow the on-screen instructions to proceed and turn off Find My Mac entirely.
Disable iCloud Drive
iCloud Drive is another culprit in this crime, as it often fails to upload files and sync them. It’s likely to be the cause if your system has corrupted or large files, which are sure to clog the process. Disabling iCloud Drive won’t cause any problems in this case, since you have already taken a Time Machine or manual backup. To disable iCloud Drive:
- Click on the Apple logo () in the top-left corner of your screen.
- Select your profile icon from the left menu and enter iCloud settings.
- Open the See All menu in the Saved to iCloud section.
- Open iCloud Drive and select the toggle next to Sync this Mac to turn it off.
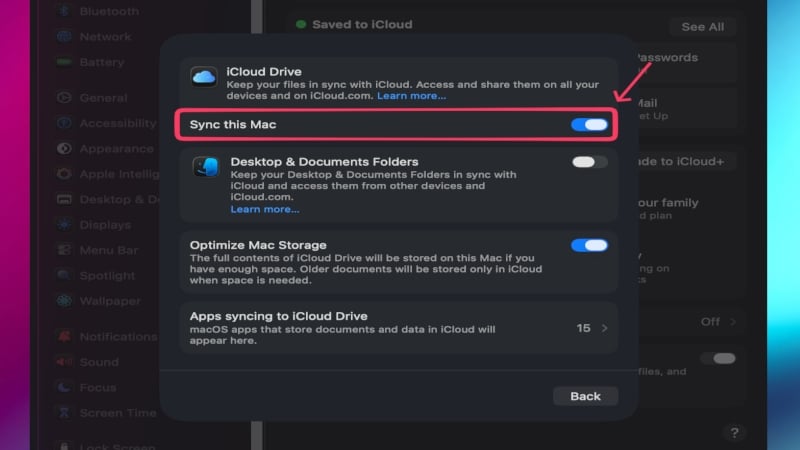
- You will be prompted to keep a local copy of your data, but it’s irrelevant in this case, as you will be resetting your Mac afterwards. Select Remove from Mac to proceed accordingly.

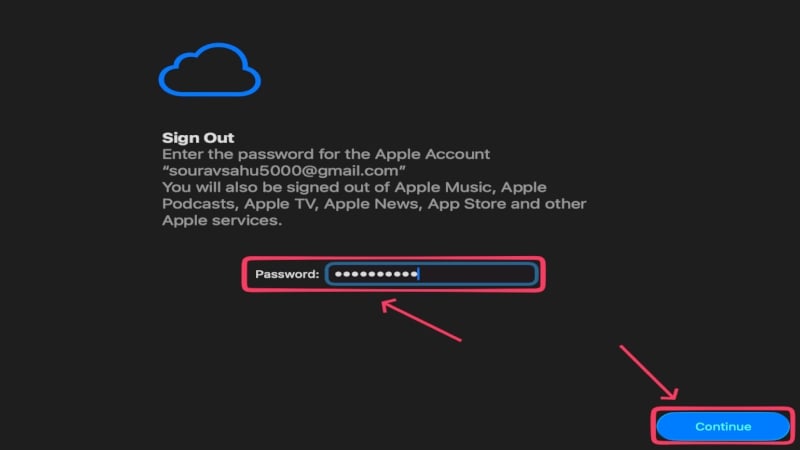
Sign Out of Apple ID
Now that you have turned off Find My Mac and disabled iCloud Drive, most of the heavy lifting is done. Signing out of your Apple ID now shouldn’t get you stuck, as it did before, which is what you want before resetting your Mac. Here is how you can sign out of your Apple ID in no time:
- Click on the Apple logo () in the top-left corner of your screen.
- Select your profile icon from the left menu and enter iCloud settings.
- Click on the Sign Out option at the bottom of the page.
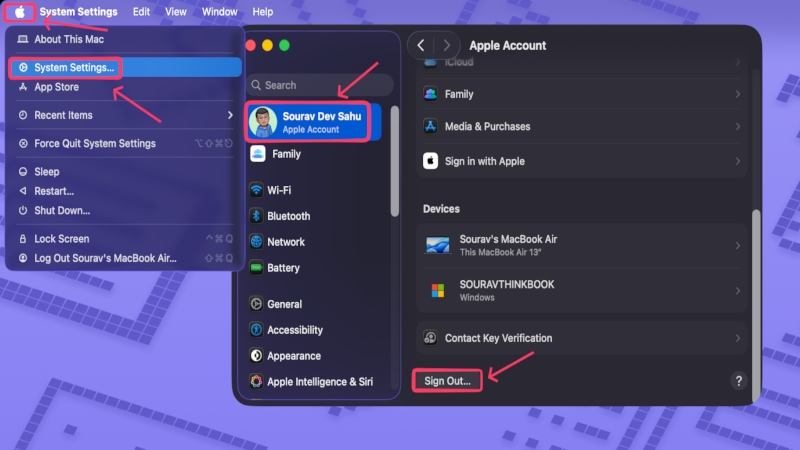
- You will be prompted to keep local copies of data for certain services, such as Passwords, Stocks, Contacts, and more, but it’s irrelevant, as you will be resetting your Mac right after this. Deselect all services and click on Continue.

- Enter your Apple ID password and select Continue.
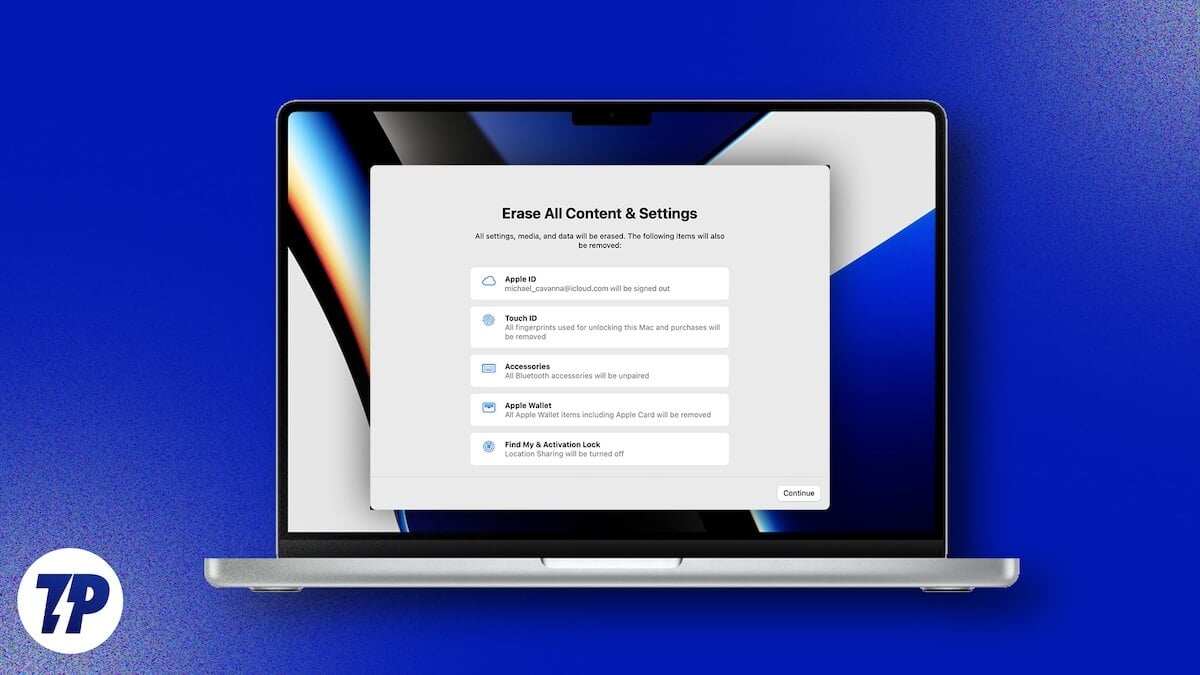
Erase All Content and Settings
This step applies to Macs launched after 2018 that have the T2 Security chip. Macs powered by Apple’s M-series of chipsets are exclusively included. This is the step that will help you reset your Mac entirely, so think twice before proceeding, as your system cannot be reverted to its original state. To reset your Mac:
- Click on the Apple logo () in the top-left corner of your screen.
- Select System Settings.
- Under General Settings, click on Transfer or Reset.
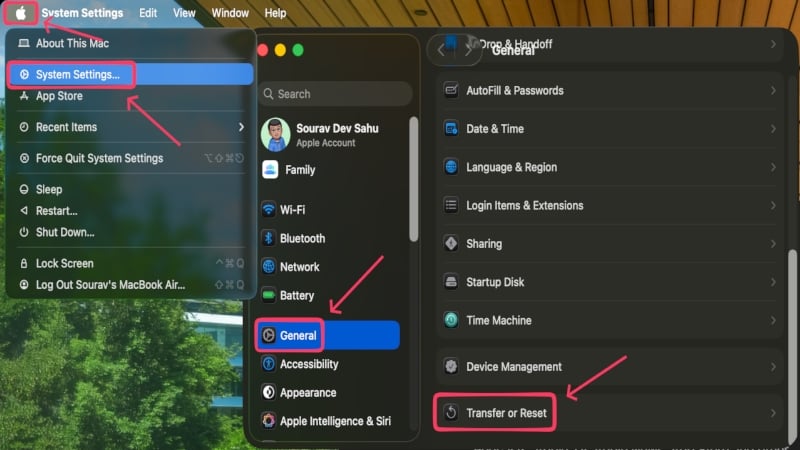
- Select Erase All Content and Settings.
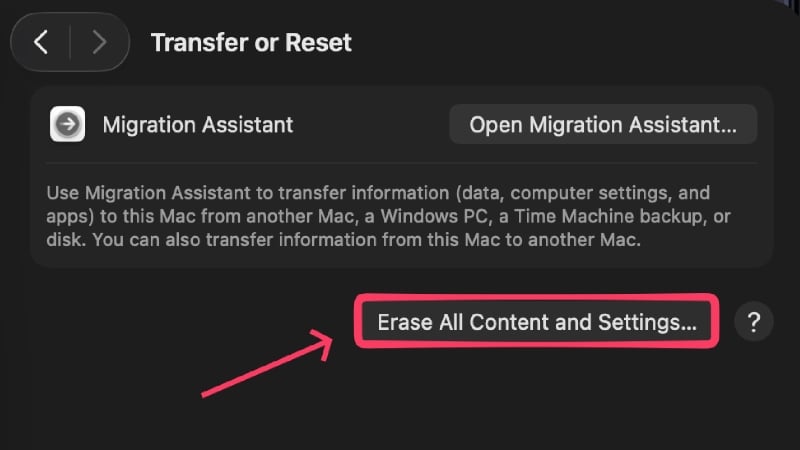
- You’ll have to enter your device’s password to authorize. Next, Erase Assistant will open to show you what will be removed from your Mac, where you can click on Continue to go to the next step.
- If you have already signed out of your Apple ID, you won’t have to enter your password again. Instead, click the red Erase All Content and Settings option to reset your Mac, after which there’s no going back. If you haven’t signed out, you must enter your Apple ID password and proceed accordingly.
That’s it! Your Mac will now restart multiple times, and eventually boot with the iconic hello text.
Disk Wipe Method (For Older Macs)
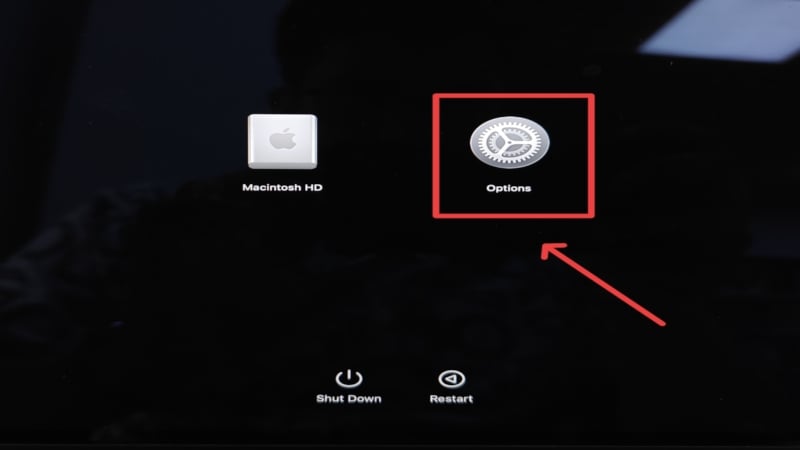
If you are rocking a Mac launched in 2017 or earlier, you may not find the setting mentioned in the previous method. Instead, you must reset your Mac by booting into Recovery Mode. This method is applicable for newer Macs, if the option to Erase All Content and Settings doesn’t exist for whatever reason. Furthermore, since this method wipes the entire drive, you must install a fresh copy of macOS as well. Here is how you can proceed with this method:
- To enter Recovery Mode on an Intel Mac, shut down your Mac, wait a moment, and press and hold the Command (⌘) + R keys together immediately after pressing the power button until the Apple logo () appears. For newer Apple M-series-based Macs, shut down your system, wait for a moment, and press and hold the power button until the Loading startup options screen appears. Then, click on Options followed by Continue.
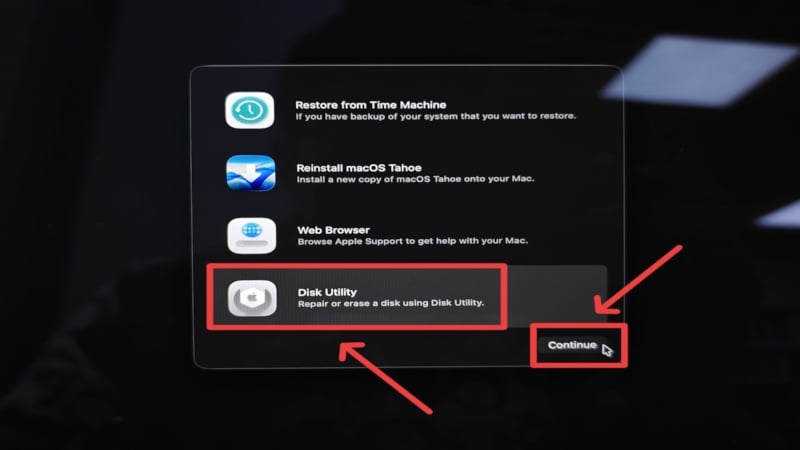
- Click on your profile picture and click on Next. You will be prompted to enter your Mac’s administrative password.

- From the Recovery Assistant menu on the next page, select Disk Utility and click on Continue.
- Select the main Macintosh HD file (the default name, unless you changed it) from the left column, ensure the format is set to APFS, and click on the Erase option from the toolbar at the top.
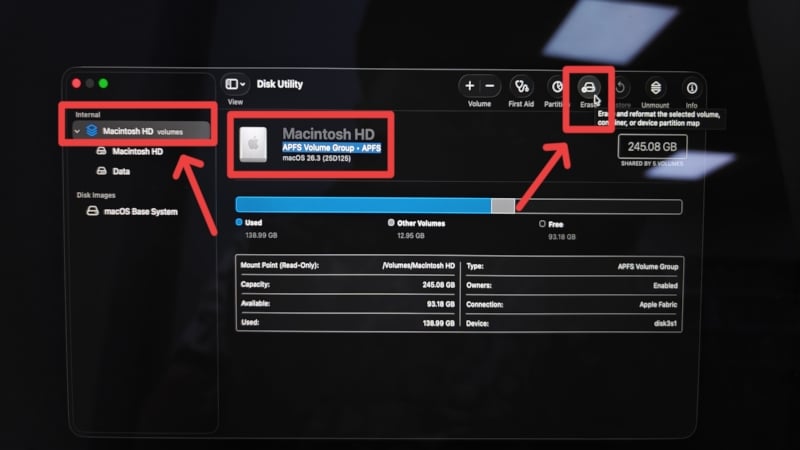
- Follow the on-screen instructions to perform the wipe.
- After it’s finished, return to the main Recovery Assistant screen (where you had selected Disk Utility), click on Reinstall macOS, and select Continue.
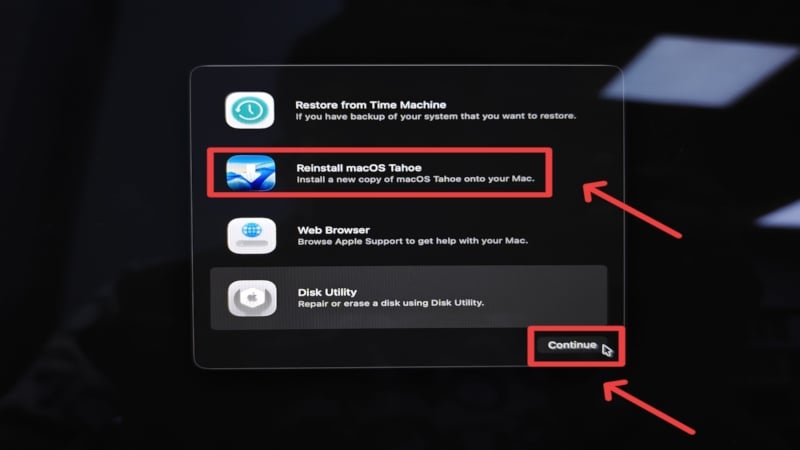
- Follow the on-screen instructions to install a fresh copy of macOS.
That’s all, folks! You have now reset your Mac successfully without getting stuck anywhere.
It’s Not Done, Yet
To ensure that you are indeed logged out of your device and that it has been reset properly, we strongly suggest visiting the iCloud Find Devices website and checking whether your device still shows up in your list of devices. Furthermore, if you have run into a hardware-related issue, we recommend visiting an authorized service center and getting it fixed at the earliest.
Give Your Mac a Fresh Start
Resetting a device is recommended if it has slowed considerably or if you are about to trade/sell it. While the process itself is straightforward, Macs are notorious for getting stuck on the Apple ID sign-out page, thereby halting the entire process. Thankfully, the fixes are simple and mostly involve taking prerequisite measures before resetting. They include creating a backup, signing out of or deauthorizing first-party apps and services, turning off Find My Mac, disabling iCloud Drive, and lastly, signing out of Apple ID manually. These small steps go a great way in fixing the problem.
