The DNS_PROBE_FINISHED_BAD_CONFIG error is the most common issue users face on browsers. Although the error might sound technical, you can easily fix it using simple methods. In this guide, you will learn about what this error is, why it’s caused, how to fix the error with simple step-by-step solutions, and also how to prevent this error from happening in the future.

Table of Contents
What is the DNS_PROBE_FINISHED_NXDOMAIN error on Google Chrome?
The DNS_PROBE_FINISHED_NXDOMAIN error occurs when the browser cannot find the IP address for the website you are looking for. When you enter a website domain, the browser requests the Domain Name System (DNS) to find the matching IP address. This error occurs if the DNS server cannot find the domain name (NXDOMAIN, which stands for ‘Non-Existent Domain’). It can be due to the domain you entered not existing or there being an issue with the DNS configuration.

What Causes the DNS_PROBE_FINISHED_NXDOMAIN Error?
There are many reasons that might cause this error on your Google Chrome. The most common issues are:
- Incorrectly typed URL.
- Misconfigured or faulty DNS settings.
- Corrupted browser cache and other browser-related problems.
- Your Security Software firewall settings.
- Router issues or misconfigurations.
- Internet connection problems.
- Incorrect entries in the host file and more.
Fix DNS_PROBE_FINISHED_BAD_CONFIG Error on Chrome
The error page doesn’t explicitly mention the causes of the issue other than the typo, which makes it hard to solve. For instance, in my case, simply restarting the router has fixed the issue several times. For example, a Reddit user spent hours resetting the router, flushing DNS, and renewing DNS, but changing his DNS configuration fixed the issue. We can point to no single solution that fixes this issue. To make it easy for you, we included the most effective solution first. You can follow the solutions to fix the issue quickly.

Check for Typos in the URL
Check the typos in the domain name you have entered. A minor error in the domain name or entering a non-existent domain name can cause this issue.
Restart Your Router
Restarting your router removes temporary glitches, resolves connectivity issues, and fixes the DNS_PROBE_FINISHED_BAD_CONFIG error. If you are having this issue, try restarting your router and then loading the website again. This has worked for me several times.
Flush DNS Cache
DNS cache is temporary data that stores information about the recent DNS lookups your device has performed. It helps to speed up the DNS lookup process and saves you time when you visit specific websites. Both your browser and the device can store the DNS cache. However, sometimes DNS cache can become outdated or corrupted, leading to errors. To fix this, you can quickly flush the DNS cache on your browser and device.
- Google Chrome: Open Chrome and type chrome: //net-internals/#dns in the address bar. Click the “Clear host cache” button to flush DNS.

- Windows: Open Command Prompt as an administrator and type ipconfig /flushdns, then press Enter.

- macOS: Open Terminal and type sudo killall -HUP mDNSResponder, then press Enter. Enter the password. Your DNS on Mac will be flushed. (You won’t see any successful message.)


Flushing the DNS cache removes the stored DNS records on your device and browser. The next time you perform a search, the DNS cache will look for new DNS information. This won’t delete or affect you in any way.
Change DNS Servers
The DNS_PROBE_FINISHED_BAD_CONFIG error occurs mostly because of issues with the current DNS server. It can be the DNS server your device is using or the network’s default DNS server. To fix this, you can change the DNS server on your device. You can add Google DNS: 8.8.8.8 and 8.8.4.4 or choose any other reliable DNS service provider. Most users were able to fix this issue by setting up custom DNS. Here is how you can set custom DNS on your device:
Windows:
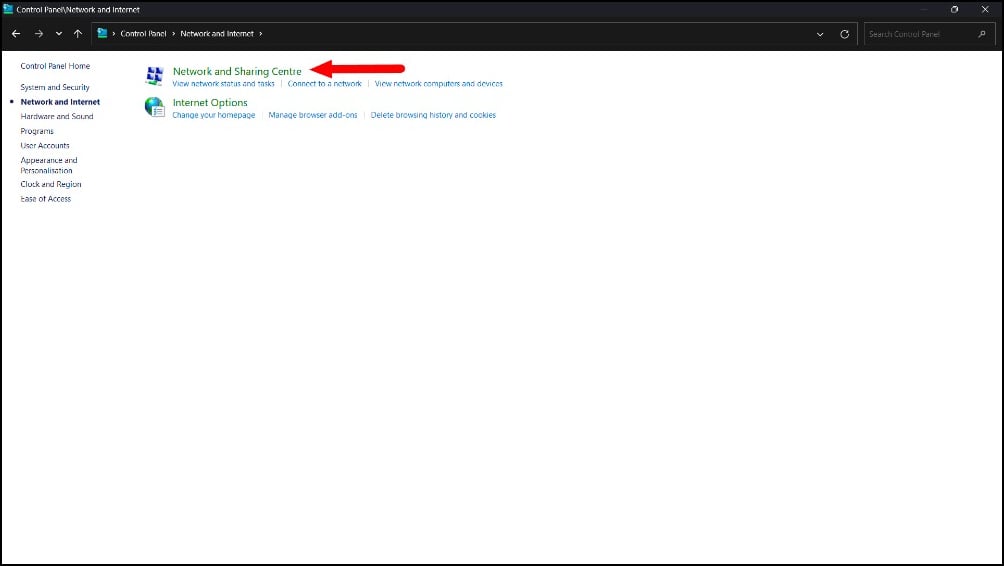
- Step 1: Go to Control Panel and click on the Network and Internet

- Step 2: Tap on the Network and Sharing Center

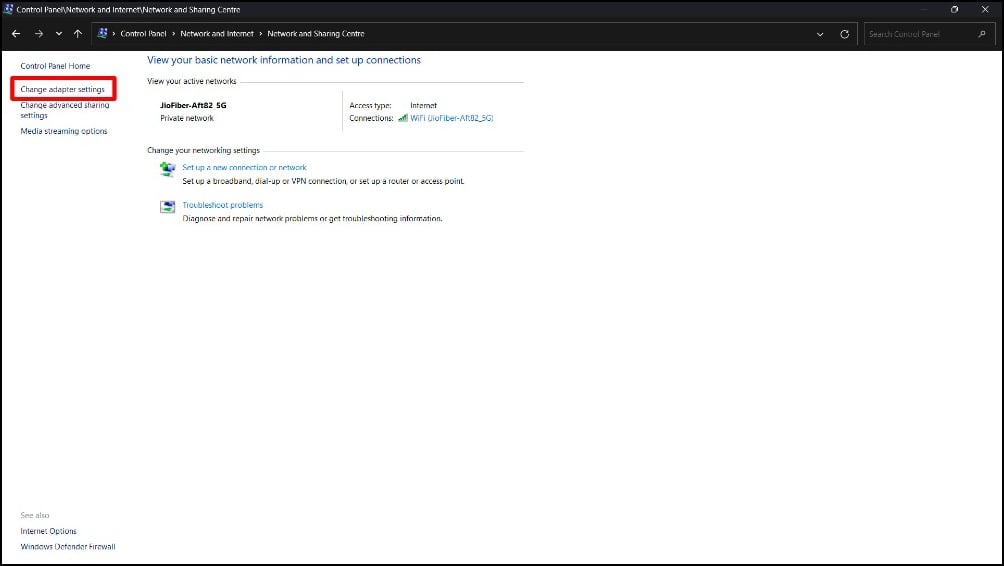
- Step 3: Click on the Change adapter settings.

- Step 4: Right-click on your active network connection and select Properties.

- Step 5: Select Internet Protocol Version 4 (TCP/IPv4) and Click on Properties.

- Step 6: Choose “Use the following DNS server addresses” and enter the DNS server addresses (e.g., Google DNS: 8.8.8.8 in the preferred and 8.8.4.4 in the alternative DNS).

- Step 7: Click OK to save the changes.

macOS:
- Step 1: Click on the Apple logo in the top left corner of the screen and Tap on the System Settings

- Step 2: Click on the Network.

- Step 3: Select your active network connection

- Step 4: Click on the Details on the active network connection.

- Step 5: Go to the DNS tab and click the “+” button to add new DNS servers. You can add Google DNS: 8.8.8.8

- Step 6: Click OK to save the changes.
Android:

- Step 1: Go to Settings on your Android smartphone and go to Wi-Fi settings.
- Step 2: Tap on your connected Wi-Fi network and select Modify network. This may work differently on your smartphone, depending on the Android version and the brand you are using. You will most likely need to modify Wi-Fi in the Wi-Fi settings on your smartphone.
- Step 3: Choose Advanced options and set IP settings to Static.
- Step 4: Enter the DNS server and use Google DNS: 8.8.8.8
Change Network DNS settings on Android
- .Step 1: You can also change the network DNS settings on your Android. You can set it to automatic if you use custom DNS and use Google DNS: 8.8.8.8 if you have issues with the automatic DNS.
- Step 2: Open settings on your Android and click on the Connection & Sharing
- Step 3: Click on the Private DNS
- Step 4: Select auto if you are using custom DNS. (I use AdGuard Private DNS to block ads on my Android smartphones. Sometimes, it does have DNS errors, and I need to remove the DNS and change it to automatic to fix this issue)

iOS:
- Step 1: Open Settings on your iPhone and go to Wi-Fi.
- Step 2: Tap the “i” icon on your connected Wi-Fi network.
- Step 3: Scroll down to Configure DNS and select Manual.
- Step 4: Add the DNS server addresses (Google DNS: 8.8.8.8) or change it to automatic if you use the custom DNS.

Clear Browsing Cache
The cache can sometimes cause DNS errors on browsers. The cache is temporary data stored by web browsers that include DNS information to load websites faster. Sometimes, if the cache becomes corrupted or outdated, it can lead to DNS errors. It can happen to specific websites or all websites and can occur on both websites and mobile devices. To fix this, you can clear the cache on your browser.
Note that clearing the cache removes the existing passwords and data you have set on websites. You will need to re-login to the websites, and a few websites might load slower for the first time after clearing the data.
On Desktop
- Step 1: Open Google Chrome, click on the three menus, and select Settings.

- Step 2: From the sidebar, click on Privacy and Security and Click on Clear browsing data.

- Step 3: Select the Time range to All time for better results. Check all boxes shown here and click on the Clear data.

On Mobile

- Step 1: Open the Google Chrome browser, click the three-dot menu, and select Settings.
- Step 2: Click on Privacy and security
- Step 3: Click on the Clear browsing data, select the time range to All time, and click on the Clear data. This removes all your Chrome cache and might also fix the error.

Disable Chrome Extensions
Google Chrome extensions can sometimes block specific DNS requests made by your browser. This can happen specifically with outdated or specific extensions related to VPN, security, or network control.
You can try disabling the extensions and see if the issue is resolved. It’s hard to find the specific extension causing the issue, but you can disable all extensions to see if the issue is fixed.
To disable or update extensions on Google Chrome, go to the menu (three dots) > Extensions, and here you can manage all your extensions.

Reset Browser Settings
Sometimes, changes to your browser settings or incorrect configuration might lead to this error. You can reset your Chrome browser settings to fix this issue. Resetting the browser will set it to the default settings and remove all browser extensions and add-ons.
- Step 1: Open Chrome. Click on the three dots in the top-right corner and Click “Settings. ”
- Step 2: Scroll down and click “Reset settings” on the sidebar.
- Step 3: Click on the Restore settings to their original defaults and click on the Reset Settings.

Restart the DNS Client Service (Windows)
The DNS Client Service stores all your DNS lookup results on your computer. If the client service on your device is having some issues, it can lead to DNS errors. To fix this, you can restart the DNS client service. Although flushing the DNS (Method 3) cache can also help, you will have an additional service to restart the DNS client on Windows.

- Step 1: Go to the services app on Windows
- Step 2: Scroll down and find the DNS Client.
- Step 3: Select the DNS Client and click the Restart Service button.
Disable Proxy Settings
Check whether your proxy settings are misconfigured. If there is an issue with the proxy server, you might get this error. Sometimes, accidentally enabled proxy servers can also lead to errors like these. To fix this, you can change the proxy settings or temporarily disable the proxy to see if the error is resolved.
Windows
- Step 1: Open the Start menu and click “Settings. ”

- Step 2: Click “Network & Internet and Select “Proxy” in the left sidebar.

- Step 4: Under “Manual proxy setup, ” toggle “Use a proxy server” to “OFF. ”

Mac
- Step 1: Click the Apple icon and select “System Preferences. ”
- Step 2: Click “Network. ”
- Step 3: Select the active network
- Step 4: Click on the Details
- Step 5: Then click “Proxies. ”

- Step 6: Turn off all the proxies and click on the OK

Disable your antivirus
Most antivirus programs have built-in firewall features that may sometimes block DNS requests, leading to errors like these. To fix this, you can temporarily disable your antivirus software. If the error is resolved after disabling the antivirus, the antivirus will likely block the DNS requests.
You need to adjust the antivirus settings to prevent issues from happening in the future. Many popular antivirus software programs like Norton, McAfee, and Avast exist. Find the firewall settings in the antivirus and ensure that your browser can have full access. Also, check the rules for Google Chrome to ensure that Chrome and DNS are allowed and not blocked. This way, you can prevent your antivirus from blocking it in the future.
Check Local Hosts File for Incorrect Entries
The host file on your device serves as a local DNS system for looking up domain names. Like DNS services, the host file lets your computer map domain names to IP addresses. Even if you have external DNS servers, if the domain name in the host file stored locally on the device is mapped to an invalid address, you can get errors. To fix this, you can check the local host file on your computer for incorrect entries.
Windows
- Step 1: Open Notepad as an administrator.
- Step 2: Go to File > Open and navigate to C: \Windows\System32\drivers\etc.

- Step 3: Open the “hosts” file.
- Step 4: Look for any entries that might be causing issues and remove or correct them.

- Step 5: Save the file and close Notepad.
On Mac
- Step 1: Open Terminal and Type sudo nano /etc/hosts and press Enter to open the hosts’ file in the nano text editor.

- Step 2: Look for any suspicious or incorrect entries and remove or correct them.

- Step 3: Use Ctrl+C to navigate the cursor. Press Ctrl + O to save changes and Ctrl + X to exit the nano editor.

Try These Commands (Windows)
If the issue still exists, try using these commands in your Command Prompt. After trying several methods, a Reddit user could finally fix this error with these commands. The user mentions that ‘netsh int ip set dns‘ has fixed the issue. If the issue still exists, try using the command in your Command Prompt on Windows. This is a seven-year-old Reddit post, but some users find it still helpful in 2022. Use the commands below and try your luck:
- ipconfig /release
- ipconfig /all
- ipconfig /flushdns
- ipconfig /renew
- netsh int ip set dns
- netsh winsock reset
- restart pc and try again
Contact Your Internet Service Provider
If the issue persists after performing all the troubleshooting techniques on your end, try contacting the network service provider. Sometimes, the issues with the network provider can be the reason why you are getting a DNS_PROBE_FINISHED_BAD_CONFIG Error on your device.
To confirm this error, you can try accessing the website from a different network. If you are using Wi-Fi, try using your mobile network. If the website loads fine with your mobile network, the issue likely is with the network service provider. You can contact the network service provider to fix the issue.
Prevent DNS_PROBE_FINISHED_NXDOMAIN Error in the Future
While DNS errors are quite common, you can follow a few steps to prevent this error in the future:
- Check Your URL: Although it can be a minor issue, it is the most common among users. Make sure that you enter the correct URL. If the error also displays a message like ‘check your URL, ‘ the issue is most likely due to a typo in the domain name.
- Flush DNS Often: Like cache, Google Chrome stores DNS information to load websites faster. Flush your DNS often to prevent this issue from happening again.
- Change Your DNS to Reliable Servers: Automatic DNS can be helpful, but setting up DNS to the most reliable services like Google DNS might prevent this issue. In our experience, Google DNS had fewer problems.
- Update Outdated VPN and Chrome Extensions: Update outdated VPN and Chrome extensions often to prevent this issue from happening in the future. You can also reset the Chrome flags if you enable any.
- Restart Your Router: Make sure that you often restart your router. Small glitches sometimes cause this error, and restarting the router often can fix the issue.
- Check antivirus settings: Sometimes, firewall settings can block specific DNS requests, leading to these errors. To fix this, adjust the antivirus firewall settings and whitelist Google Chrome.
Hopefully, these methods will fix the issue. Fixing this error can be hectic if you don’t know where the issue is coming from. In most cases, it can be easily fixed by restarting a router, and in some cases, you may need to go through specific solutions like DNS configurations and more. We hope this guide has helped you to fix the issue. If it doesn’t work, you can comment on your issue below, and we are happy to help.
FAQs on Fixing DNS Errors on Google Chrome
1. Can changing DNS servers solve the DNS_PROBE_FINISHED_NXDOMAIN error?
Yes, changing the DNS server can help you to solve this error. Many users reported that changing DNS helped them fix the issue faster. If you have this issue, try changing your DNS before applying other solutions.
2. Why does DNS_PROBE_FINISHED_NXDOMAIN only appear on some websites?
You might have entered the wrong URL, or your ISP has blocked specific websites in your network, or there are issues with the DNS files on your PC. To fix this, you can check for typos in the URL, clear your browsing cache, and check your host file for incorrect entries.
3. Is DNS_PROBE_FINISHED_NXDOMAIN related to my internet service provider?
Yes, sometimes DNS problems can be related to your internet service provider, as your ISP can block specific domains or might face issues with their DNS server. You can contact your internet service provider for more information about the issue. Try applying the troubleshooting on your end, and if none of them work, contact your internet service provider.
