Quick Answer
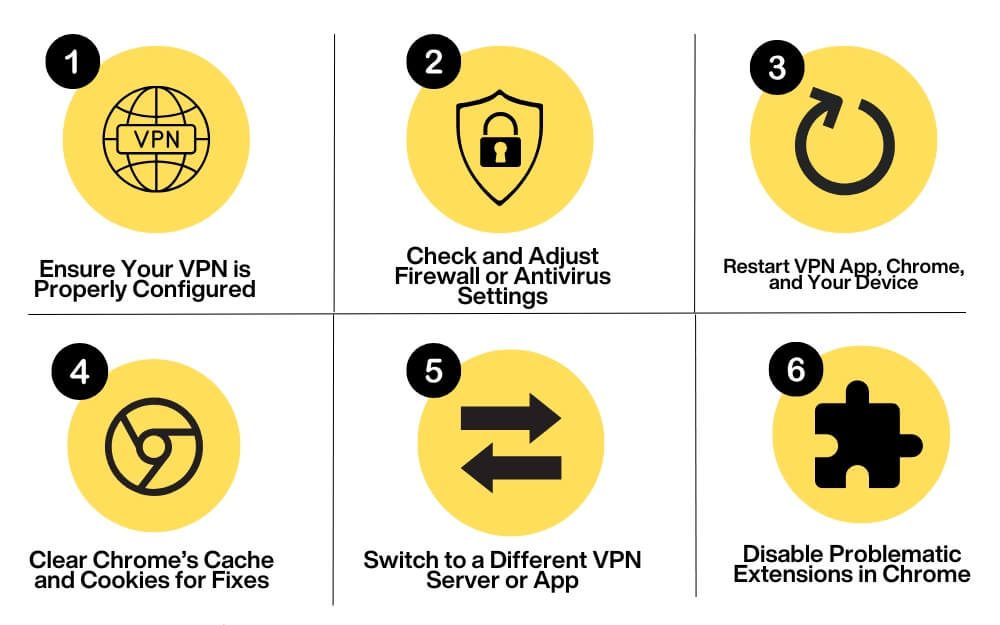
If Chrome is not routing your traffic through VPN, to fix it, check if your VPN is configured properly, check and adjust Firewall or Antivirus settings, restart the VPN app, Chrome browser, and your device, clear Chrome’s cache and cookies and temporarily disable extensions in Chrome. If these don’t fix the issue, follow the advanced troubleshooting techniques like fixing DNS leaks and disabling WebRTC protocol. Follow the guide for a step-by-step process.
A VPN can help mask your location, access restricted websites blocked in your region, and protect your data by routing it through a secure tunnel. Chrome doesn’t come with a built-in VPN. You have to depend on external VPN software or use a VPN extension.

However, sometimes Chrome fails to recognize the VPN and routes your network activity through regular routing, which can expose your actual data, prevent access to restricted websites, and make you more prone to privacy issues. Fortunately, you can quickly fix this issue by following the simple troubleshooting techniques listed below.
Table of Contents
How to Solve VPN Issues on Google Chrome
S.no | Action to Take | What to Do |
|---|---|---|
1 | Turn on your VPN | Ensure the VPN is enabled and connected to the correct server location. |
2 | Allow VPN in Firewall/Antivirus | Disable your firewall/antivirus temporarily or allow Chrome in their settings. |
3 | Switch VPN Protocol | Change the VPN protocol to OpenVPN, WireGuard, or IKEv2 in the VPN settings. |
4 | Disable Chrome Extensions | Turn off Chrome extensions from the Exentions>Manage Exetnsions |
5 | Clear Cache and Cookies | Go to Chrome’s Settings > Privacy and Security > Delete Browsing Data to clear cached files. |
6 | Enable DNS Leak Protection | Turn on DNS leak protection in your VPN app or set a custom DNS like Google DNS 8.8.8.8. |
7 | Use Obfuscation Servers or Dedicated IP | Select obfuscation servers or dedicated IP in your VPN to bypass restrictions. |
8 | Install a WebRTC Blocker Extension | Add a WebRTC blocker like WebRTC Control from the Chrome Web Store to stop IP leaks. |
9 | Restart Everything | Restart Chrome, the VPN app, and your device to resolve temporary glitches. |
10 | Reconfigure Router VPN or Use a Different Network | Access router settings if you are using Router VPN to fix VPN configuration or connect to another network. |
11 | Try a New VPN or Reset Device | Switch to another VPN service or reset your device as a last resort Factory reset your device. |
Before using troubleshooting methods, ensure that your VPN is enabled and not working on Chrome. To check, visit websites like whatismyip.com and compare your IP address to the one shown. If it detects your actual location instead of the VPN server location, you can confirm that it isn’t working.
Start with the Quick Fixes
Check Your VPN Settings
Make sure your VPN is turned on and enabled on your network. Although this sounds very obvious, it is one of the most common reasons a VPN doesn’t work when using Chrome. Once you’ve enabled the VPN, ensure you’ve selected the correct VPN server location based on your needs, especially if you want to unblock geo-restricted websites.
Also, try changing the VPN protocol in the VPN settings. You can set it to OpenVPN, WireGuard, or IKEv2 for better connectivity. While at it, check whether Chrome is excluded from the VPN list, as this might prevent it from being used.
Check for Firewall or Antivirus Interference
Sometimes, a firewall or antivirus can interfere with your VPN connection and disconnect it. If so, you may need to temporarily disable your antivirus protection or edit the firewall settings to allow Chrome to use the VPN. You can usually find this option in the antivirus or firewall settings.
Restart VPN and Chrome
Often, a temporary glitch or bug might be preventing Chrome from working properly with the VPN. Restart Chrome and your VPN to resolve this and reconnect to your existing network. If this doesn’t fix the issue, restart your device and router, then check if the problem persists.
Clear Cache and Cookies
In many cases, outdated cookies or a corrupted cache could be why your VPN is not working on specific websites. Chrome stores cookies and cache to load websites faster, but sometimes, it might use this saved data to reload websites without the VPN, which may expose your actual IP address.
To fix this, you can clear Chrome’s cache for specific websites or your browsing history and data to prevent issues and resolve the problem. To clear cache, Go to settings on your Chrome, Go to the Privacy and Security tab on the sidebar, and under the Privacy and Security section, tap Delete browsing data. Here, you can select all data and delete it.

Try Alternative VPN Service
Try using another VPN. There are many free VPN services that you can try. If this resolves the issue, the problem will most likely be related to your VPN service. Try updating your VPN to the latest version or reinstall it if possible, then reconnect and check if it works.
Disable Extensions
Sometimes, extensions might interfere with your VPN connection and cause issues with the VPN. This can happen mostly with extensions related to other security, the network, or your direct VPN server installed on your Chrome. Try disabling them first and check if the issue persists.
How to disable the extension on Chrome
- Click on the Extension icon at the top and click on Manage Extensions.

- Find the problematic extension and disable it.

- To disable all extensions, add the #extensions-menu-access-control flag from chrome://flags/ and relaunch the Chrome browser.
- To disable all extensions, Click the Extension icon and turn off the extension toggle.

Advanced Troubleshooting Techniques
If the quick fixes don’t fix the issue, follow the advanced methods to fix the isolated problems causing VPN issues on your Chrome.
Check if a Specific Website Blocks the VPN
If you’re having issues with a specific website, like accessing the website or downloading the files from the website. This might be likely to the cause that you are being blacklisted and restricted by the website. Some VPN services allow you to use obfuscation servers like regular HTTPS traffic. You can find this under special servers if your VPN supports it. And some allow you to use dedicated IP addresses, which reduces the blacklisting.
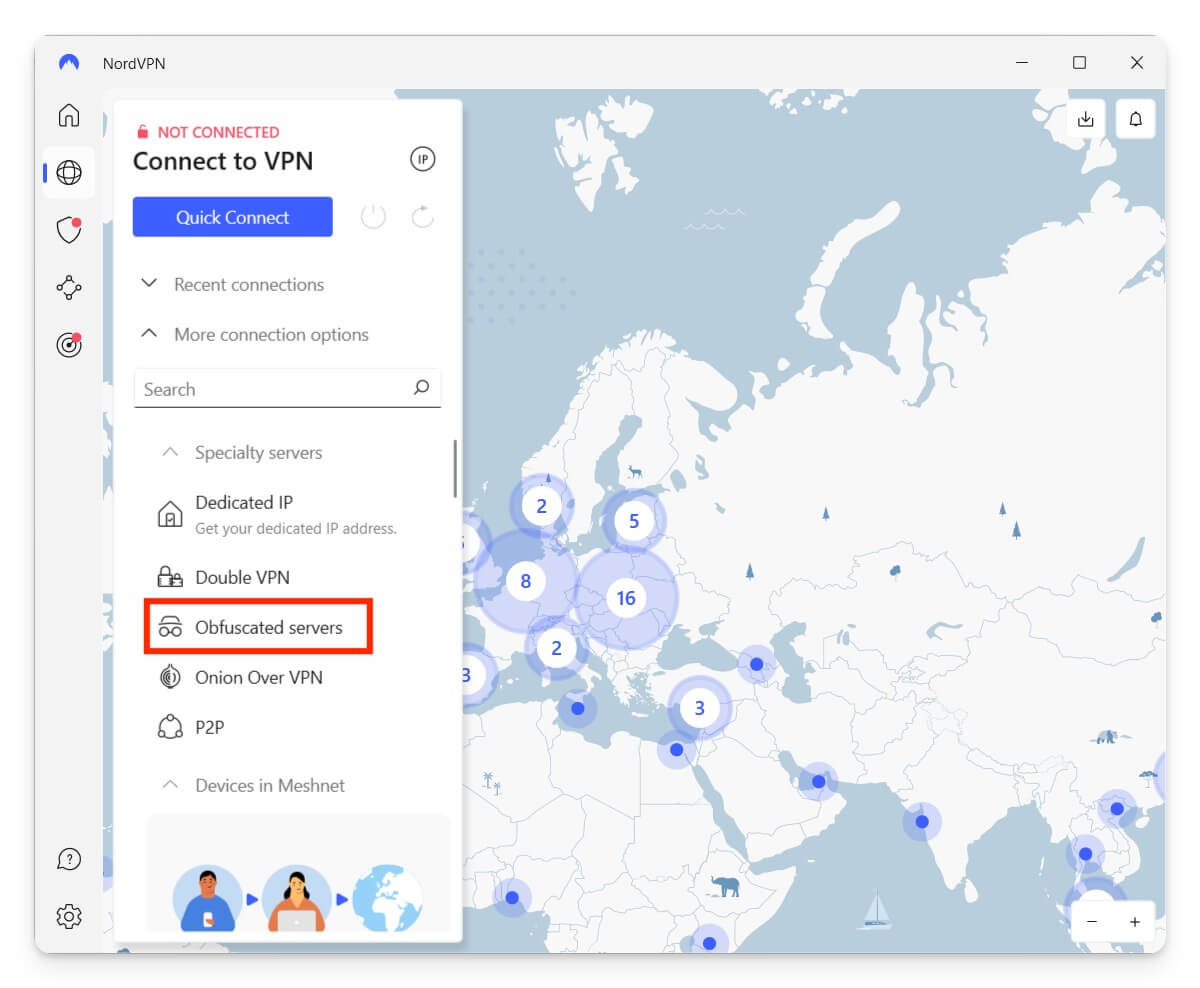
To enable, go to VPN Settings and look for the option that obfuscation servers. Alternatively, look for the option to use the dedicated IP address to prevent backlisting.
Check for DNS Leaks
If the DNS, commonly referred to as the domain name system query, is used to find the website and link the IP address to the website, if these queries bypass your VPN and are directly sent to your ISP’s DNS service, there is a chance of a DNS leak.
This compromises your privacy by exposing the websites you have visited and also your location. You can test it by connecting your VPN and visiting sites like DNSleaktest.com or IPleak.net and checking which DNS service is used. If the servers are from your ISP, the DNS is leaking.
You can fix this by enabling built-in DNS leak protection on most VPN apps. If you use a premium VPN, look for the option DNS function or IPv6 DNS. Enable this protection. Once you’re there, restart your VPN on Chrome and check if the issue persists. If it still does, change your DNS settings.
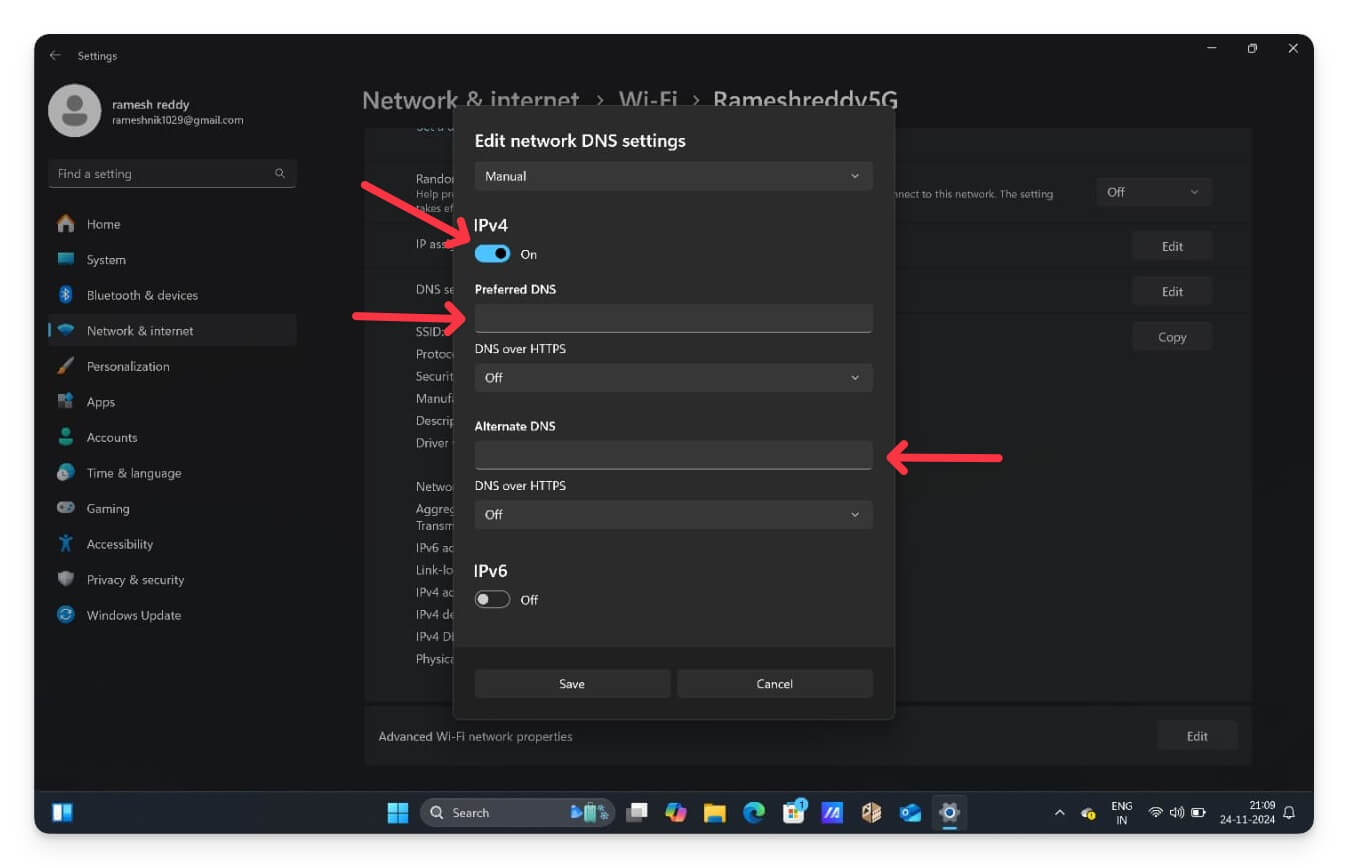
You can also set your custom DNS server instead of your ISP DNS server. For Windows, go to Settings and Network and Internet. Click on the WiFi and select the WiFi you are using. Scroll and click on the Edit button next to the DNS server assignment, and then click on the Automatic DHCP and choose Manual. Now enable IPv4 and enter the preferred DNS. You can enter Google’s DNS 8.8.8.8 or Cloudflare DNS 1.1.1.1 and click Save to set private custom DNS on your Windows.

For macOS, go to Settings > Network > Wifi > click on the Details button next to the Wifi and then go to the DNS Tab from the side. Click on the plus icon, add secure DNS from Google 8.8.8.8 or another provider, and click OK.
Disable WebRTC Manually
The WebRTC framework establishes a direct peer-to-peer (PTP) connection between browsers, bypassing traditional servers. Most websites these days, especially those focused on streaming and communication, use the WebRTC framework for faster interactions with less latency.
However, due to its server-less communication method, WebRTC requires the real IP address of the browser it is communicating with to establish a connection. This happens even if you use a VPN to encrypt your internet traffic and mask your IP address.
To avoid this, you can use Chrome extensions like Web RTC Blocker to block Web RTC and route your traffic through an encrypted VPN. Plenty of extensions that help you block Web RTC exist, and the Web RTC Blocker is the most common extension I like the most.

To install and block WebRTC extensions on your browser, open Chrome, go to the Extension Store, search for WebRTC Contol extension or use this link. Click on Install or Add to Chrome. Click on the extension icon and tap on the Web RTC extension. This blocks websites’ latest Web RTC framework, a regular Server network, and routes your traffic to the VPN Tunnel.
Factory Reset Your Device
I often recommend a factory resetting the device to fix any issues. It is an effective method that resets every setting and uninstalls third-party apps or services that might be causing the issue you are unaware of. It also updates your device to the latest version, which might be causing the problem.
If you have followed all the steps above and still can’t resolve Chrome not using a VPN, as a last resort, factory reset your device and check if this fixes the issue. In most cases, following all the steps and factory resetting as the last option helps many people resolve the issue.
However, when you factory reset your device, all your data, including the locally stored files, will be wiped. It is highly recommended to back them up before performing a factory reset on your mobile or computer device.
Easily Resolve “VPN Not Working on Chrome” Issue
If the issue persists, ensure the VPN is compatible with your network. Some networks, especially workplaces, may restrict VPN usage. If your VPN is not wired, try connecting to a different network using a hotspot, like your mobile network.
If you are using your router VPN, ensure it is properly configured. You can access the router settings and route your traffic through the VPN. You can set up the router to use only your DNS servers, like Google DNS or Cloud DNS. If that doesn’t fix the issue, try using a privacy-focused browser like Brave and Firefox or browsers with built-in VPNs. These VPN browsers offer extra flexibility and might help you temporarily use the browser’s VPN effectively.
FAQs on VPN Issues on Google Chrome
Can I use multiple VPNs simultaneously for added security?
You can use multiple VPNs, possibly two simultaneously, for added security. Most premium VPNs, like NordVPN, also offer double VPN connections that route traffic through multiple VPN servers.
How can I ensure my VPN is configured correctly on my mobile Chrome browser?
Ensure your mobile VPN app is running in the background and turned on. Once enabled, you will see a lock symbol when the VPN is active in the status bar. To verify, you can use third-party websites like VPN Check to confirm that you are connected to the VPN and configured properly.
What’s the difference between a VPN app and a VPN browser extension?
A VPN app encrypts all your data, including browser activity, app connections, and background processes. Meanwhile, a browser VPN extension only encrypts the traffic within the browser and not your entire device. You can use either the app or the extension based on your preference.
What alternative browsers can I use if Chrome continues to have VPN issues?
You can use browsers with built-in VPNs if you have issues with a VPN on your Chrome browser. If that doesn’t work, you can try Firefox, the Tor browser, or the popular Opera browser, which has a built-in VPN.
