Quick Answer
If your Windows laptop is lagging, you can speed it up by disabling unnecessary startup programs, uninstalling unused apps, clearing temp files, performing a disk cleanup, updating Windows and drivers, adjusting power settings, and turning on Storage Sense. These simple tweaks made my laptop faster and smoother.
If your Windows laptop is lagging, it can be a real pain to deal with, especially when you are working on something important. With time, it’s natural that your laptop may start to slow down due to various reasons, such as too many programs running in the background or a full hard drive. But it doesn’t mean it can’t be fixed.

I went through this myself on my Lenovo IdeaPad 3 with 8GB RAM running Windows 11. After going through the fixes below, Task Manager showed my CPU idle usage drop from around 82% to 24%, and the startup time improved noticeably. In this guide, I will share the tips and tricks that actually worked for me so you can get your laptop back to running at full speed too.
Table of Contents
Why is my laptop freezing and lagging?
There are several reasons why your laptop misbehaves and throws tantrums. The system may become slow for the following reasons:
- The software you’re running is taking up too many resources or is incompatible.
- You have multiple programs running in the background that consume resources.
- Your computer does not have enough memory or processing power to support a particular software.
- The presence of viruses or malware can also greatly impact the performance of your laptop.
- Your laptop is full of junk files that unnecessarily consume your PC’s resources.
- You have multiple programs of the same type installed on your PC.
- Unwanted programs are running at startup.
- Drivers are not up-to-date, or you are using an old version of Windows.
- Your laptop’s power options are not optimal for the type of task you want to do.
Most of these issues can be resolved with the software-level fixes below. However, if your laptop has 4GB of RAM or less, or if it is still running on a traditional spinning hard drive rather than an SSD, no amount of software tweaking will bring it back to a smooth experience. In that case, a hardware upgrade is the most effective long-term fix, and it does not have to be expensive.
Pro Tips to Make Your Laggy Laptop Faster
Steps | What to Do |
|---|---|
1. Disable Startup Programs | Open Task Manager > Startup tab > Disable unwanted apps |
2. Uninstall Unused Programs | Go to Control Panel > Programs > Uninstall unnecessary apps |
3. Update Windows & Drivers | Settings > Windows Update > Check for updates |
4. Clear Temporary Files | Press Win + R > Type %temp% > Delete all files |
5. Run Disk Cleanup | Right-click C: > Properties > Disk Cleanup |
6. Check Disk for Errors | Run chkdsk c: /x /f in Command Prompt (Requires Admin access) |
7. Use System Configuration (msconfig) | Run msconfig > Disable third-party services |
8. Increase Processor Cores (Advanced) | msconfig > Boot > Advanced Options > Set max cores |
9. Adjust Power Settings | Set to High Performance in Power Options |
10. Enable Storage Sense | Settings > Storage > Turn on Storage Sense |
11. Use Web Apps Instead of Desktop Apps | Use web versions of Teams, Zoom, Outlook, etc. |
12. Optimize Browser Setting | Enable memory optimisation feature in Chrome, microsoft or in any other supported browser |
There’s no doubt that your laptop is lightning-fast today, but with time and continued use, it’s common for it to slow down. As you add more applications and data to your computer, it may start getting slow, leading to laggy performance.
However, there are several ways to improve the speed of your laptop without having to spend a lot of money. By following these pro tips, you can make your laggy laptop faster and more efficient in no time, just like I did.
Let’s get right to it! But first, you must know the root cause of the issue!
Basic Fixes for a Lagging Windows Laptop
Disable Unwanted Programs from Running at Startup
Certain applications are required to run at startup for smooth operation, but having too many unnecessary programs can slow down your laptop. You can easily disable these programs in the Task Manager.
Here’s how you can do it:
- Press Ctrl + Shift + Esc to open Task Manager.
- Click on the “Startup” tab.
- Right-click on any program you don’t want to launch automatically and select “Disable.”

Disable all the unwanted programs. System processes are crucial and should be left alone. This simple step can significantly improve the speed and performance of your laptop. And if your main complaint is a slow boot time specifically, our guide on making your Windows 11 PC boot faster has a few more tricks worth trying.
Uninstall Unnecessary Programs
Uninstalling programs that you no longer require is one of the best ways to speed up your laptop. It can be unwanted AI assistants like Co-pilots or pre-installed software like antivirus software on your PC. If the Photos app in particular is making your system sluggish, we have a separate guide on fixing the Photos app slowing down your Windows 11 PC that goes into more detail.
Many companies bundle cheaper antivirus software, which can slow down your PC and push unwanted configurations, contributing to slowing down your PC I would highly recommend replacing it with more reliable options. Follow the steps below to uninstall such programs.
A. How to uninstall unwanted programs on your Windows PC
- Press the Windows key to open the Start menu.
- Search for “Control Panel” and open it.
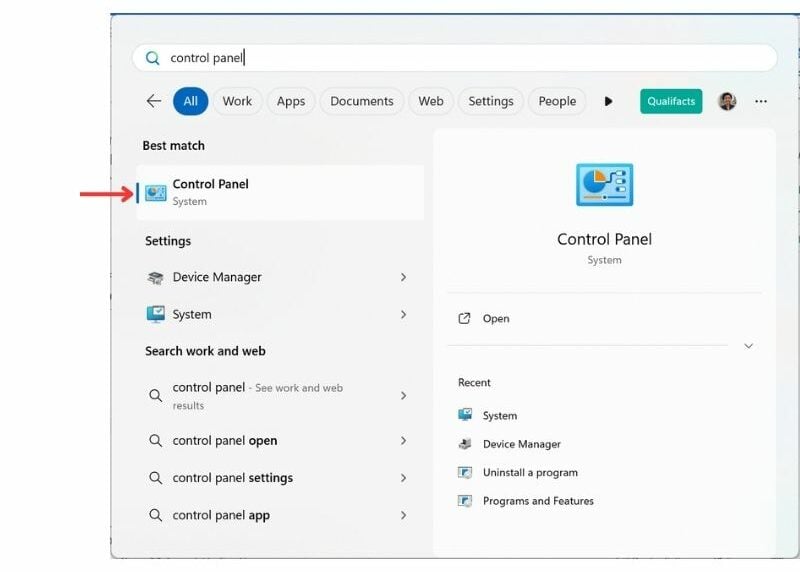
- Go to “Programs.”
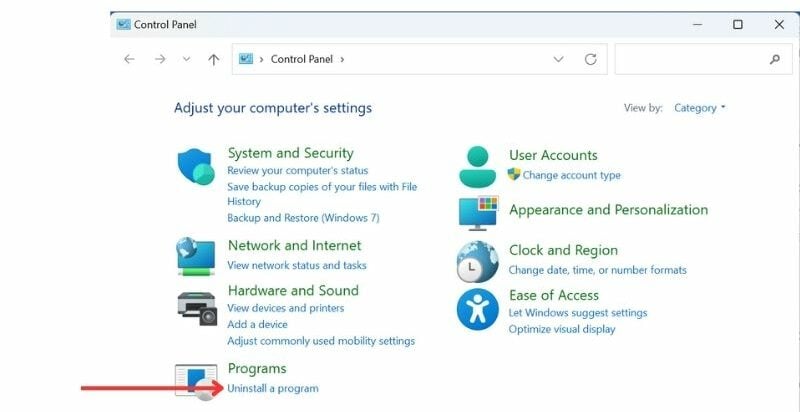
- Find programs you no longer use and click “Uninstall.”

- Follow the on-screen instructions to remove the program completely.
B. Disable Microsoft Co-Pilot on your laptop
Microsoft has started bundling its Co-Pilot out of the box. To make things worse, it auto-starts as soon as you boot your PC. If your PC is already low and laggy, this can even make things worse. Fortunately, you can completely disable the Microsoft Co-Pilot and get rid of the assistant instantly. Watch the video below for a detailed step-by-step process.

- To remove, press Windows + R and type the following: REGEDIT and then press Enter.
- Now use the following text to navigate to the Microsoft Co-Pilot folder: HKEY_CURRENT_USER\Software\Policies\Microsoft\Windows
- Right-click on Windows and select New > Key, and then name it WindowsCopilot
- Now, click on the new window Copilot key, choose New > DWORD (32-bit) Value, and you can name it TurnOffWindowsCopilot
- Now, click on the Turn off Windows Co-Pilot settings and set its value data to 1, and restart your PC.
This should hopefully remove the Windows Co-Pilot on your PC. If you want your guide, you can watch the video above.
Keep Your Windows and Drivers Up to Date
In addition to the above tips, make sure you keep your Windows operating system and drivers up to date. Regular updates can help optimize performance and fix any bugs or issues that may be slowing down your laptop.
- Open the Start menu and search for “Windows Update.”
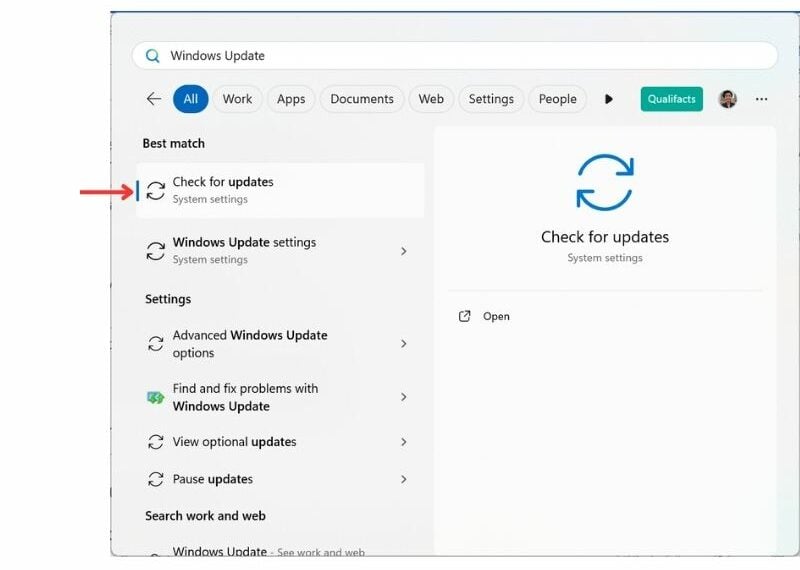
- Click on “Windows Update” to launch the settings.
- Check for updates and install any available ones.
Outdated drivers, especially graphics and chipset drivers, are a common reason for a Windows laptop lagging suddenly after an update. If Windows Update does not pick them up, visit your laptop manufacturer’s website (Dell, HP, Lenovo, ASUS) to download the latest drivers manually. According to Microsoft’s official performance guide, keeping Windows and your drivers updated is one of the most effective ways to prevent performance issues and fix unexpected lag.
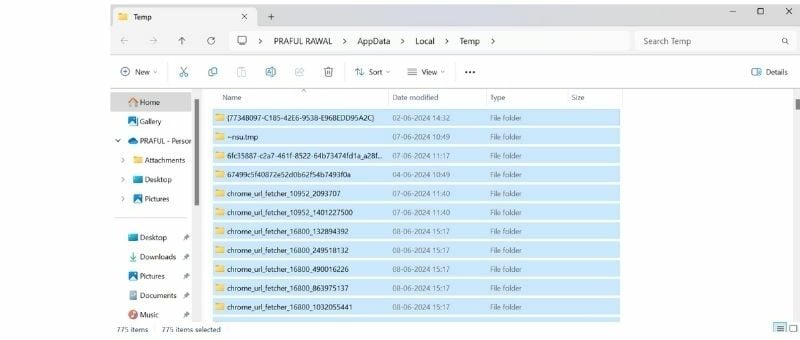
Clear Temporary Files
Your system generates temporary files whenever you use your computer. These files are called backlogs and can take up significant space on your hard drive, potentially slowing down your laptop. Clearing out these temporary files can help improve performance and free up storage space.
To clear the temp files, follow the steps below.
- Press the Windows key + R to open the Run dialog box.
- Type %temp% and press Enter. This will open a folder containing temporary files.
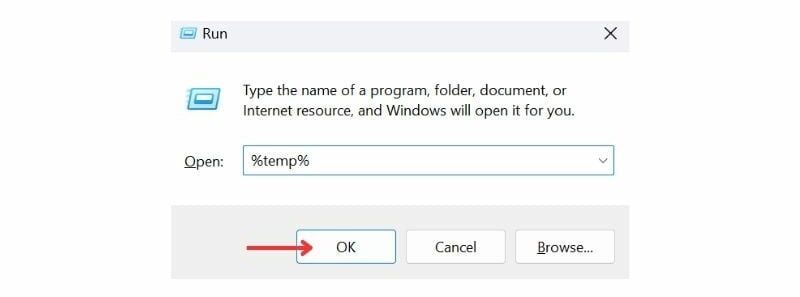
- Press Ctrl + A to select all files and then press Delete.
Clean Disk Space (Disk Cleanup)
When your system is running low on storage, it may lead to laggy performance and frequent crashes. A disk cleanup can significantly improve your system’s speed and efficiency by removing unnecessary files and freeing up disk space.
To perform a disk cleanup, follow the given steps.
- Go to This PC in your file manager.
- Right-click on your main drive (usually C:) and select “Properties“.
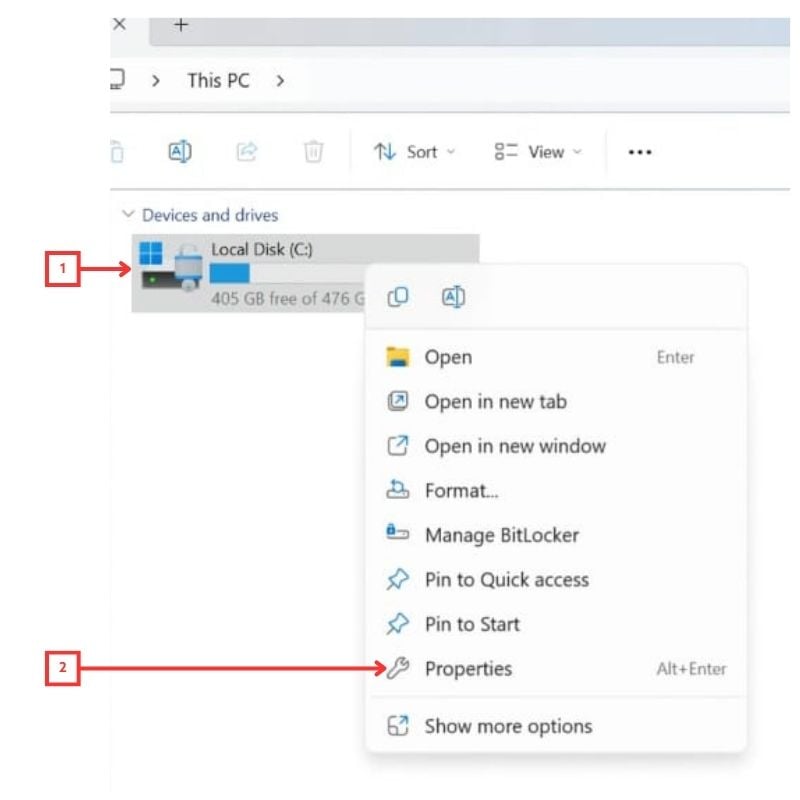
- Click on the “Disk Cleanup” button under the General tab (Windows 10). And then delete the folders you don’t need anymore.
- In Windows 11, you’ll see a “Details” button instead. Click on that.

- This will open Storage options in Settings. Navigate to “Temporary Files“.
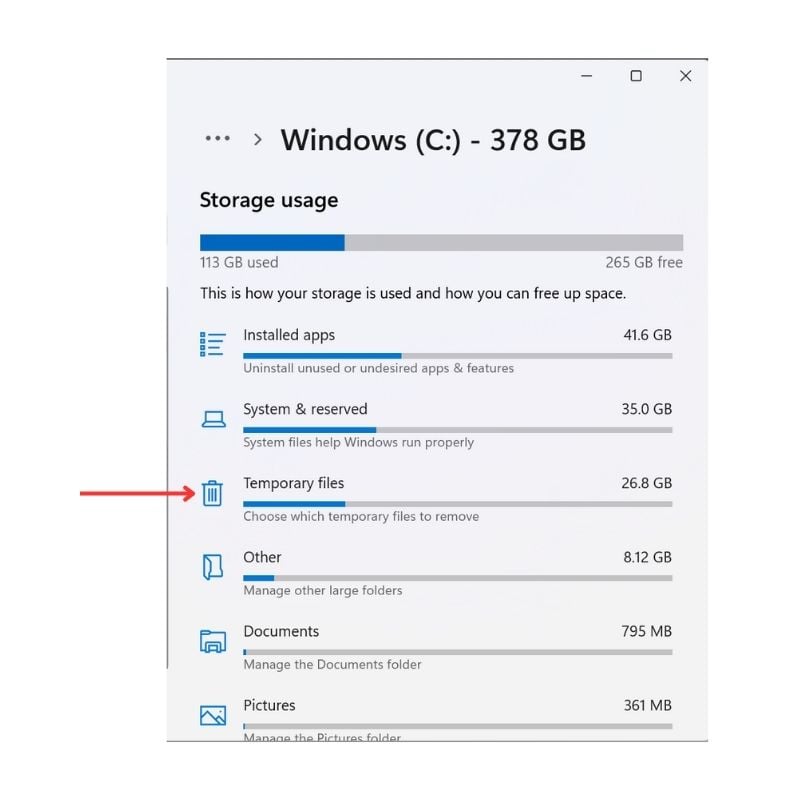
- Select the files you want to delete (be sure to exclude Downloads if you have important files there.)
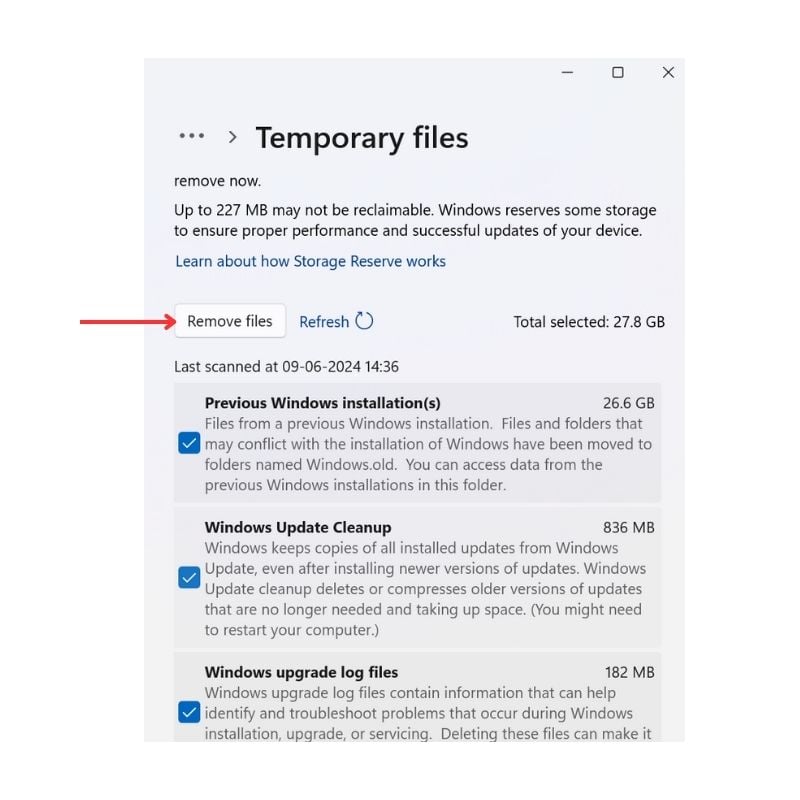
The operation takes 15–20 minutes, depending on the number of files to be cleaned up. Once the process is complete, you should notice a difference in your system’s performance.
Scan Your Laptop for Malware and Viruses
One of the most overlooked reasons for a Windows laptop lagging is a malware or virus infection running silently in the background. These malicious programs eat up your CPU and RAM without you knowing, making your laptop sluggish for no obvious reason. Thankfully, Windows has a built-in tool to handle this.
Here’s how you can run a scan using Windows Security:
- Press the Windows key and search for Windows Security.
- Open it and click on Virus and threat protection.
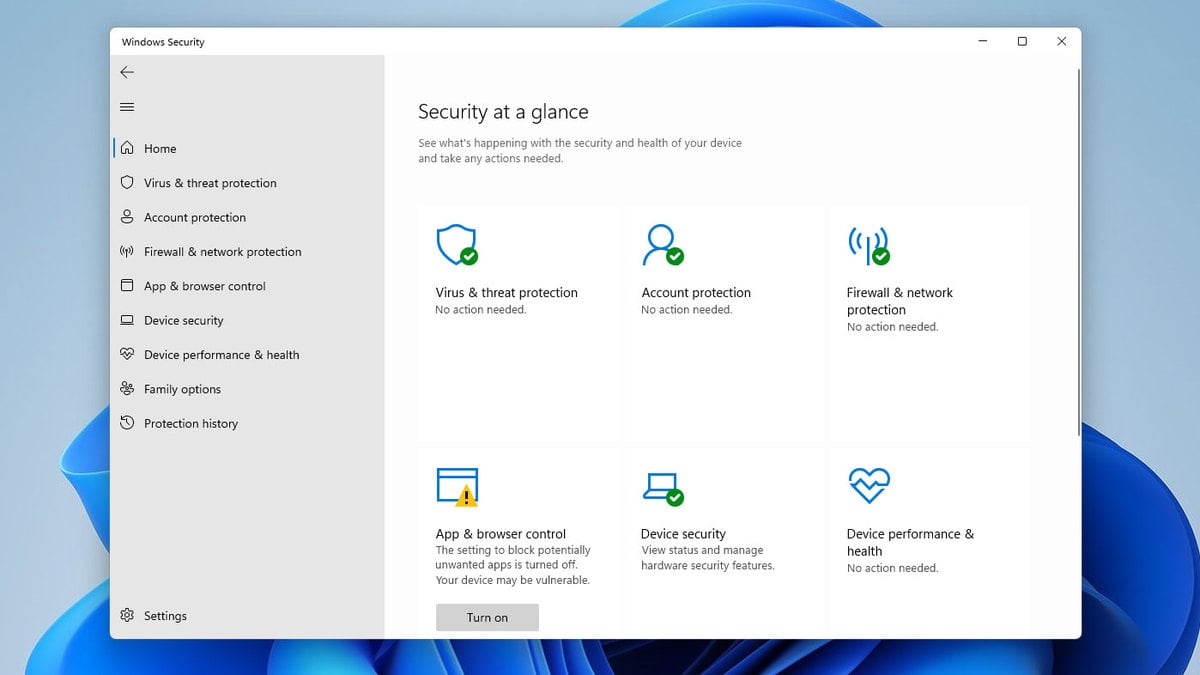
- Click Quick scan to start an immediate scan of your system.
- If threats are found, follow the on-screen prompts to remove them.
For a more thorough check, click on Scan options and select Full scan. It takes longer, but it is worth doing if your laptop has been lagging for a while with no clear cause.
Pause OneDrive Syncing
If you have OneDrive set up on your laptop, it might be syncing files in the background without you noticing. This can cause high disk and CPU usage, especially on older laptops or ones with a mechanical hard drive, and it directly contributes to your Windows laptop lagging during regular use.
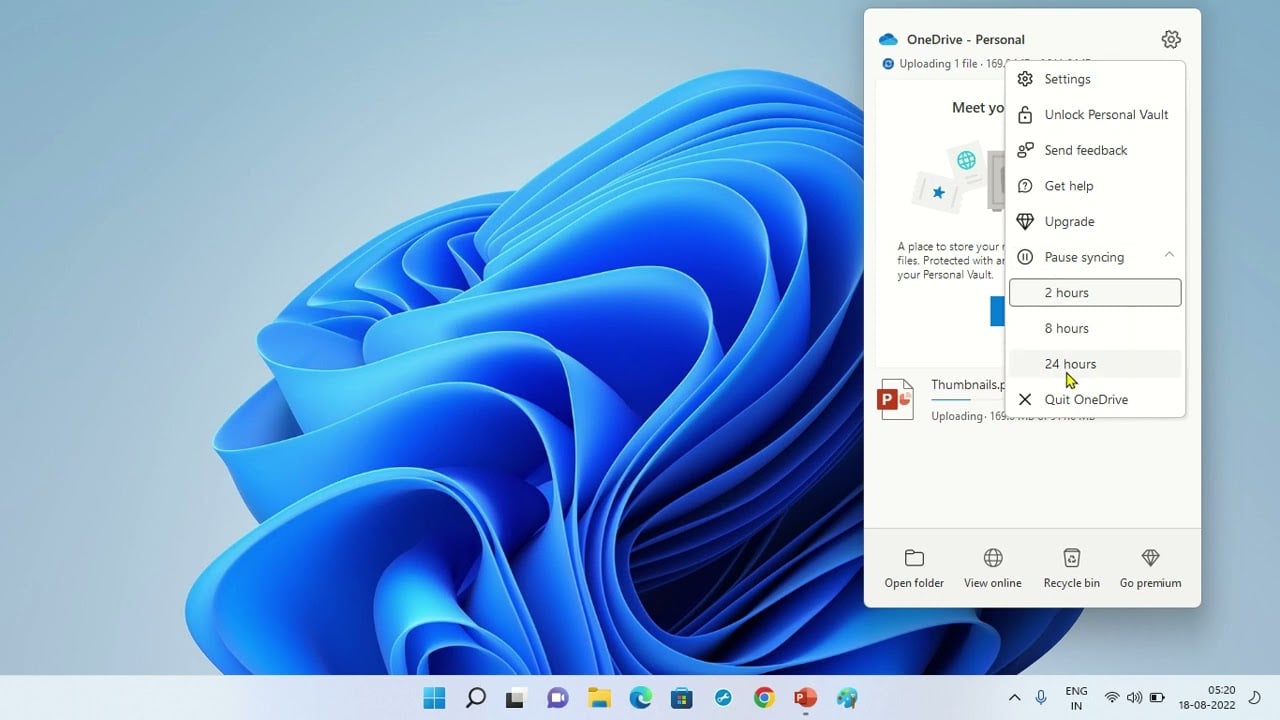
Here’s how to pause OneDrive syncing temporarily:
- Click on the OneDrive icon in the system tray (bottom-right corner of your taskbar).
- Click on Settings (the gear icon).
- Select Pause syncing and choose a duration: 2 hours, 8 hours, or 24 hours.
If pausing it makes your laptop feel noticeably faster, you can go one step further and prevent OneDrive from starting with Windows. Here’s how:
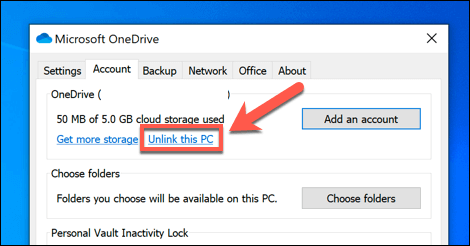
- Right-click the OneDrive icon in the system tray.
- Go to Settings > Account.
- Click Unlink this PC if you don’t need the syncing at all, or simply disable it from startup using the Task Manager Startup tab (covered in Fix 1 above)
 .
.
If background apps and processes are a recurring issue for you, our guide on minimizing background processes in Windows 11 covers a few more ways to get things under control.
Adjust Visual Effects for Best Performance
Windows runs a bunch of visual animations and effects by default, like window fade effects, animated controls, and taskbar animations. On a high-end laptop, you won’t even notice them. But on an older or mid-range laptop, these effects quietly consume system resources and can make your Windows laptop lag, especially during multitasking.
Here’s how to disable them:
- Press the Windows key + R, type sysdm.cpl, and press Enter.
- Go to the Advanced tab and click Settings under the Performance section.
- Select Adjust for best performance to disable all visual effects at once.
- Or select Custom and manually uncheck effects like:
-
- Animate windows when minimizing and maximizing
- Fade or slide menus into view
- Show shadows under the mouse pointer
-
- Click Apply and then OK.
This is one of those tweaks that makes a surprisingly noticeable difference on older hardware.
Free Up RAM by Adjusting Virtual Memory
If your laptop does not have a lot of RAM, Windows uses a portion of your hard drive as virtual memory (also called the page file) to compensate. If this is not configured correctly, it can cause your Windows laptop to lag heavily when multiple programs are open.
Here’s how to manually set virtual memory:
- Press Windows key + R, type sysdm.cpl, and press Enter.
- Go to the Advanced tab and click Settings under Performance.
- Click the Advanced tab inside the Performance Options window.
- Under Virtual memory, click Change.
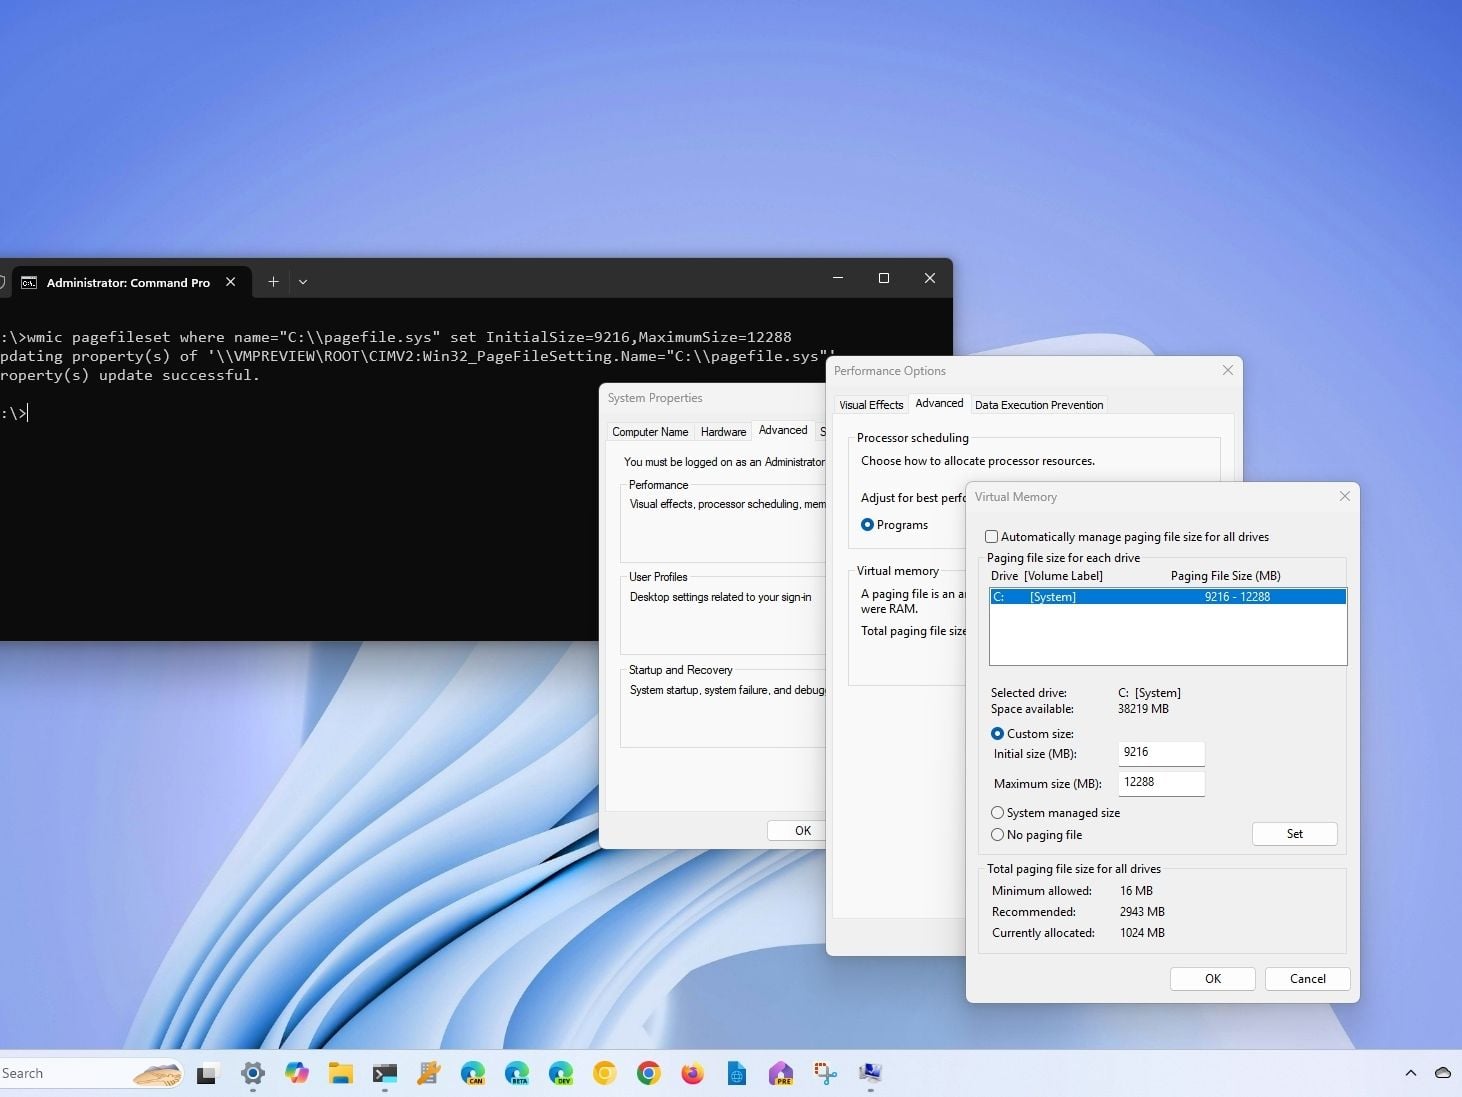
- Uncheck Automatically manage paging file size for all drives.
- Select your C: drive, then choose Custom size.
- Set the Initial size to 1.5x your total RAM (in MB) and the Maximum size to 3x your total RAM.
- Click Set and then OK, and restart your laptop.
For example, if you have 8 GB of RAM, set the initial size to 12288 MB and the maximum to 24576 MB.
Check for Overheating
This one is rarely mentioned, but overheating is a surprisingly common reason for a Windows laptop lagging, especially on older machines or ones used on soft surfaces like beds or cushions. When your laptop gets too hot, the processor automatically slows itself down to avoid damage. This is called thermal throttling, and it can make even a decent laptop feel painfully slow.
Here’s what you can do:
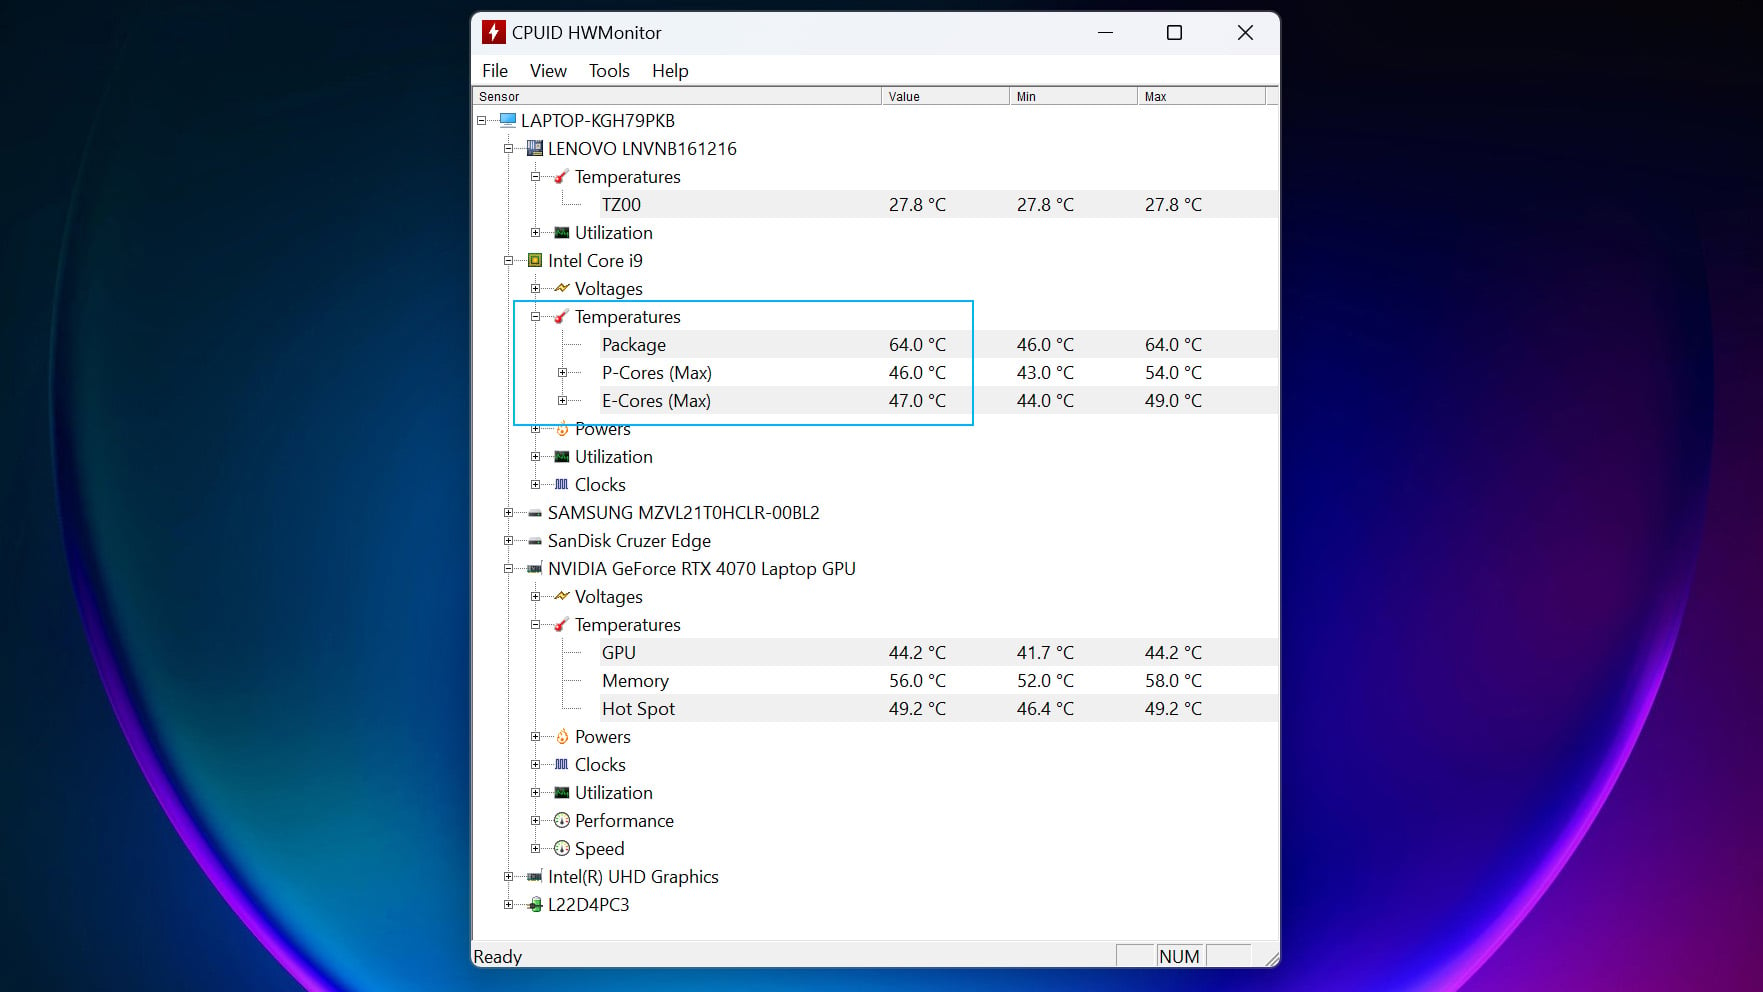
- Download and install HWMonitor (free tool) from CPUID to check your CPU and GPU temperatures.
- If your CPU temperature is consistently above 90°C under load, overheating is likely the cause of your lag.
- Make sure you always use your laptop on a hard, flat surface to allow proper airflow.
- Consider buying a laptop cooling pad, which can drop temperatures by 5 to 10 degrees.
- If the laptop is more than 2 to 3 years old, the thermal paste on the CPU may have dried out. Getting it reprofessionally replaced at a service center can make a significant difference.
You can also use the Task Manager to check if your CPU is running at its base clock speed or lower during normal tasks, which is a clear sign of thermal throttling.
Advanced Fixes to Speed Up Your Windows Laptop
If the above tips and tricks don’t work efficiently for you, try these advanced tips. These tips will help you optimize the performance and storage of your device.
Fix the Disk and Dismount the Volume
One of the most effective ways to improve your laptop’s performance is to check and fix any issues with the hard drive or disk itself. There can be some malfunctioning areas on the disk that may be causing performance and efficiency issues in your device.
To do this, you need to run the check disk command on the command prompt. Here’s how you can do it:
- Open the Command Prompt as an administrator.

- In the Command Prompt window, type the following command and press Enter: chkdsk c: /x /f (Replace “c:” with your main drive letter if it’s different.)
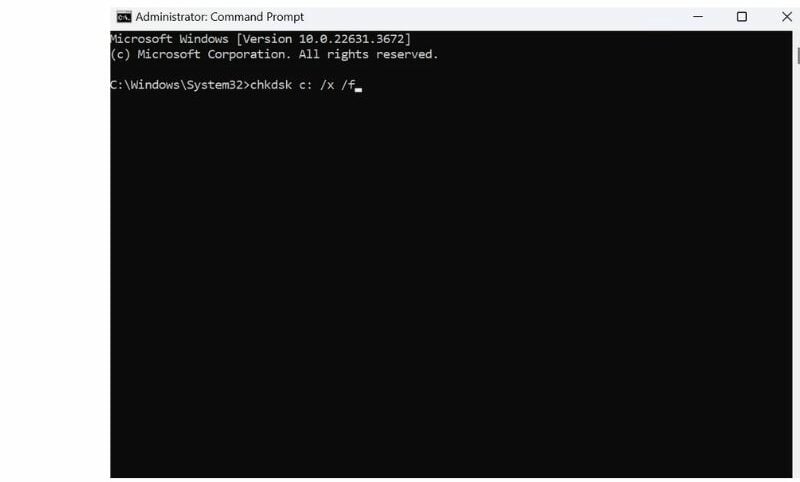
- The /x parameter tells chkdsk to dismount the volume before the scan begins.
- The /f parameter tells chkdsk to fix any errors found during the scan.
- Once done, you will be prompted with a query to schedule a volume check; type Y to confirm.

By dismounting the volume and fixing the disk errors, you can ensure that your C drive is running smoothly and efficiently.
Tweak System Configuration
Another way you can optimize your laptop’s performance is by making a few tweaks to the system configuration. The system configuration is a hidden tool mostly known among developers and troubleshooters. It allows you to change how Windows starts, change the boot process, tweak startup processes, and alter some administrative programs.
If you make appropriate changes to these settings, you can experience a significant improvement in your laptop’s speed and overall performance. Just be sure to research each change before making it, as some adjustments can negatively impact your system if done incorrectly.
You can access these settings by following the steps below.
- Launch the Command Prompt as an administrator.
- Run this command: msconfig
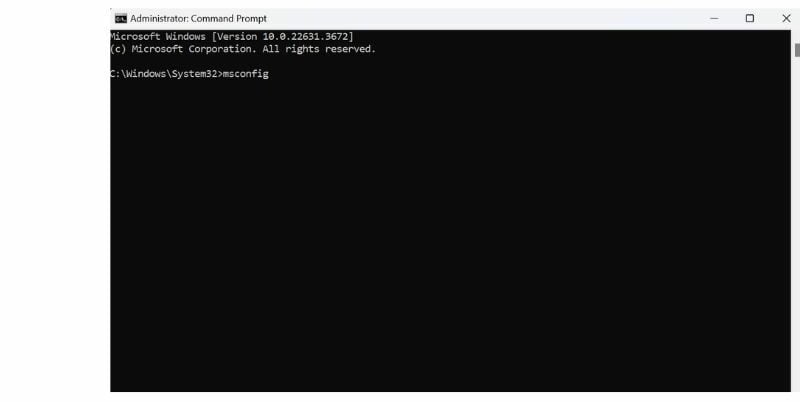
- Note: You can also run this command in Windows Run.
- A new window will open on your screen.
Here are a few tweaks you can try that may help improve your system’s performance.
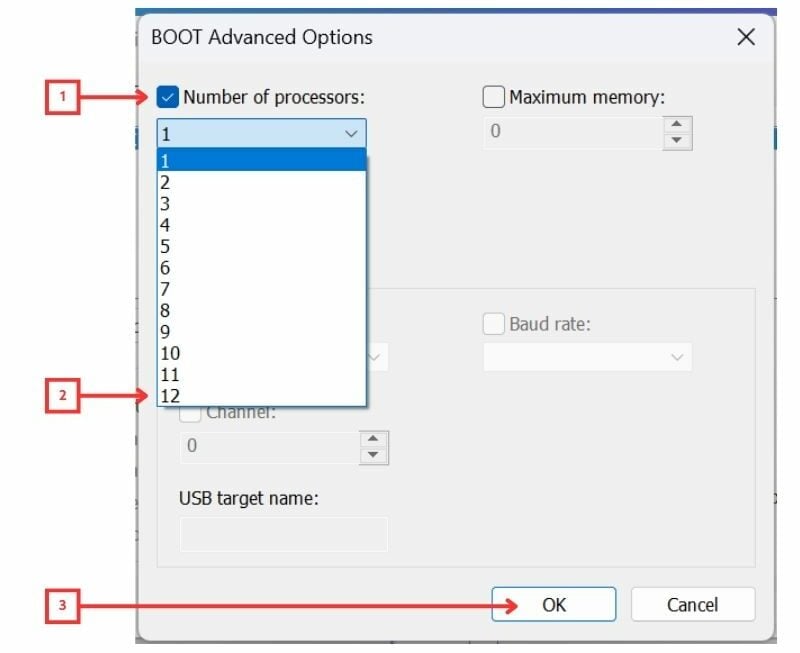
A. Increase the Number of Processors
By setting the maximum number of processor cores in the Boot Advanced options, you can force Windows to identify and use the real number of cores that the processor has. However, it can only use the limited number of processor cores you have set. Moreover, by default, Windows uses these cores as required.
Here’s how you can do it:
- Go to the Boot tab, and then navigate to Advanced Options.
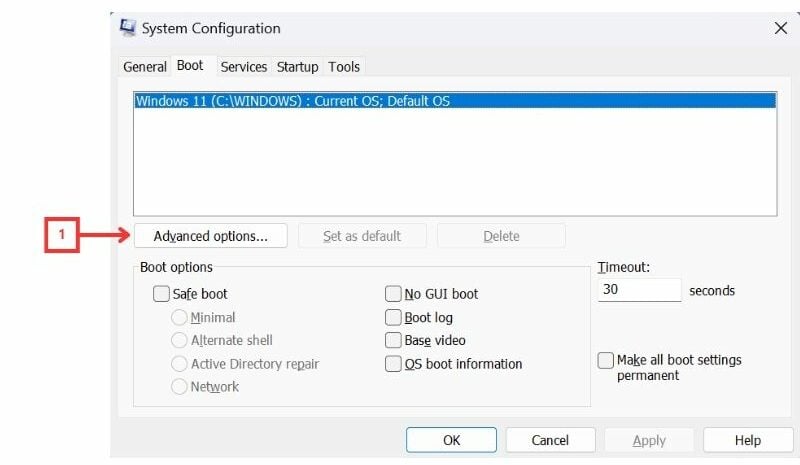
- Tick the Number of Processors checkbox and select the maximum number of cores available on your processor.
- Finally, click on OK to save the changes.
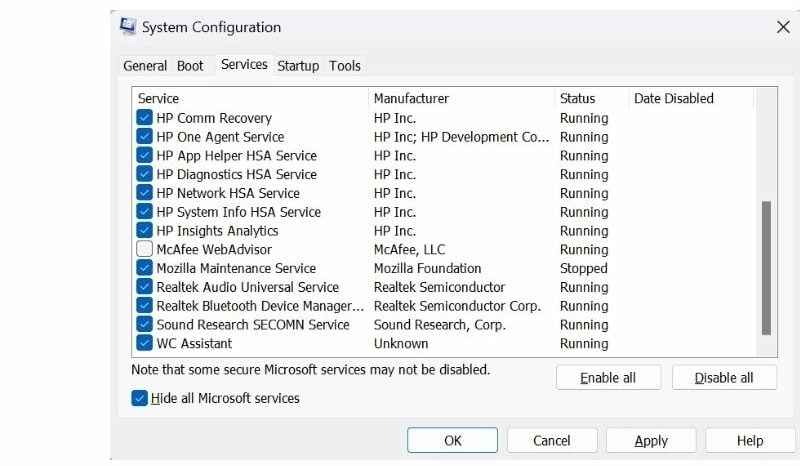
B. Disable Third-Party Services that Start with Boot
When your Windows device boots, certain services and applications also start up automatically. Some of these services and applications are third-party programs that may not be necessary for your system to function properly. You can stop these services and improve your system’s efficiency and speed.
Here’s how you can do it:
- Go to the Services tab.
- You will see a list of all services that start when Windows starts.
- To disable only third-party services from booting, check the box that says “Hide all Microsoft services.”
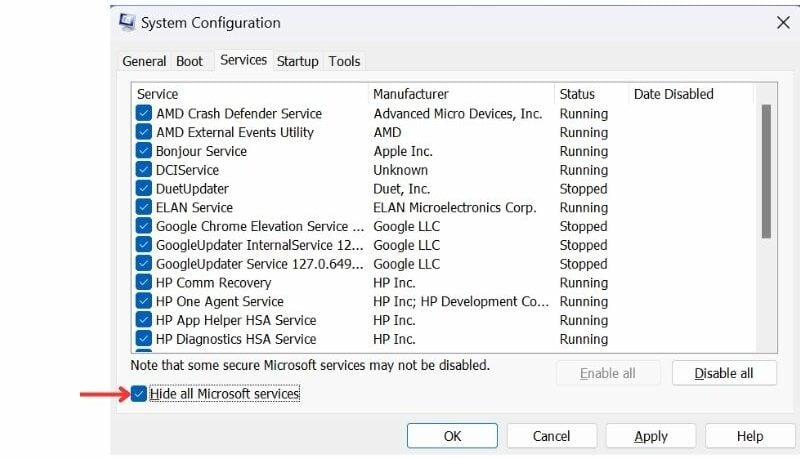
- Finally, select all the third-party services you wish to disable from booting by unchecking the checkbox.
Extra Tips to Keep Your Windows Laptop Running Fast
In addition to the above tips and tricks, there are a few things that can not only help you keep your system running smoothly but also improve its performance.
1. Use Appropriate Power Settings
The battery and power settings on your computer directly affect its performance. Most users run their laptop in battery saver mode when the charger is unplugged, thinking it will help save battery life, but this actually limits your CPU speed and can make your Windows laptop lag noticeably. Make sure to switch to High Performance or Balanced mode when you are plugged in to get the best speed from your system.
2. Use Web Versions of Applications and Optimize Browsers
If you are someone who uses a laptop for work purposes, try using web versions of common applications like Teams, Skype, Outlook, etc., instead of downloading desktop applications, as they can consume more resources and slow down your system.
And also, since browsers are sometimes the main culprit of slowing down your PC, you can use a light browser or use optimized browser settings, such as tab discarding feature on Chrome, sleeping tabs on Microsoft Edge browser, and more. Based on your browser, you can visit the settings and limit RAM usage to keep your system fast.
Here are links for web versions of some of the most commonly used applications:
3. Turn on Storage Sense
Windows Storage Sense helps free up space on your computer by automatically deleting unnecessary files and temporary data. By turning it on, you can be at peace knowing any junk or temporary files on your device will be automatically deleted. This can help improve your device’s performance and free up storage as well.
Here’s how you turn on Storage Sense:
- Click on the Start button and search for Storage Sense.
- Click on the Storage Sense icon to open the settings page.
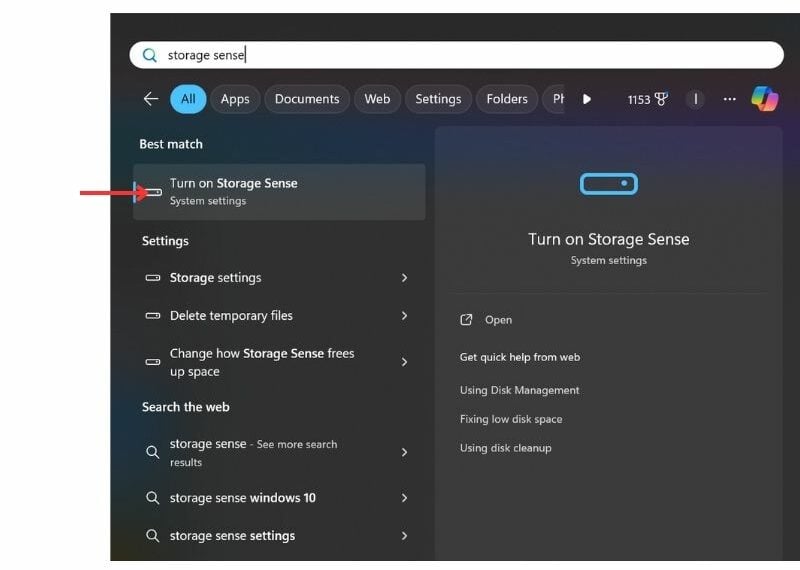
- Toggle on the Storage Sense option to enable the feature.
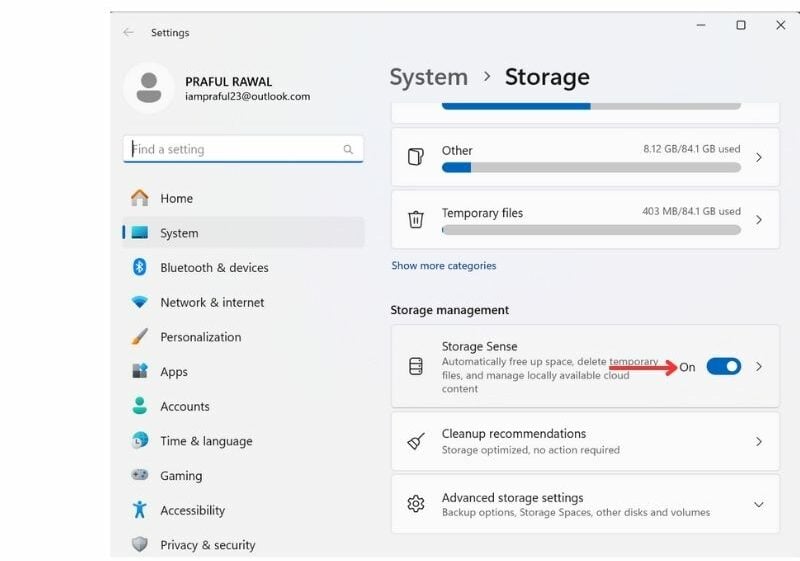
- You can also customize how this feature works by clicking on Storage Sense and selecting the desired settings.
Final Thoughts on Fixing a Lagging Windows Laptop
That’s it! With these tips and tricks, you should be able to troubleshoot your slow and laggy laptop and get it back to running smoothly. If you are not sure where to start, I would suggest going through the basic fixes first, as they make the biggest difference for most users and take less than 15 minutes to complete.
If you have tried everything here and the laptop is still struggling, it is likely a hardware issue. A RAM or SSD upgrade is usually the most cost-effective next step at that point, and it can make even a 5-year-old machine feel fast again. Let me know in the comments which fix worked for you.
